-
![]()
Advanced Product Options Suite
A feature-rich and highly customizable solution to set and manage Magento product options. Display your product variations beautifully and accurately. -
![]()
SEO Suite Ultimate
The pioneer Magento SEO extension, instantly enhanced and updated to comply with the continuous changes in the SEO world. All-in-one Adobe Commerce SEO toolkit. -
![]()
Shipping Suite
All you could possibly need to build a Magento shipping system. Shipping methods, rates, carriers, shipping cost calculator, zip code validation. -
![]()
Ultimate Sales Boost
Need to give your Magento store an ultimate sales boost? Build urgency, scarcity, and trust with the help of countdown timers, products popularity popups, stock status, etc. -
![]()
Order Management
Magento delete orders functionality. Editing any order details without having to cancel orders. Adding 28 extra order parameters and 20 extra order mass actions. Staff access levels. -
![]()
Store Locator & In-Store Pickup
Magento 2 Store Locator extension to introduce BOPIS. No-contact delivery. Curbside pickup. Items’ availability tracking. Store locations on Google Maps. -
![]()
Checkout Suite
Magento One Page Checkout extension to introduce a delivery-oriented checkout flow. Comes with integrated Delivery Date and Store Locator & In-Store Pickup. -
![]()
Delivery Date & Time
All you need to display estimated shipment dates in your Magento-based store. Checkout page delivery. Shipping date restrictions and extra charges for specific time slots. -
![]()
Customer Prices Suite
The toolkit to personalize Magento prices and discounts. Shopper- and group-specific customer prices. Individual and group promotions. Updating prices in bulk.


-
![]()
FAQ
Create and manage FAQ sections for Magento 2 product pages, category pages, and CMS pages. Improve customer experience, reduce support requests, support AI-ready content, and add FAQ schema markup via Mageworx SEO Suite. -
![]()
AI Product Compare
Add AI-powered product comparison to Magento 2 with OpenAI ChatGPT and Google Gemini. Help shoppers quickly understand product similarities, key differences, pricing, and recommendations — all in a clear, decision-ready format. -
![]()
Shipping Suite
All you could possibly need to build a Magento shipping system. Shipping methods, rates, carriers, shipping cost calculator, zip code validation. -
![]()
SEO Suite Ultimate
The pioneer Magento SEO extension, instantly enhanced and updated to comply with the continuous changes in the SEO world. All-in-one Adobe Commerce SEO toolkit. -
![]()
Advanced Product Options Suite
A feature-rich and highly customizable solution to set and manage Magento product options. Display your product variations beautifully and accurately. -
![]()
Gift Cards
Online and offline Magento 2 gift card giving made easy. Flexible pricing schemes, multi-store gift cards, flexible pricing configuration possibilities. -
![]()
Multi Fees
Magento 2 extra fee extension that allows you to set up any Magento fee, including product, shopping cart, shipping methods, license, handling, and transaction fees. -
![]()
Reward Points
Build a Magento 2 reward points program that works! Reward your most active and loyal customers, motivate hesitating ones and generate more profit for each order. -
![]()
Store Locator & In-Store Pickup
Magento 2 Store Locator extension to introduce BOPIS. No-contact delivery. Curbside pickup. Items’ availability tracking. Store locations on Google Maps.

-
![]()
Store Locator & In-Store Pickup
Magento 2 Store Locator extension to introduce BOPIS. No-contact delivery. Curbside pickup. Items’ availability tracking. Store locations on Google Maps. -
![]()
Gift Cards
Online and offline Magento 2 gift card giving made easy. Flexible pricing schemes, multi-store gift cards, flexible pricing configuration possibilities. -
![]()
Multi Fees
Magento 2 extra fee extension that allows you to set up any Magento fee, including product, shopping cart, shipping methods, license, handling, and transaction fees. -
![]()
Reward Points
Build a Magento 2 reward points program that works! Reward your most active and loyal customers, motivate hesitating ones and generate more profit for each order. -
![]()
Shipping Suite
All you could possibly need to build a Magento shipping system. Shipping methods, rates, carriers, shipping cost calculator, zip code validation. -
![]()
Advanced Product Options Suite
A feature-rich and highly customizable solution to set and manage Magento product options. Display your product variations beautifully and accurately.
-
![]()
SEO Suite Ultimate
The pioneer Magento SEO extension, instantly enhanced and updated to comply with the continuous changes in the SEO world. All-in-one Adobe Commerce SEO toolkit. -
![]()
Advanced Product Reviews & Reminders
Use Magento 2 Review Reminder to increase trust in your brand by transforming Magento 2 reviews into advanced product feedback. Trigger email/popup review reminders. -
![]()
AI Product Compare
Add AI-powered product comparison to Magento 2 with OpenAI ChatGPT and Google Gemini. Help shoppers quickly understand product similarities, key differences, pricing, and recommendations — all in a clear, decision-ready format. -
![]()
FAQ
Create and manage FAQ sections for Magento 2 product pages, category pages, and CMS pages. Improve customer experience, reduce support requests, support AI-ready content, and add FAQ schema markup via Mageworx SEO Suite.

-
![]()
FAQ
Create and manage FAQ sections for Magento 2 product pages, category pages, and CMS pages. Improve customer experience, reduce support requests, support AI-ready content, and add FAQ schema markup via Mageworx SEO Suite. -
![]()
SEO Suite Ultimate
The pioneer Magento SEO extension, instantly enhanced and updated to comply with the continuous changes in the SEO world. All-in-one Adobe Commerce SEO toolkit. -
![]()
Landing Pages
The Landing Pages Magento extension allows you to create SEO- and user-friendly landing pages for your marketing campaigns. Pages creation in bulk. -
![]()
Layered Navigation
A set of flexible features to make Magento layered navigation search engine and user-friendly. Advanced configuration of filter attributes. -
![]()
Extended Rich Snippets
Draw users' attention and win the click with more detailed Magento rich snippets. Developed according to the latest Google and Schema.org standards. -
![]()
SEO Meta Templates
The Magento 2 SEO Meta Tags Template module to optimize product and category page metadata, keywords, short and detailed descriptions. -
![]()
Cross Linking
All you need to create and manage Magento 2 cross-linking SEO. Internal links optimization on the product, category, and CMS pages. Linking to relevant external sources. -
![]()
Sitemap Suite
XML and HTML Magento 2 sitemaps to enhance your site’s crawling, indexation, and navigation. Magento 2 Cron for automatic sitemaps navigation. -
![]()
Short Category & Product URLs
Make product and category pages better crawled by the search engine spiders. Use the Magento Short URL extension to remove parent categories from URLs.
-
![]()
Shipping Suite
All you could possibly need to build a Magento shipping system. Shipping methods, rates, carriers, shipping cost calculator, zip code validation. -
![]()
Store Locator & In-Store Pickup
Magento 2 Store Locator extension to introduce BOPIS. No-contact delivery. Curbside pickup. Items’ availability tracking. Store locations on Google Maps. -
![]()
Delivery Date & Time
All you need to display estimated shipment dates in your Magento-based store. Checkout page delivery. Shipping date restrictions and extra charges for specific time slots. -
![]()
Shipping Table Rates
With our Magento 2 Shipping Table Rates extension, you can overcome the default limitations and create an unlimited number of carriers, methods, and shipping rates. -
![]()
Shipping Calculator on Product Page
Increase conversion rates and improve customer experience by letting your shoppers calculate the cost of shipping right on your product pages. Estimated shipping block. -
![]()
Green Delivery
This Green Delivery module helps quickly offer such an option in your Magento-based store. Multi-store and multi-language support. -
![]()
No-Contact Delivery / Curbside Pickup
This Free Curbside Pickup module helps quickly offer the no-contact delivery option in your Magento-based store. Multi-store and multi-language support.

-
![]()
Marketing & Sales Suite
There’s no better tool to tackle Magento 2 marketing automation than this suite. Rewards program, recent sales notifications, countdown timers, review reminders, discounts. -
![]()
Customer Prices Suite
The toolkit to personalize Magento prices and discounts. Shopper- and group-specific customer prices. Individual and group promotions. Updating prices in bulk. -
![]()
Gift Cards
Online and offline Magento 2 gift card giving made easy. Flexible pricing schemes, multi-store gift cards, flexible pricing configuration possibilities. -
![]()
Reward Points
Build a Magento 2 reward points program that works! Reward your most active and loyal customers, motivate hesitating ones and generate more profit for each order. -
![]()
Multi Fees
Magento 2 extra fee extension that allows you to set up any Magento fee, including product, shopping cart, shipping methods, license, handling, and transaction fees. -
![]()
Ultimate Sales Boost
Need to give your Magento store an ultimate sales boost? Build urgency, scarcity, and trust with the help of countdown timers, products popularity popups, stock status, etc. -
![]()
Advanced Product Reviews & Reminders
Use Magento 2 Review Reminder to increase trust in your brand by transforming Magento 2 reviews into advanced product feedback. Trigger email/popup review reminders. -
![]()
Product Countdown Timers
Magento 2 Countdown Timer extension to add beautifully visualized timers to your product pages. The module comes with 20+ highly customizable design templates. -
![]()
Affiliate
Magento 2 Affiliate module helps you launch, run and manage flexible affiliate marketing programs. It allows you to effectively market your products with a low budget, low effort, and time while enjoying high ROI.

-
![]()
Advanced Product Options Suite
A feature-rich and highly customizable solution to set and manage Magento product options. Display your product variations beautifully and accurately. -
![]()
File Downloads and Product Attachments
Add any kind and any format of Magento 2 product attachments to your product pages―equip them with product videos, user guides, price lists, etc. -
![]()
Customer Prices Suite
The toolkit to personalize Magento prices and discounts. Shopper- and group-specific customer prices. Individual and group promotions. Updating prices in bulk. -
![]()
Customer Group Prices
Diversify your pricing strategy with custom Magento customer group prices. Set custom prices for wholesale and retail shoppers. Special deals for targeted groups. -
![]()
Prices per Customer
Add a personalized touch to your Magento pricing with the help of this Magento Price per Customer module. Mass update customer prices. Prices import/export. -
![]()
Product Custom Options Templates
Ease the pain of manual Magento custom options configuration. Create any number of custom options templates like color, size, dimensions, etc., in a few clicks. -
![]()
Shipping Calculator on Product Page
Increase conversion rates and improve customer experience by letting your shoppers calculate the cost of shipping right on your product pages. Estimated shipping block. -
![]()
Event Management by Staylime
Create, manage and sell Magento events. Let shoppers search for, wishlist, review any type of events as Magento products: conferences, concerts, parties, etc.

-
![]()
Order Management
Magento delete orders functionality. Editing any order details without having to cancel orders. Adding 28 extra order parameters and 20 extra order mass actions. Staff access levels. -
![]()
Order Editor
Magento edit order without canceling. Add, delete, and remove any order details, order customers' billing, payment, and shipping info. Order edit logs and staff permissions. -
![]()
Extended Orders Grid
Extend and customize the default Magento 2 orders grid. Easily add 28 extra colums with essential order parameters, perform order mass-actions, synch order data and more. -
![]()
Custom Order Number
Expand the native numbering scheme with the Magento 2 Custom Order Number module. Edit order length, add custom prefixes, increment prefixes, etc.
-
![]()
Affiliate
Magento 2 Affiliate module helps you launch, run and manage flexible affiliate marketing programs. It allows you to effectively market your products with a low budget, low effort, and time while enjoying high ROI. -
![]()
Ultimate Sales Boost
Need to give your Magento store an ultimate sales boost? Build urgency, scarcity, and trust with the help of countdown timers, products popularity popups, stock status, etc. -
![]()
Custom Order Number
Expand the native numbering scheme with the Magento 2 Custom Order Number module. Edit order length, add custom prefixes, increment prefixes, etc. -
![]()
Shop by Brand
Brands create desire, a sense of belonging, status, and prestige. Use Magento Shop by Brand to bridge the distance between your customers and their favorite offerings. -
![]()
Short Category & Product URLs
Make product and category pages better crawled by the search engine spiders. Use the Magento Short URL extension to remove parent categories from URLs. -
![]()
Personal Customer Discount
Motivate shoppers to complete a purchase with custom-tailored coupon codes & Magento discount per customer. Select customers for promotions. -
![]()
Landing Pages
The Landing Pages Magento extension allows you to create SEO- and user-friendly landing pages for your marketing campaigns. Pages creation in bulk. -
![]()
Checkout Suite
Magento One Page Checkout extension to introduce a delivery-oriented checkout flow. Comes with integrated Delivery Date and Store Locator & In-Store Pickup. -
![]()
Layered Navigation
A set of flexible features to make Magento layered navigation search engine and user-friendly. Advanced configuration of filter attributes.
-
![]()
Magento development
Full-cycle Magento 2 development taken care of. -
![]()
Magento migration
End-to-end migration from Magento 1 to Magento 2. -
![]()
Shopify development
Full-fledged Shopify store implementation. -
![]()
Magento maintenance & support
Ad hoc support and ongoing maintenance services for your store. -
![]()
Magento design
Unique Magento theme design and development. -
![]()
SEO Suite Ultimate configuration
Advanced configuration of our best-selling SEO extension.


MailChimp Opt-in Signup Process Customization
Before sending any promotional or marketing data to customers, you must receive their confirmation. Be it CAN-SPAM act in the U.S., CASL laws in Canada, or any other local law that regulates this side of customer-merchant relations, email campaigns - including confirmation emails - must be created the way they don’t contravene the law & complement your business requirements to the full.
Opt-in (subscription): Meaning
It’s illegal to send out promotional emails to customers without their permission. Moreover, such ‘uninvited’ guests are quite annoying and will result in high abuse rate, your email provider account termination, blacklists, etc. Thus, when saying that shoppers ‘opt-in’, it is meant that they confirm/agree to receive any kind of email marketing content.
This is often carried out by offering customers to subscribe via various signup forms, subscription popups, etc.
Two MailChimp Opt-in Settings
It’s critical to have MailChimp opt-in settings clearly understood.
Single Opt-in
This is the simplest opt-in method. As soon as customers fill in and submit the offered signup form, their data get added to a mailing list. These data include users’ IP addresses as well as the exact signup date. The single opt-in method will suit merchants that intend to grow the mailing lists as fast as possible in order to increase sales. This is especially useful when you have a high percentage of signups via handheld devices, as a small number of customers will want to travel through an extended signup process. Here’s how this method looks:
1) A customer fills in the subscription form,
2) A customer gets added to the mailing list.
Double Opt-in
It offers users more steps to complete. It doesn’t differ much from the above-mentioned method except for the MailChimp opt-in confirmation email. That’s when users – after filling in and submitting the offered signup form – receive an email. There, they are asked to confirm whether they want to receive any marketing content or not. Here are the main steps of this method:
1) A customer fills in the signup form,
2) A customer receives a MailChimp confirmation email and confirms the subscription,
3) A customer gets added to the list.
This method suits merchants who have low open rates and abuse complaints in the past. This method should be considered in certain countries with particular regulations. With a growing number of advanced spambots that may target your mailing list and use your signup forms, the double opt-in method allows decreasing the possibility of being suspended.
Customization of the MailChimp Confirmation Emails and Pages
While the whole signup process can be customized, let’s concentrate on the double opt-in customization, i.e. the signup Thank You Page, opt-in confirmation email, confirmation thank you page, and final welcome email.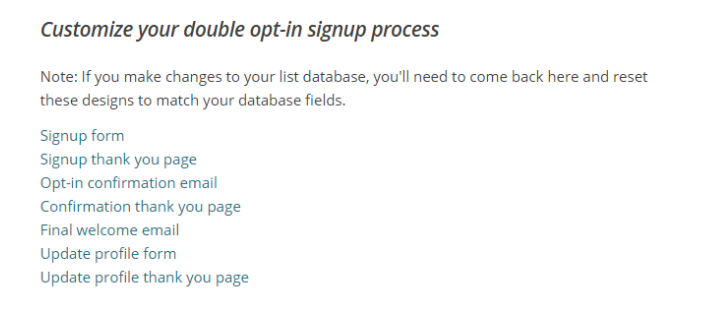
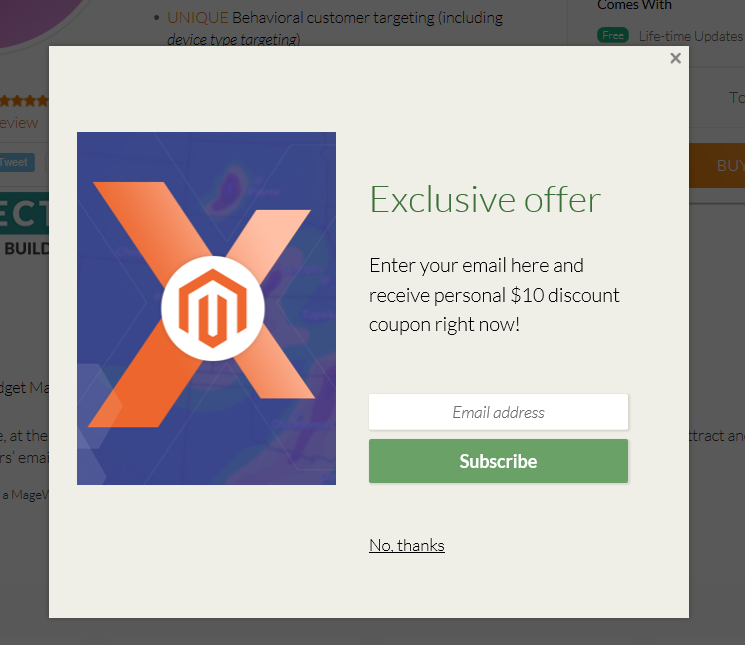
Signup Thank You Page
This is what your future subscribers will see after they sign up no matter what signup method you use. When it comes to the double opt-in method, you can modify the way users are asked to check the mailboxes and verify the subscriptions.
In fact, MailChimp even allows using custom redirects that lead customers directly to a certain page of your website as soon as the submission is successful.
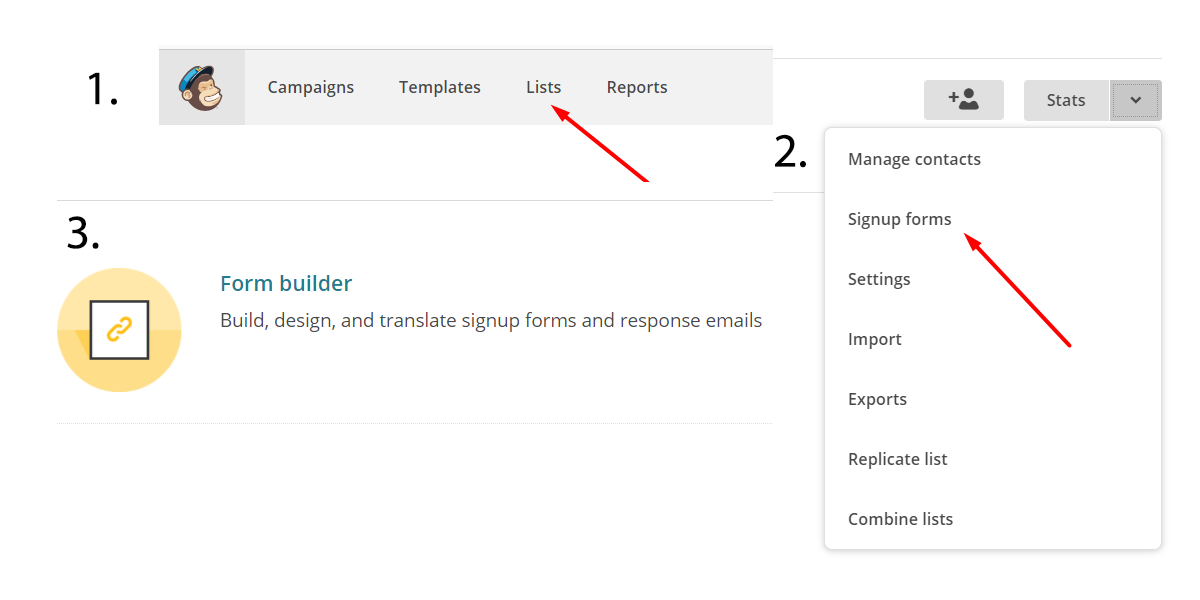
To set them up, go to Lists > Signup forms > Form Builder .
Then, choose from the Forms and Response Emails > Confirmation Thank You Page.
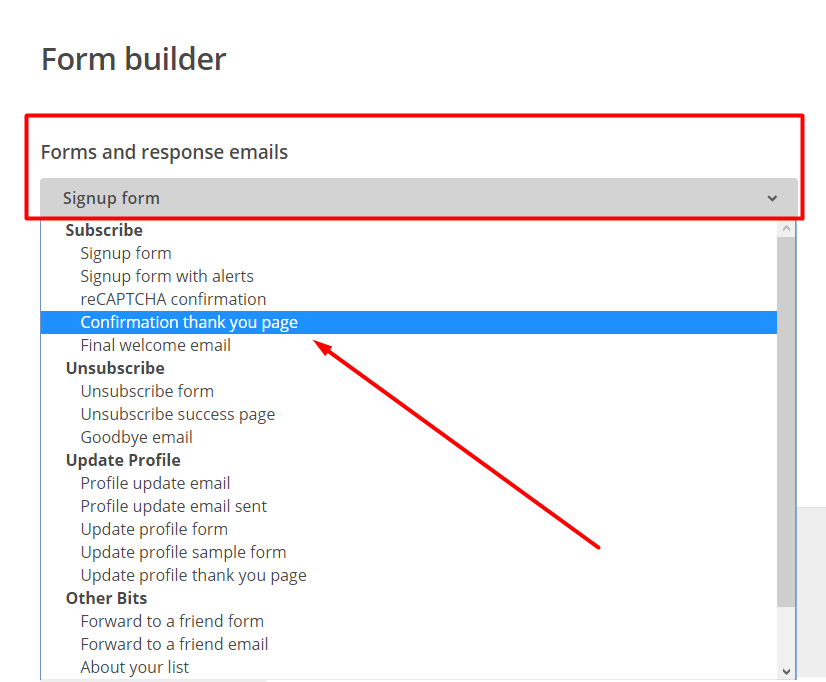
There is an option to either modify the signup Thank You page here, or enter the necessary URL:

Don’t forget to click Save!
In fact, that’s where most of the customization settings related to MailChimp opt-in signup take place.
MailChimp Confirmation Email
This exact confirmation email distinguishes single opt-in method from a double opt-in one. Such emails normally contain:
- confirmation link/button,
- brief brand info and/or logo,
- short overview of the content customers sign up for, etc.
You might want to shift from a standardized version of confirmation emails and get customers engaged on a deeper level. You are absolutely right saying that we do not need any extra decorations, deals or whatever else to attract users’ attention. We need such emails to lead customers straight to a button click. Nevertheless, the first impression does count. So, before going for a stark email look, make sure your opt-in confirmation email has:
- CTA button that can be easily found,
- Content that is brief but catchy,
- Company logo or image/gif that is straight to the point.
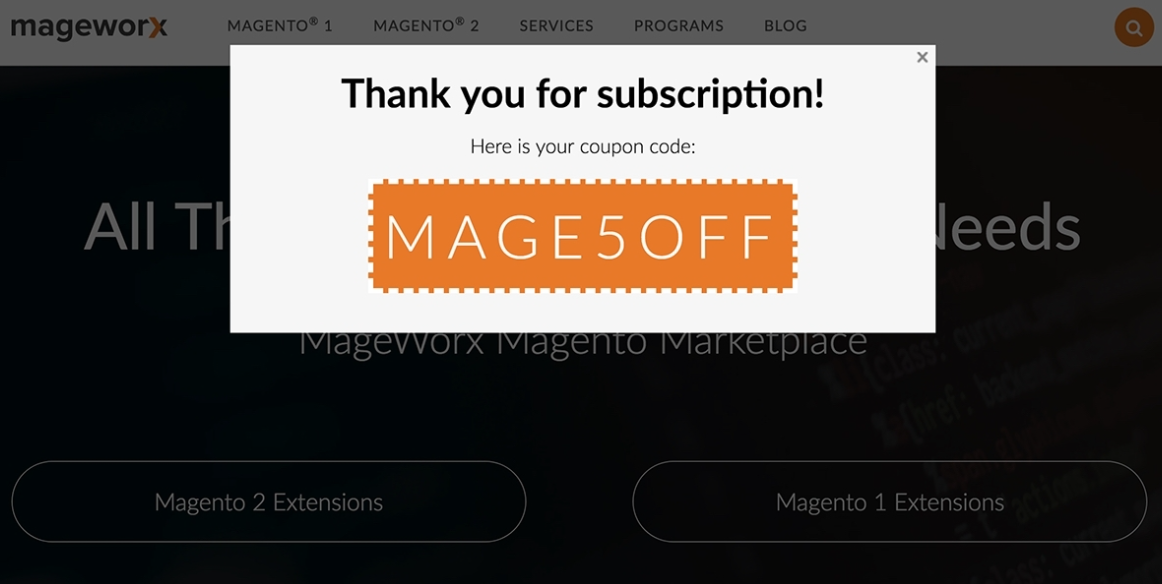
Confirmation Thank You Page
MailChimp confirmation Thank You page appears right after users click the CTA button in the opt-in confirmation email. There is a belief that such pages nurture leads. Do you agree? I’d say there is certainly a deal of truth in it, a great deal of truth!
If your customers have arrived at the confirmation thank you page, it is most likely you’ve managed to ‘sell’. Shoppers’ guard is down, and a secondary CTA here will be quite logical, especially if an offer is related. I am not saying that this will work for everyone. Everything should be double-tested in eCommerce, but this does bring leads according to my experience.
Final Welcome Email
These emails are sent right after users subscribe to your list. In fact, such emails are disabled in MailChimp by default, and can be enabled either from the form builder or from list settings.
To have this enabled or disabled, go to Lists > Signup Forms > Form Builder > Forms and Response Emails > Final Welcome Email:
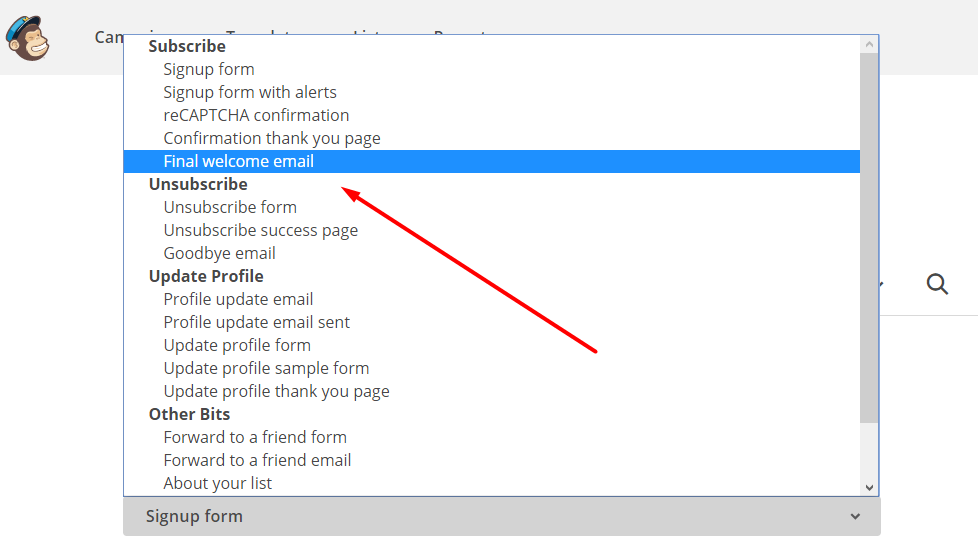
Then check off the box that says ‘Send a final welcome email’ if you want to send such emails, or leave it unchecked –if you don’t want any.
If you want it to be customized, go to Settings > List name & default and check off Send a final welcome email.
Click ‘the list forms designer’ to get to the page with more customization options:
What Should I do if My MailChimp Account Gets Suspended?
You can always contact MailChimp in case of an issue: https://mailchimp.com/contact/.
Also, consider the following steps:
- enable the double opt-in process,
- remove any address added through your API within a certain period of time. This period might must be counted off from a certain date before your last campaign. To do that, you’ll have to see your segmenting options to select certain list data. Once creating this segment, bulk unsubscribe those contacts. This is likely to remove any illegitimate addresses that were recently added.
- Finally, make sure either double opt-in or reCaptcha is enabled for it.
Bottom Line
The opt-in signup process is crucial to each and every email marketing campaign. Its customization will certainly play into your hands, make your emails and ‘Thank You pages’ look more appealing, resonate better with customers, and luckily result in more CTA button clicks!