-
![]()
Advanced Product Options Suite
A feature-rich and highly customizable solution to set and manage Magento product options. Display your product variations beautifully and accurately. -
![]()
SEO Suite Ultimate
The pioneer Magento SEO extension, instantly enhanced and updated to comply with the continuous changes in the SEO world. All-in-one Adobe Commerce SEO toolkit. -
![]()
Shipping Suite
All you could possibly need to build a Magento shipping system. Shipping methods, rates, carriers, shipping cost calculator, zip code validation. -
![]()
Ultimate Sales Boost
Need to give your Magento store an ultimate sales boost? Build urgency, scarcity, and trust with the help of countdown timers, products popularity popups, stock status, etc. -
![]()
Order Management
Magento delete orders functionality. Editing any order details without having to cancel orders. Adding 28 extra order parameters and 20 extra order mass actions. Staff access levels. -
![]()
Store Locator & In-Store Pickup
Magento 2 Store Locator extension to introduce BOPIS. No-contact delivery. Curbside pickup. Items’ availability tracking. Store locations on Google Maps. -
![]()
Checkout Suite
Magento One Page Checkout extension to introduce a delivery-oriented checkout flow. Comes with integrated Delivery Date and Store Locator & In-Store Pickup. -
![]()
Delivery Date & Time
All you need to display estimated shipment dates in your Magento-based store. Checkout page delivery. Shipping date restrictions and extra charges for specific time slots. -
![]()
Customer Prices Suite
The toolkit to personalize Magento prices and discounts. Shopper- and group-specific customer prices. Individual and group promotions. Updating prices in bulk.


-
![]()
FAQ
Create and manage FAQ sections for Magento 2 product pages, category pages, and CMS pages. Improve customer experience, reduce support requests, support AI-ready content, and add FAQ schema markup via Mageworx SEO Suite. -
![]()
AI Product Compare
Add AI-powered product comparison to Magento 2 with OpenAI ChatGPT and Google Gemini. Help shoppers quickly understand product similarities, key differences, pricing, and recommendations — all in a clear, decision-ready format. -
![]()
Shipping Suite
All you could possibly need to build a Magento shipping system. Shipping methods, rates, carriers, shipping cost calculator, zip code validation. -
![]()
SEO Suite Ultimate
The pioneer Magento SEO extension, instantly enhanced and updated to comply with the continuous changes in the SEO world. All-in-one Adobe Commerce SEO toolkit. -
![]()
Advanced Product Options Suite
A feature-rich and highly customizable solution to set and manage Magento product options. Display your product variations beautifully and accurately. -
![]()
Gift Cards
Online and offline Magento 2 gift card giving made easy. Flexible pricing schemes, multi-store gift cards, flexible pricing configuration possibilities. -
![]()
Multi Fees
Magento 2 extra fee extension that allows you to set up any Magento fee, including product, shopping cart, shipping methods, license, handling, and transaction fees. -
![]()
Reward Points
Build a Magento 2 reward points program that works! Reward your most active and loyal customers, motivate hesitating ones and generate more profit for each order. -
![]()
Store Locator & In-Store Pickup
Magento 2 Store Locator extension to introduce BOPIS. No-contact delivery. Curbside pickup. Items’ availability tracking. Store locations on Google Maps.

-
![]()
Store Locator & In-Store Pickup
Magento 2 Store Locator extension to introduce BOPIS. No-contact delivery. Curbside pickup. Items’ availability tracking. Store locations on Google Maps. -
![]()
Gift Cards
Online and offline Magento 2 gift card giving made easy. Flexible pricing schemes, multi-store gift cards, flexible pricing configuration possibilities. -
![]()
Multi Fees
Magento 2 extra fee extension that allows you to set up any Magento fee, including product, shopping cart, shipping methods, license, handling, and transaction fees. -
![]()
Reward Points
Build a Magento 2 reward points program that works! Reward your most active and loyal customers, motivate hesitating ones and generate more profit for each order. -
![]()
Shipping Suite
All you could possibly need to build a Magento shipping system. Shipping methods, rates, carriers, shipping cost calculator, zip code validation. -
![]()
Advanced Product Options Suite
A feature-rich and highly customizable solution to set and manage Magento product options. Display your product variations beautifully and accurately.
-
![]()
SEO Suite Ultimate
The pioneer Magento SEO extension, instantly enhanced and updated to comply with the continuous changes in the SEO world. All-in-one Adobe Commerce SEO toolkit. -
![]()
Advanced Product Reviews & Reminders
Use Magento 2 Review Reminder to increase trust in your brand by transforming Magento 2 reviews into advanced product feedback. Trigger email/popup review reminders. -
![]()
AI Product Compare
Add AI-powered product comparison to Magento 2 with OpenAI ChatGPT and Google Gemini. Help shoppers quickly understand product similarities, key differences, pricing, and recommendations — all in a clear, decision-ready format. -
![]()
FAQ
Create and manage FAQ sections for Magento 2 product pages, category pages, and CMS pages. Improve customer experience, reduce support requests, support AI-ready content, and add FAQ schema markup via Mageworx SEO Suite.

-
![]()
FAQ
Create and manage FAQ sections for Magento 2 product pages, category pages, and CMS pages. Improve customer experience, reduce support requests, support AI-ready content, and add FAQ schema markup via Mageworx SEO Suite. -
![]()
SEO Suite Ultimate
The pioneer Magento SEO extension, instantly enhanced and updated to comply with the continuous changes in the SEO world. All-in-one Adobe Commerce SEO toolkit. -
![]()
Landing Pages
The Landing Pages Magento extension allows you to create SEO- and user-friendly landing pages for your marketing campaigns. Pages creation in bulk. -
![]()
Layered Navigation
A set of flexible features to make Magento layered navigation search engine and user-friendly. Advanced configuration of filter attributes. -
![]()
Extended Rich Snippets
Draw users' attention and win the click with more detailed Magento rich snippets. Developed according to the latest Google and Schema.org standards. -
![]()
SEO Meta Templates
The Magento 2 SEO Meta Tags Template module to optimize product and category page metadata, keywords, short and detailed descriptions. -
![]()
Cross Linking
All you need to create and manage Magento 2 cross-linking SEO. Internal links optimization on the product, category, and CMS pages. Linking to relevant external sources. -
![]()
Sitemap Suite
XML and HTML Magento 2 sitemaps to enhance your site’s crawling, indexation, and navigation. Magento 2 Cron for automatic sitemaps navigation. -
![]()
Short Category & Product URLs
Make product and category pages better crawled by the search engine spiders. Use the Magento Short URL extension to remove parent categories from URLs.
-
![]()
Shipping Suite
All you could possibly need to build a Magento shipping system. Shipping methods, rates, carriers, shipping cost calculator, zip code validation. -
![]()
Store Locator & In-Store Pickup
Magento 2 Store Locator extension to introduce BOPIS. No-contact delivery. Curbside pickup. Items’ availability tracking. Store locations on Google Maps. -
![]()
Delivery Date & Time
All you need to display estimated shipment dates in your Magento-based store. Checkout page delivery. Shipping date restrictions and extra charges for specific time slots. -
![]()
Shipping Table Rates
With our Magento 2 Shipping Table Rates extension, you can overcome the default limitations and create an unlimited number of carriers, methods, and shipping rates. -
![]()
Shipping Calculator on Product Page
Increase conversion rates and improve customer experience by letting your shoppers calculate the cost of shipping right on your product pages. Estimated shipping block. -
![]()
Green Delivery
This Green Delivery module helps quickly offer such an option in your Magento-based store. Multi-store and multi-language support. -
![]()
No-Contact Delivery / Curbside Pickup
This Free Curbside Pickup module helps quickly offer the no-contact delivery option in your Magento-based store. Multi-store and multi-language support.

-
![]()
Marketing & Sales Suite
There’s no better tool to tackle Magento 2 marketing automation than this suite. Rewards program, recent sales notifications, countdown timers, review reminders, discounts. -
![]()
Customer Prices Suite
The toolkit to personalize Magento prices and discounts. Shopper- and group-specific customer prices. Individual and group promotions. Updating prices in bulk. -
![]()
Gift Cards
Online and offline Magento 2 gift card giving made easy. Flexible pricing schemes, multi-store gift cards, flexible pricing configuration possibilities. -
![]()
Reward Points
Build a Magento 2 reward points program that works! Reward your most active and loyal customers, motivate hesitating ones and generate more profit for each order. -
![]()
Multi Fees
Magento 2 extra fee extension that allows you to set up any Magento fee, including product, shopping cart, shipping methods, license, handling, and transaction fees. -
![]()
Ultimate Sales Boost
Need to give your Magento store an ultimate sales boost? Build urgency, scarcity, and trust with the help of countdown timers, products popularity popups, stock status, etc. -
![]()
Advanced Product Reviews & Reminders
Use Magento 2 Review Reminder to increase trust in your brand by transforming Magento 2 reviews into advanced product feedback. Trigger email/popup review reminders. -
![]()
Product Countdown Timers
Magento 2 Countdown Timer extension to add beautifully visualized timers to your product pages. The module comes with 20+ highly customizable design templates. -
![]()
Affiliate
Magento 2 Affiliate module helps you launch, run and manage flexible affiliate marketing programs. It allows you to effectively market your products with a low budget, low effort, and time while enjoying high ROI.

-
![]()
Advanced Product Options Suite
A feature-rich and highly customizable solution to set and manage Magento product options. Display your product variations beautifully and accurately. -
![]()
File Downloads and Product Attachments
Add any kind and any format of Magento 2 product attachments to your product pages―equip them with product videos, user guides, price lists, etc. -
![]()
Customer Prices Suite
The toolkit to personalize Magento prices and discounts. Shopper- and group-specific customer prices. Individual and group promotions. Updating prices in bulk. -
![]()
Customer Group Prices
Diversify your pricing strategy with custom Magento customer group prices. Set custom prices for wholesale and retail shoppers. Special deals for targeted groups. -
![]()
Prices per Customer
Add a personalized touch to your Magento pricing with the help of this Magento Price per Customer module. Mass update customer prices. Prices import/export. -
![]()
Product Custom Options Templates
Ease the pain of manual Magento custom options configuration. Create any number of custom options templates like color, size, dimensions, etc., in a few clicks. -
![]()
Shipping Calculator on Product Page
Increase conversion rates and improve customer experience by letting your shoppers calculate the cost of shipping right on your product pages. Estimated shipping block. -
![]()
Event Management by Staylime
Create, manage and sell Magento events. Let shoppers search for, wishlist, review any type of events as Magento products: conferences, concerts, parties, etc.

-
![]()
Order Management
Magento delete orders functionality. Editing any order details without having to cancel orders. Adding 28 extra order parameters and 20 extra order mass actions. Staff access levels. -
![]()
Order Editor
Magento edit order without canceling. Add, delete, and remove any order details, order customers' billing, payment, and shipping info. Order edit logs and staff permissions. -
![]()
Extended Orders Grid
Extend and customize the default Magento 2 orders grid. Easily add 28 extra colums with essential order parameters, perform order mass-actions, synch order data and more. -
![]()
Custom Order Number
Expand the native numbering scheme with the Magento 2 Custom Order Number module. Edit order length, add custom prefixes, increment prefixes, etc.
-
![]()
Affiliate
Magento 2 Affiliate module helps you launch, run and manage flexible affiliate marketing programs. It allows you to effectively market your products with a low budget, low effort, and time while enjoying high ROI. -
![]()
Ultimate Sales Boost
Need to give your Magento store an ultimate sales boost? Build urgency, scarcity, and trust with the help of countdown timers, products popularity popups, stock status, etc. -
![]()
Custom Order Number
Expand the native numbering scheme with the Magento 2 Custom Order Number module. Edit order length, add custom prefixes, increment prefixes, etc. -
![]()
Shop by Brand
Brands create desire, a sense of belonging, status, and prestige. Use Magento Shop by Brand to bridge the distance between your customers and their favorite offerings. -
![]()
Short Category & Product URLs
Make product and category pages better crawled by the search engine spiders. Use the Magento Short URL extension to remove parent categories from URLs. -
![]()
Personal Customer Discount
Motivate shoppers to complete a purchase with custom-tailored coupon codes & Magento discount per customer. Select customers for promotions. -
![]()
Landing Pages
The Landing Pages Magento extension allows you to create SEO- and user-friendly landing pages for your marketing campaigns. Pages creation in bulk. -
![]()
Checkout Suite
Magento One Page Checkout extension to introduce a delivery-oriented checkout flow. Comes with integrated Delivery Date and Store Locator & In-Store Pickup. -
![]()
Layered Navigation
A set of flexible features to make Magento layered navigation search engine and user-friendly. Advanced configuration of filter attributes.
-
![]()
Magento development
Full-cycle Magento 2 development taken care of. -
![]()
Magento migration
End-to-end migration from Magento 1 to Magento 2. -
![]()
Shopify development
Full-fledged Shopify store implementation. -
![]()
Magento maintenance & support
Ad hoc support and ongoing maintenance services for your store. -
![]()
Magento design
Unique Magento theme design and development. -
![]()
SEO Suite Ultimate configuration
Advanced configuration of our best-selling SEO extension.


Magento 2 Sitemap Setup
It's common knowledge that all the websites compete for visibility in the search engines. The store owners wish to attract new clients and achieve this they need their websites to be crawled by search bots (like Google or Bing) and shown in the results. Sitemaps are just one of the numerous tools to reach this goal.
A sitemap for Magento 2 is an XML file that contains the links to all the pages of the website. Magento 2 websites have hundreds or even thousands of pages so using a Sitemap is essential to help the search bot index the products pages including those that might have been ignored otherwise. Adding images to the sitemap is another feature that is quite important for better Search results as images can bring you more traffic when search bot indexes them.
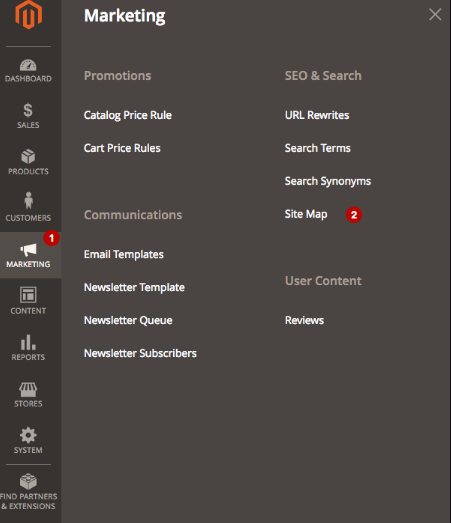
First of all, you need to create the sitemaps. For this, go to MARKETING ⟶ SEO & Search ⟶ Site Map.
This section contains all the sitemaps generated in your Magento 2 website.
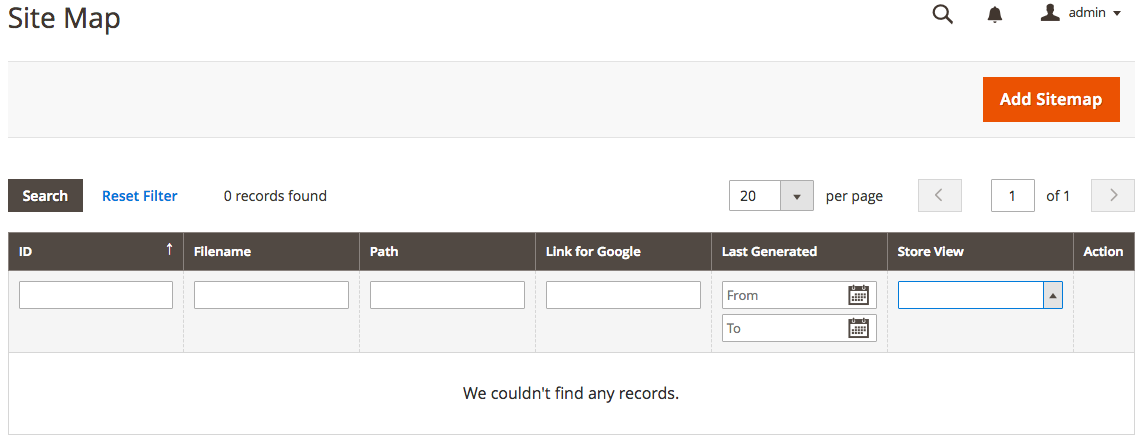
Let’s add the new sitemap. For this, click the Add Sitemap button.
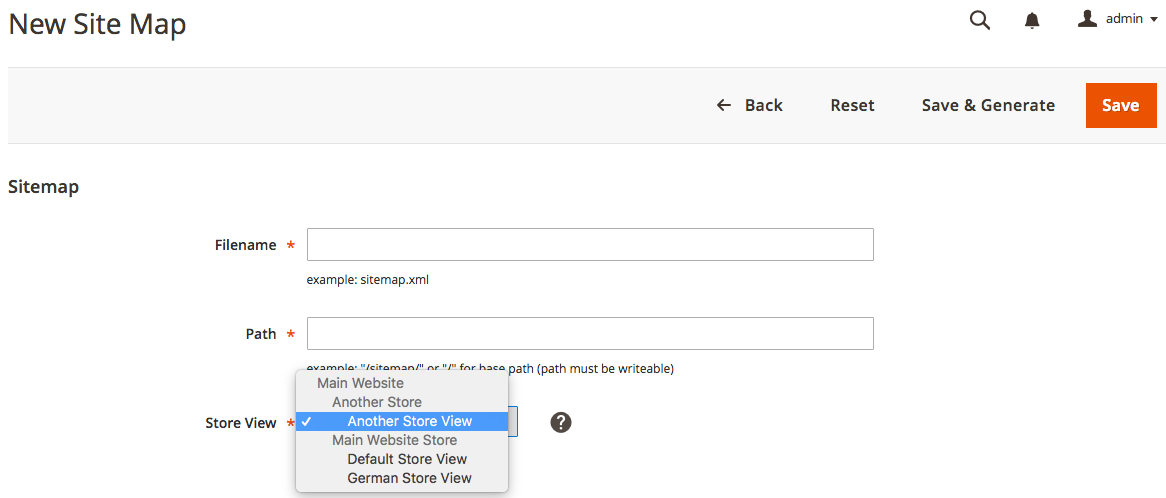
As you can create sitemaps for each Store View separately, you may need to differentiate them. So you can name them in the Filename field. The file can be stored in any existing directory so you can write your own desired Path. Once the sitemap is set up, you can either Save it or Save & Generate it immediately.
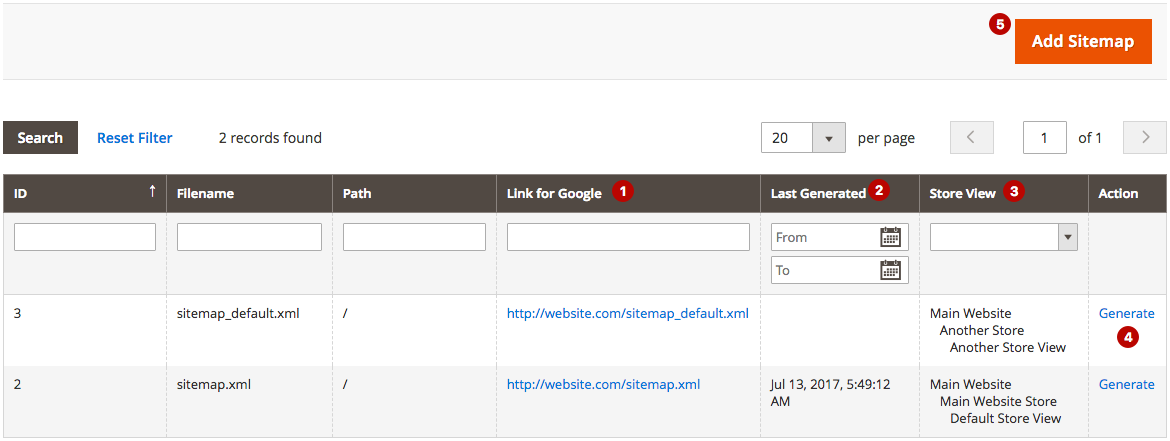
After that you can observe the created template in the grid. The generated sitemap URLs can be found in the Link for Google column. The time when the sitemap was generated for the last time is provided in the Last Generated column. You can specify separate sitemaps for different store views. The store view of the sitemap can be observed in the Store View column. Once the sitemap is created you can generate it by clicking the Generate button.
After these initials operations you'll need to setup the sitemaps.
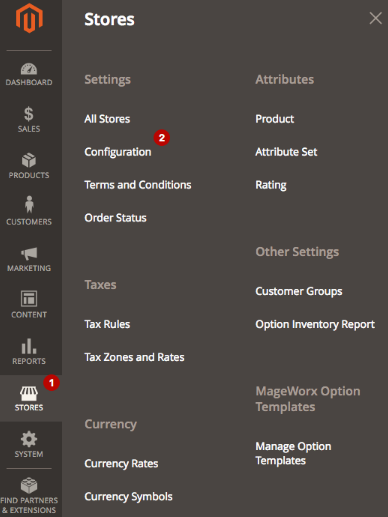
To access your Sitemap configuration page, go to STORES ⟶ Configuration from your admin area.
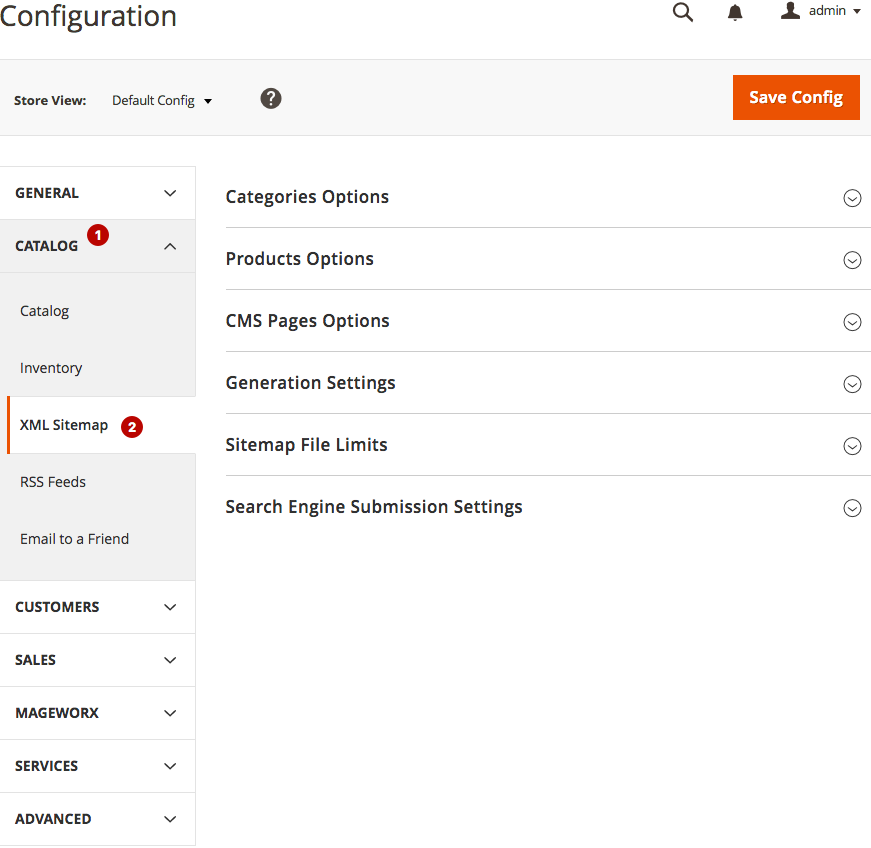
This opens the default Magento configuration. To setup the XML, open the CATALOG tab and click the XML Sitemap.
The first 3 tabs: Categories Options, Products Options and CMS Pages Options have the similar structure as you need to specify the Frequency and Priority.
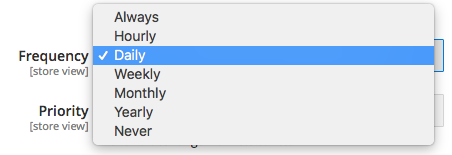
Frequency setting adjusts the general information to search bots and may not correlate exactly to how often they really crawl these particular pages. This setting shows mostly how often the page is likely to change. The Always value means that the page content will differ each time they are accessed. The value Never is used for archived URLs like some old blog posts or such. Please note that this is just the proposed value not the mandatory one and it’s always up to the search bot to decide when these pages should be recrawled. We recommend setting at least monthly or weekly for the categories and product pages.
Priority feature is designed to sort the pages on your store according to their importance. Please note that the priority is set according to other URLs on your Magento 2 website. Putting the high priority wouldn’t lead to the changing of the position of your pages in search results pages. The priority is the relative value so putting the highest priority on all the pages wouldn’t help. We recommend playing around the 0.4-0.7 values.
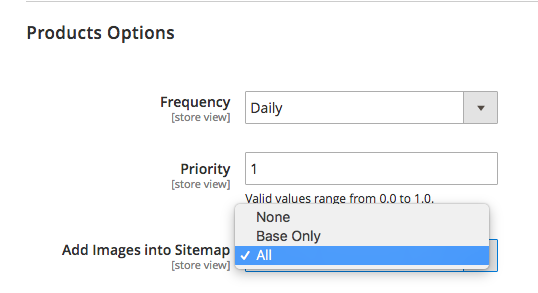
Products Options tab has the possibility to Add Images into Sitemap
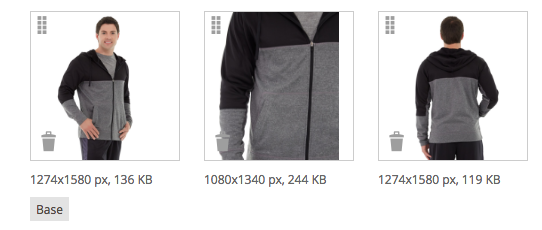
The Base Only adds the main image to the sitemap while All will assign all the images. It depends on the number of products and the average number of images per product but it may be quite reasonable to add only the base images due to the sitemaps size limitations.
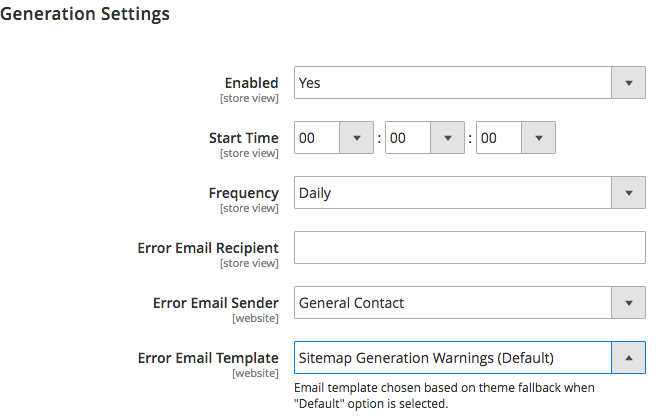
The Generation Settings provide one of the most important configurations for the sitemap adjustments.
Enabling this section allows to set up the autogeneration of the sitemap and configure the scheduler. Please note that it will work correctly only in case CRON is working correctly. If the autogeneration fails, Magento 2 allows setting up email notifications. Enter your email address in the Error Email Recipient field.
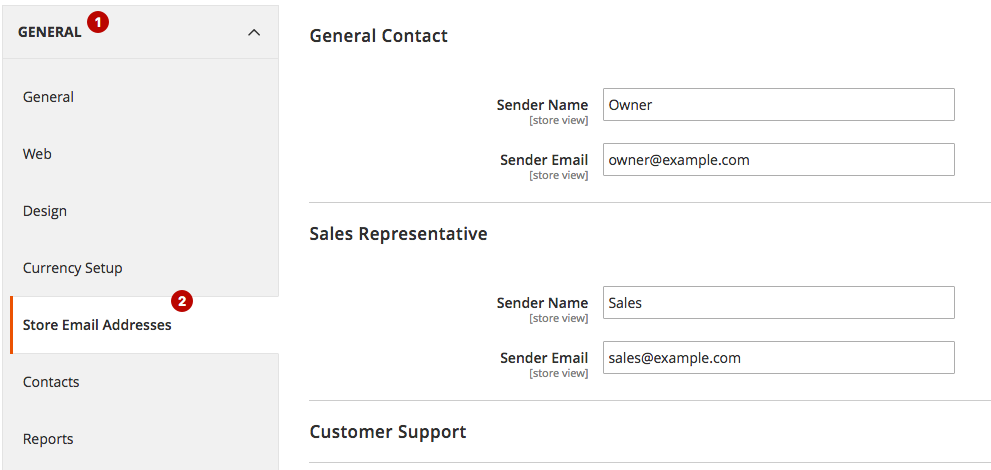
The Sender is set up in GENERAL ⟶ Store Email Addresses
The Email Template can be edited according to this official Magento 2 guide.
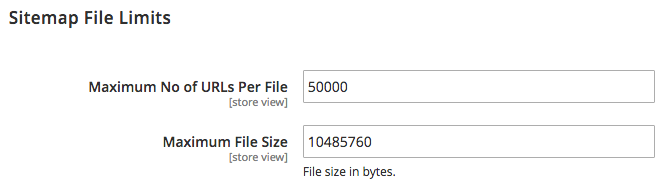
The Sitemap File Limits tab manages the Sitemap limitations.
Different search engines declare different rules and limitations. According to the Google rules, it is recommended that Maximum No of URLs Per File is less than 50,000 URLs and Max File Size is not larger than 50MB (52 428 800 bytes).

The Search Engine Submission Settings allow adding the Sitemap directly to Robots.txt
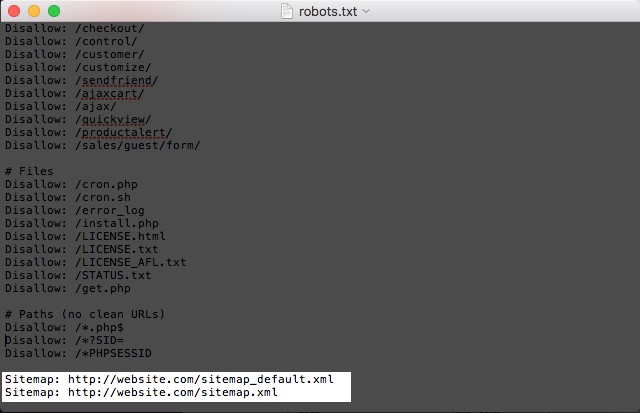
If you enable this feature to add sitemaps to the robots.txt file, they will be listed individually. This automatised operation may be handy for the situations with the multiple store-views.
Following these quite simple steps will dramatically improve your store’s visibility. Search bots can now easily navigate your Magento 2 store and possibly rank it higher. This will, in turn, attract more clients to your website.
The Magento 2 developers have done considerable work in respect of Search Engine Optimisation. In particular, sitemap generation is a flexible and versatile solution and can be used as-is without any third-party extensions. It covers the most important features and solves the main problems that confront the website owner.