-
![]()
Advanced Product Options Suite
A feature-rich and highly customizable solution to set and manage Magento product options. Display your product variations beautifully and accurately. -
![]()
SEO Suite Ultimate
The pioneer Magento SEO extension, instantly enhanced and updated to comply with the continuous changes in the SEO world. All-in-one Adobe Commerce SEO toolkit. -
![]()
Shipping Suite
All you could possibly need to build a Magento shipping system. Shipping methods, rates, carriers, shipping cost calculator, zip code validation. -
![]()
Ultimate Sales Boost
Need to give your Magento store an ultimate sales boost? Build urgency, scarcity, and trust with the help of countdown timers, products popularity popups, stock status, etc. -
![]()
Order Management
Magento delete orders functionality. Editing any order details without having to cancel orders. Adding 28 extra order parameters and 20 extra order mass actions. Staff access levels. -
![]()
Store Locator & In-Store Pickup
Magento 2 Store Locator extension to introduce BOPIS. No-contact delivery. Curbside pickup. Items’ availability tracking. Store locations on Google Maps. -
![]()
Checkout Suite
Magento One Page Checkout extension to introduce a delivery-oriented checkout flow. Comes with integrated Delivery Date and Store Locator & In-Store Pickup. -
![]()
Delivery Date & Time
All you need to display estimated shipment dates in your Magento-based store. Checkout page delivery. Shipping date restrictions and extra charges for specific time slots. -
![]()
Customer Prices Suite
The toolkit to personalize Magento prices and discounts. Shopper- and group-specific customer prices. Individual and group promotions. Updating prices in bulk.


-
![]()
Shipping Suite
All you could possibly need to build a Magento shipping system. Shipping methods, rates, carriers, shipping cost calculator, zip code validation. -
![]()
SEO Suite Ultimate
The pioneer Magento SEO extension, instantly enhanced and updated to comply with the continuous changes in the SEO world. All-in-one Adobe Commerce SEO toolkit. -
![]()
Advanced Product Options Suite
A feature-rich and highly customizable solution to set and manage Magento product options. Display your product variations beautifully and accurately. -
![]()
Gift Cards
Online and offline Magento 2 gift card giving made easy. Flexible pricing schemes, multi-store gift cards, flexible pricing configuration possibilities. -
![]()
Multi Fees
Magento 2 extra fee extension that allows you to set up any Magento fee, including product, shopping cart, shipping methods, license, handling, and transaction fees. -
![]()
Reward Points
Build a Magento 2 reward points program that works! Reward your most active and loyal customers, motivate hesitating ones and generate more profit for each order. -
![]()
Store Locator & In-Store Pickup
Magento 2 Store Locator extension to introduce BOPIS. No-contact delivery. Curbside pickup. Items’ availability tracking. Store locations on Google Maps. -
![]()
Delivery Date & Time
All you need to display estimated shipment dates in your Magento-based store. Checkout page delivery. Shipping date restrictions and extra charges for specific time slots. -
![]()
File Downloads and Product Attachments
Add any kind and any format of Magento 2 product attachments to your product pages―equip them with product videos, user guides, price lists, etc.
-
![]()
Store Locator & In-Store Pickup
Magento 2 Store Locator extension to introduce BOPIS. No-contact delivery. Curbside pickup. Items’ availability tracking. Store locations on Google Maps. -
![]()
Gift Cards
Online and offline Magento 2 gift card giving made easy. Flexible pricing schemes, multi-store gift cards, flexible pricing configuration possibilities. -
![]()
Multi Fees
Magento 2 extra fee extension that allows you to set up any Magento fee, including product, shopping cart, shipping methods, license, handling, and transaction fees. -
![]()
Reward Points
Build a Magento 2 reward points program that works! Reward your most active and loyal customers, motivate hesitating ones and generate more profit for each order. -
![]()
Shipping Suite
All you could possibly need to build a Magento shipping system. Shipping methods, rates, carriers, shipping cost calculator, zip code validation. -
![]()
Advanced Product Options Suite
A feature-rich and highly customizable solution to set and manage Magento product options. Display your product variations beautifully and accurately.
-
![]()
SEO Suite Ultimate
The pioneer Magento SEO extension, instantly enhanced and updated to comply with the continuous changes in the SEO world. All-in-one Adobe Commerce SEO toolkit. -
![]()
Advanced Product Reviews & Reminders
Use Magento 2 Review Reminder to increase trust in your brand by transforming Magento 2 reviews into advanced product feedback. Trigger email/popup review reminders.

-
![]()
SEO Suite Ultimate
The pioneer Magento SEO extension, instantly enhanced and updated to comply with the continuous changes in the SEO world. All-in-one Adobe Commerce SEO toolkit. -
![]()
Landing Pages
The Landing Pages Magento extension allows you to create SEO- and user-friendly landing pages for your marketing campaigns. Pages creation in bulk. -
![]()
Layered Navigation
A set of flexible features to make Magento layered navigation search engine and user-friendly. Advanced configuration of filter attributes. -
![]()
Extended Rich Snippets
Draw users' attention and win the click with more detailed Magento rich snippets. Developed according to the latest Google and Schema.org standards. -
![]()
SEO Meta Templates
The Magento 2 SEO Meta Tags Template module to optimize product and category page metadata, keywords, short and detailed descriptions. -
![]()
Cross Linking
All you need to create and manage Magento 2 cross-linking SEO. Internal links optimization on the product, category, and CMS pages. Linking to relevant external sources. -
![]()
Sitemap Suite
XML and HTML Magento 2 sitemaps to enhance your site’s crawling, indexation, and navigation. Magento 2 Cron for automatic sitemaps navigation. -
![]()
Short Category & Product URLs
Make product and category pages better crawled by the search engine spiders. Use the Magento Short URL extension to remove parent categories from URLs.
-
![]()
Shipping Suite
All you could possibly need to build a Magento shipping system. Shipping methods, rates, carriers, shipping cost calculator, zip code validation. -
![]()
Store Locator & In-Store Pickup
Magento 2 Store Locator extension to introduce BOPIS. No-contact delivery. Curbside pickup. Items’ availability tracking. Store locations on Google Maps. -
![]()
Delivery Date & Time
All you need to display estimated shipment dates in your Magento-based store. Checkout page delivery. Shipping date restrictions and extra charges for specific time slots. -
![]()
Shipping Table Rates
With our Magento 2 Shipping Table Rates extension, you can overcome the default limitations and create an unlimited number of carriers, methods, and shipping rates. -
![]()
Shipping Calculator on Product Page
Increase conversion rates and improve customer experience by letting your shoppers calculate the cost of shipping right on your product pages. Estimated shipping block. -
![]()
Green Delivery
This Green Delivery module helps quickly offer such an option in your Magento-based store. Multi-store and multi-language support. -
![]()
No-Contact Delivery / Curbside Pickup
This Free Curbside Pickup module helps quickly offer the no-contact delivery option in your Magento-based store. Multi-store and multi-language support.

-
![]()
Marketing & Sales Suite
There’s no better tool to tackle Magento 2 marketing automation than this suite. Rewards program, recent sales notifications, countdown timers, review reminders, discounts. -
![]()
Customer Prices Suite
The toolkit to personalize Magento prices and discounts. Shopper- and group-specific customer prices. Individual and group promotions. Updating prices in bulk. -
![]()
Gift Cards
Online and offline Magento 2 gift card giving made easy. Flexible pricing schemes, multi-store gift cards, flexible pricing configuration possibilities. -
![]()
Reward Points
Build a Magento 2 reward points program that works! Reward your most active and loyal customers, motivate hesitating ones and generate more profit for each order. -
![]()
Multi Fees
Magento 2 extra fee extension that allows you to set up any Magento fee, including product, shopping cart, shipping methods, license, handling, and transaction fees. -
![]()
Ultimate Sales Boost
Need to give your Magento store an ultimate sales boost? Build urgency, scarcity, and trust with the help of countdown timers, products popularity popups, stock status, etc. -
![]()
Advanced Product Reviews & Reminders
Use Magento 2 Review Reminder to increase trust in your brand by transforming Magento 2 reviews into advanced product feedback. Trigger email/popup review reminders. -
![]()
Product Countdown Timers
Magento 2 Countdown Timer extension to add beautifully visualized timers to your product pages. The module comes with 20+ highly customizable design templates. -
![]()
Affiliate
Magento 2 Affiliate module helps you launch, run and manage flexible affiliate marketing programs. It allows you to effectively market your products with a low budget, low effort, and time while enjoying high ROI.

-
![]()
Advanced Product Options Suite
A feature-rich and highly customizable solution to set and manage Magento product options. Display your product variations beautifully and accurately. -
![]()
File Downloads and Product Attachments
Add any kind and any format of Magento 2 product attachments to your product pages―equip them with product videos, user guides, price lists, etc. -
![]()
Customer Prices Suite
The toolkit to personalize Magento prices and discounts. Shopper- and group-specific customer prices. Individual and group promotions. Updating prices in bulk. -
![]()
Customer Group Prices
Diversify your pricing strategy with custom Magento customer group prices. Set custom prices for wholesale and retail shoppers. Special deals for targeted groups. -
![]()
Prices per Customer
Add a personalized touch to your Magento pricing with the help of this Magento Price per Customer module. Mass update customer prices. Prices import/export. -
![]()
Product Custom Options Templates
Ease the pain of manual Magento custom options configuration. Create any number of custom options templates like color, size, dimensions, etc., in a few clicks. -
![]()
Shipping Calculator on Product Page
Increase conversion rates and improve customer experience by letting your shoppers calculate the cost of shipping right on your product pages. Estimated shipping block. -
![]()
Event Management by Staylime
Create, manage and sell Magento events. Let shoppers search for, wishlist, review any type of events as Magento products: conferences, concerts, parties, etc.

-
![]()
Order Management
Magento delete orders functionality. Editing any order details without having to cancel orders. Adding 28 extra order parameters and 20 extra order mass actions. Staff access levels. -
![]()
Order Editor
Magento edit order without canceling. Add, delete, and remove any order details, order customers' billing, payment, and shipping info. Order edit logs and staff permissions. -
![]()
Extended Orders Grid
Extend and customize the default Magento 2 orders grid. Easily add 28 extra colums with essential order parameters, perform order mass-actions, synch order data and more. -
![]()
Custom Order Number
Expand the native numbering scheme with the Magento 2 Custom Order Number module. Edit order length, add custom prefixes, increment prefixes, etc.
-
![]()
Affiliate
Magento 2 Affiliate module helps you launch, run and manage flexible affiliate marketing programs. It allows you to effectively market your products with a low budget, low effort, and time while enjoying high ROI. -
![]()
Custom Order Number
Expand the native numbering scheme with the Magento 2 Custom Order Number module. Edit order length, add custom prefixes, increment prefixes, etc. -
![]()
Shop by Brand
Brands create desire, a sense of belonging, status, and prestige. Use Magento Shop by Brand to bridge the distance between your customers and their favorite offerings. -
![]()
Short Category & Product URLs
Make product and category pages better crawled by the search engine spiders. Use the Magento Short URL extension to remove parent categories from URLs. -
![]()
Personal Customer Discount
Motivate shoppers to complete a purchase with custom-tailored coupon codes & Magento discount per customer. Select customers for promotions. -
![]()
Landing Pages
The Landing Pages Magento extension allows you to create SEO- and user-friendly landing pages for your marketing campaigns. Pages creation in bulk. -
![]()
Checkout Suite
Magento One Page Checkout extension to introduce a delivery-oriented checkout flow. Comes with integrated Delivery Date and Store Locator & In-Store Pickup. -
![]()
Layered Navigation
A set of flexible features to make Magento layered navigation search engine and user-friendly. Advanced configuration of filter attributes. -
![]()
Search Autocomplete FREE
Immediate product Magento autocomplete search results. Let your customers instantly find what they are looking for. Customizable AJAX popup.
-
![]()
Magento development
Full-cycle Magento 2 development taken care of. -
![]()
Magento migration
End-to-end migration from Magento 1 to Magento 2. -
![]()
Shopify development
Full-fledged Shopify store implementation. -
![]()
Magento maintenance & support
Ad hoc support and ongoing maintenance services for your store. -
![]()
Magento design
Unique Magento theme design and development. -
![]()
SEO Suite Ultimate configuration
Advanced configuration of our best-selling SEO extension.


Store and Currency Auto Switcher for Magento 2
Store and Currency Auto Switcher for Magento 2
Main features
Gallery


Version
2.4.0
Magento Compatibility
CE 2.4.x; EE 2.4.x

Comes with
- Lifetime access to the source code
- 1 year of free updates and support
- No subscriptions
Key features

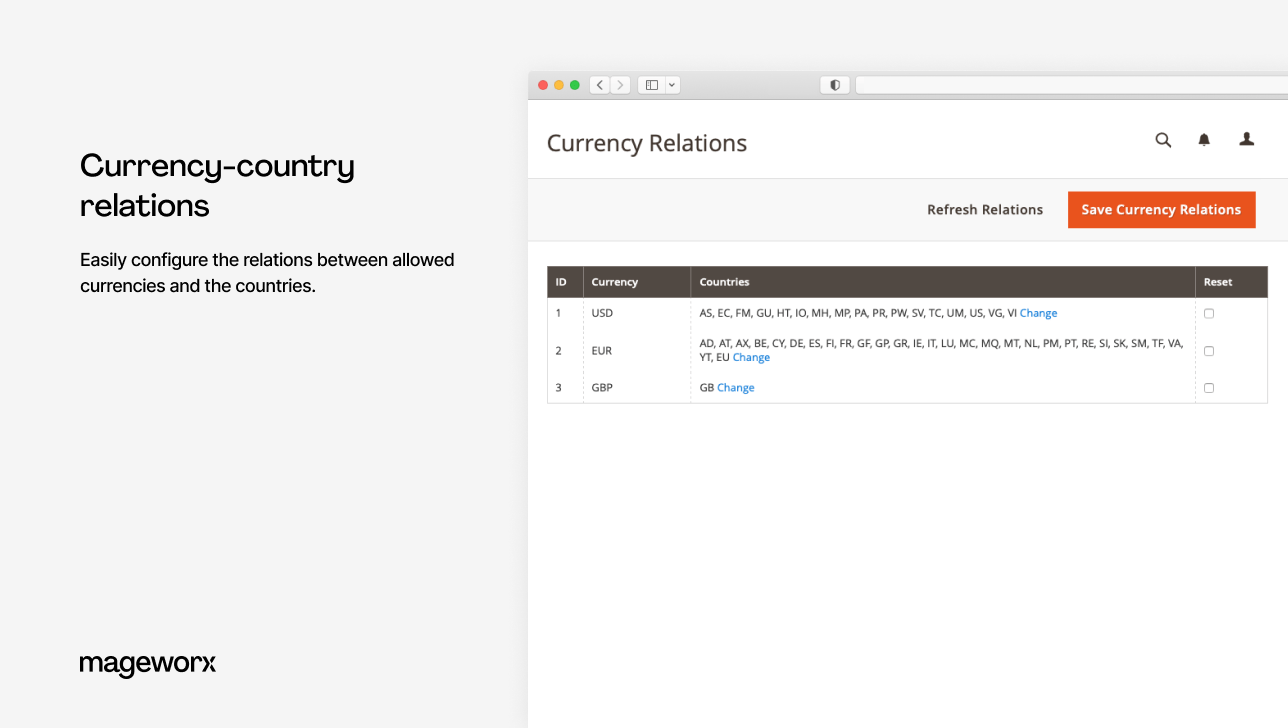
Magento 2 currency switcher
Offer your international customers the convenience of shopping in their local currency. Use Currency Auto Switcher to set currency rates and manage country-currency relations. Learn more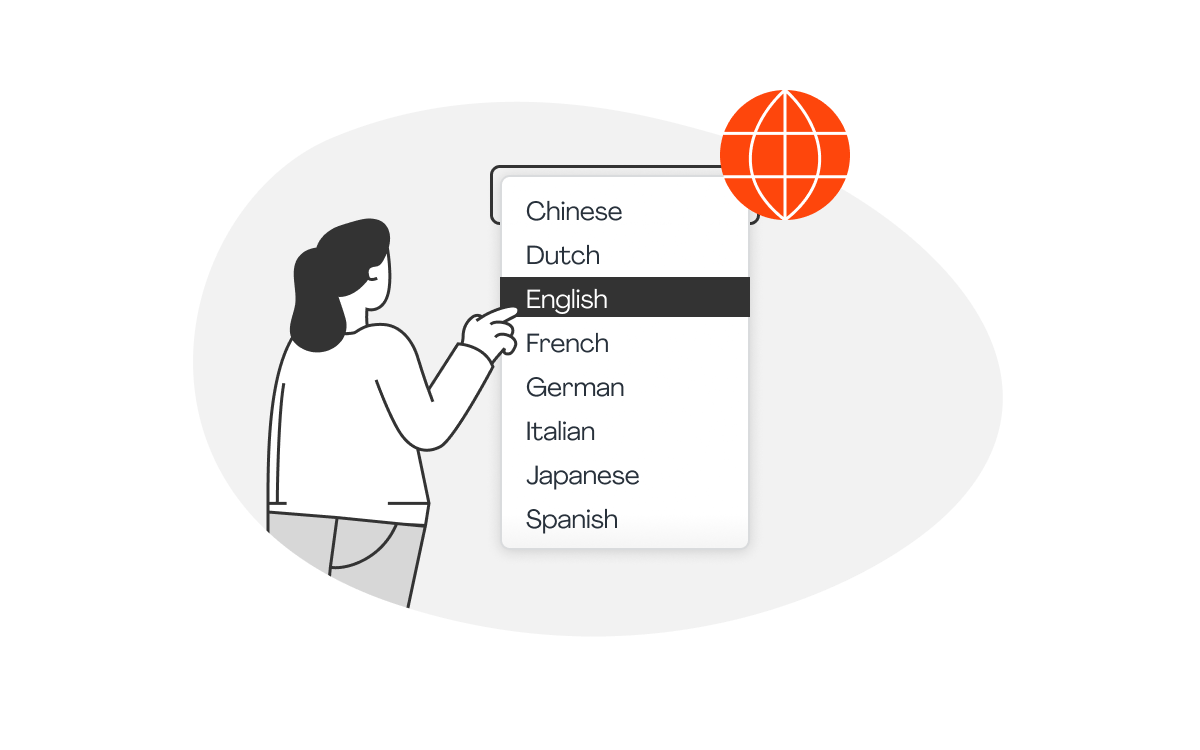
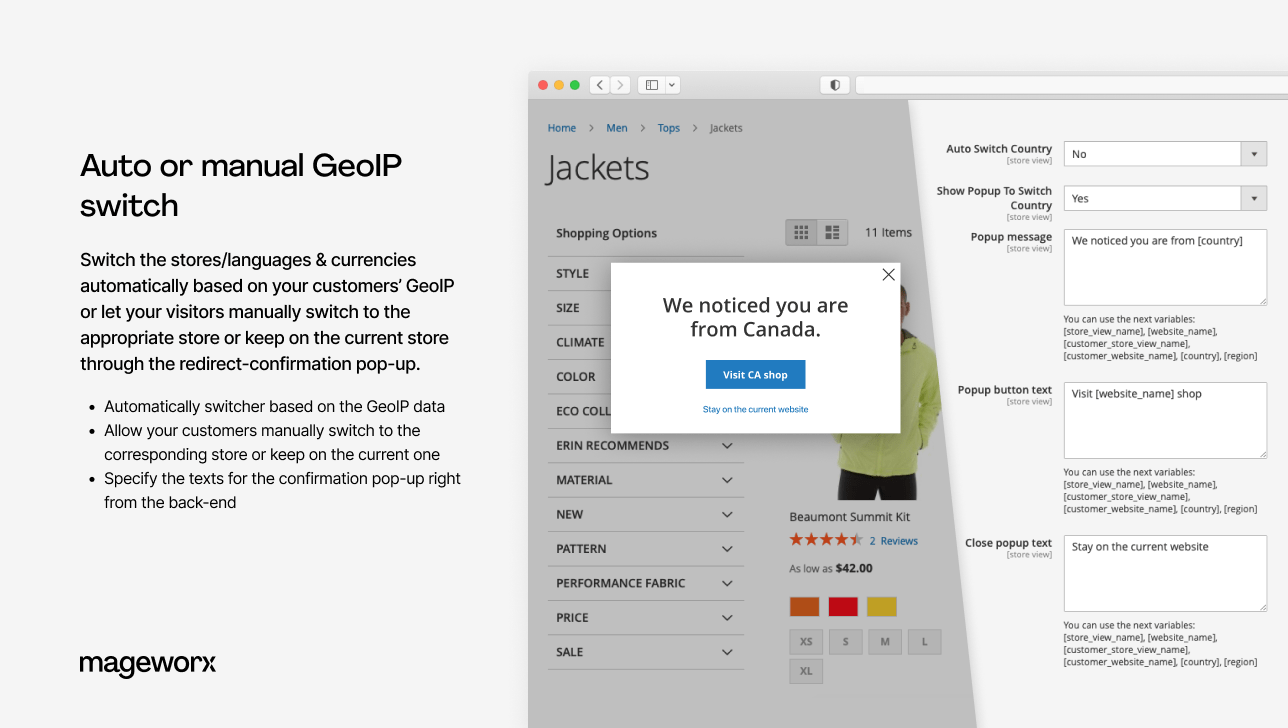
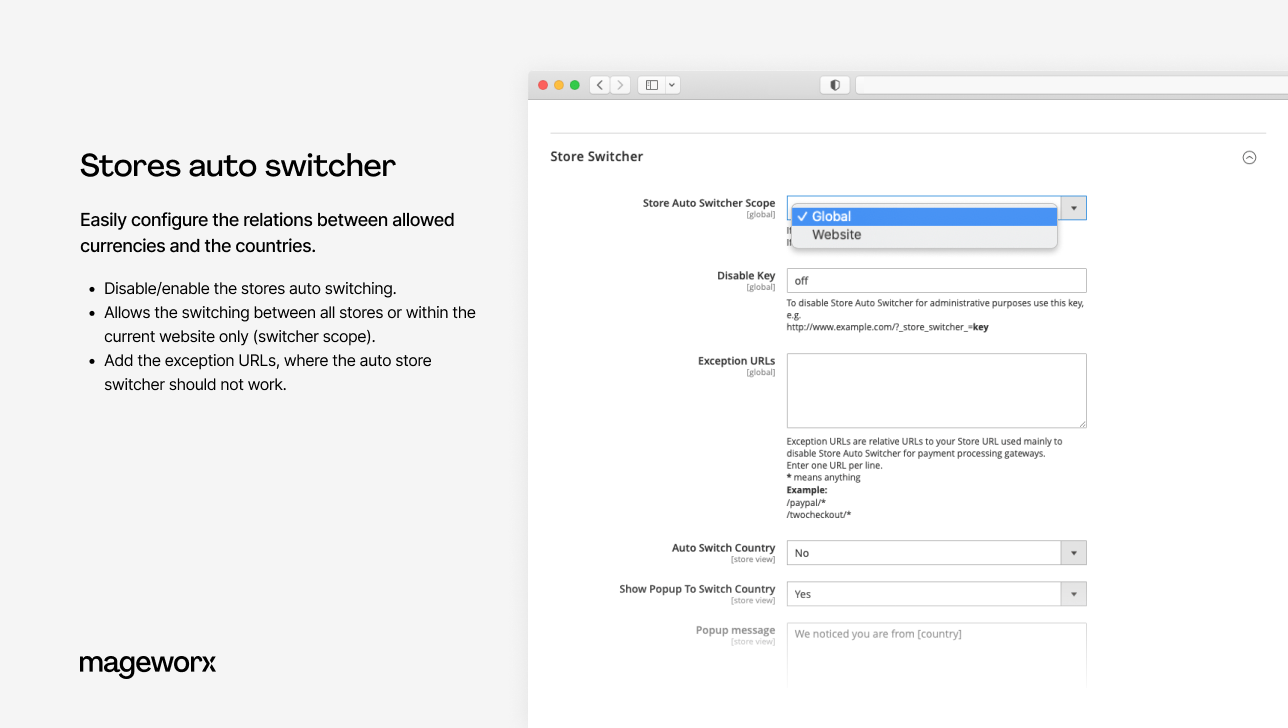
Magento 2 store switcher
Learn where your customers come from. Use Store Switcher Magento 2 to direct shoppers to relevant store views, based on the visitors’ IP addresses. Learn more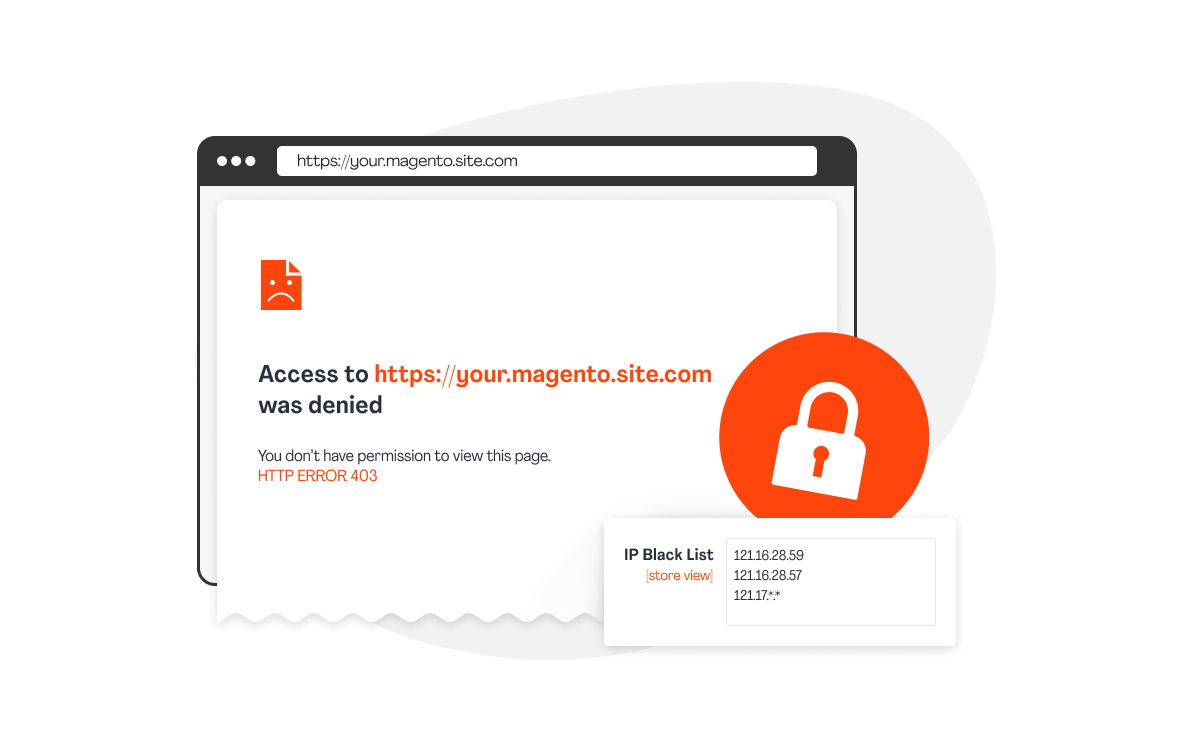
Location access control
Protect your online store from spammers and bots—use the switch extension to grant or deny access to your Magento 2 store. White or blacklist IP addresses of your choice. Learn more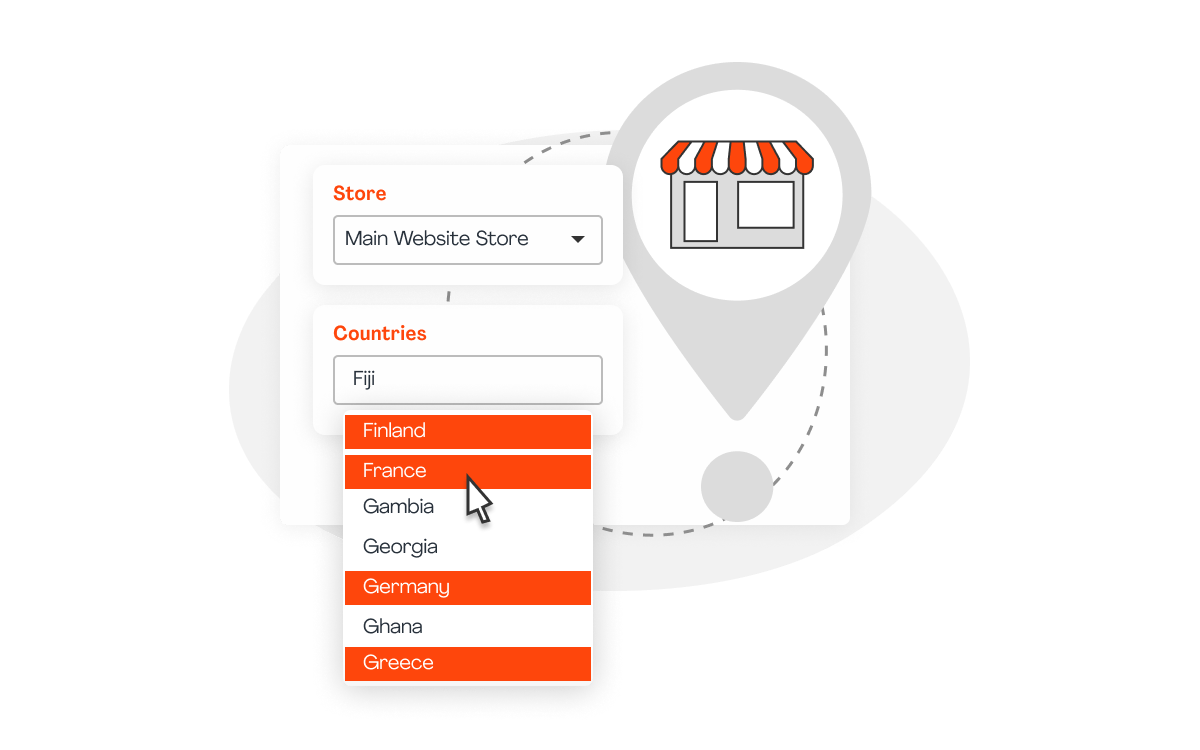
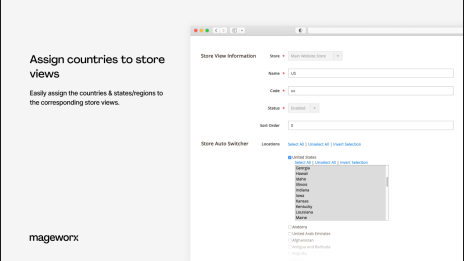
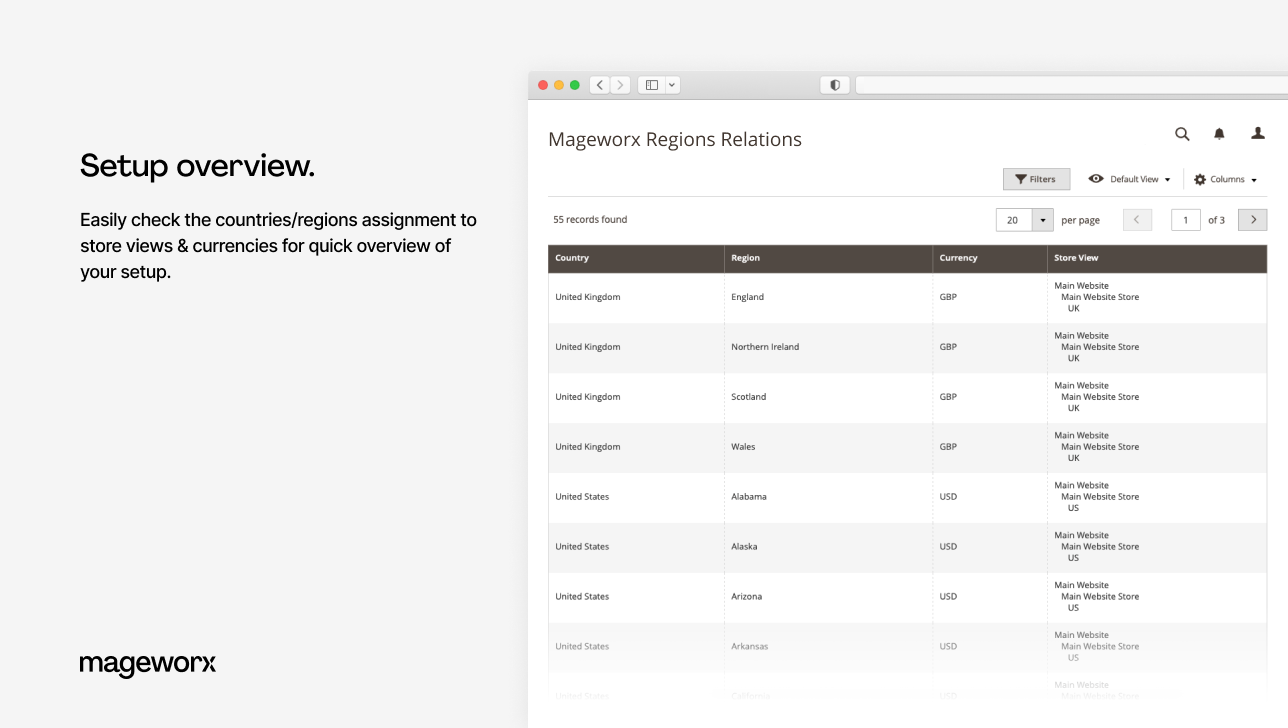
Store-country management
With the Store Currency Auto Switcher Magento extension, you can extend the default store management functionality and quickly set countries (with particular languages) for the corresponding stores. Learn moreExtensible. Customizable. Developer-friendly
Composer installation for easier extensions installation and management
No overwriting the core classes unless unachievable within a functionality
Unencrypted code for hassle-free editing if required by your clients
Extensions' code implementation following Magento's recommended best practices
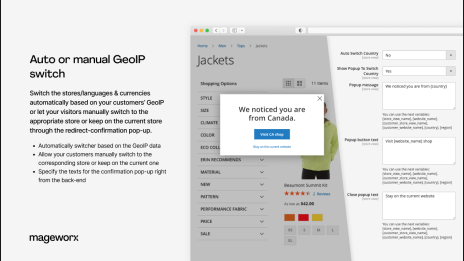
Automatic store switcher Magento 2
According to a study by Common Sense Advisory, 72.1% of consumers prefer to browse websites in their native language, and 56.2% consider language as more important than price.
The store switcher brings store owners such benefits as enhanced user experience, increase in conversion rates, expanding your global market reach, and gaining a competitive edge in the industry.
With the Store Currency Auto Switcher Magento extension, you can effortlessly set country-language relations and:
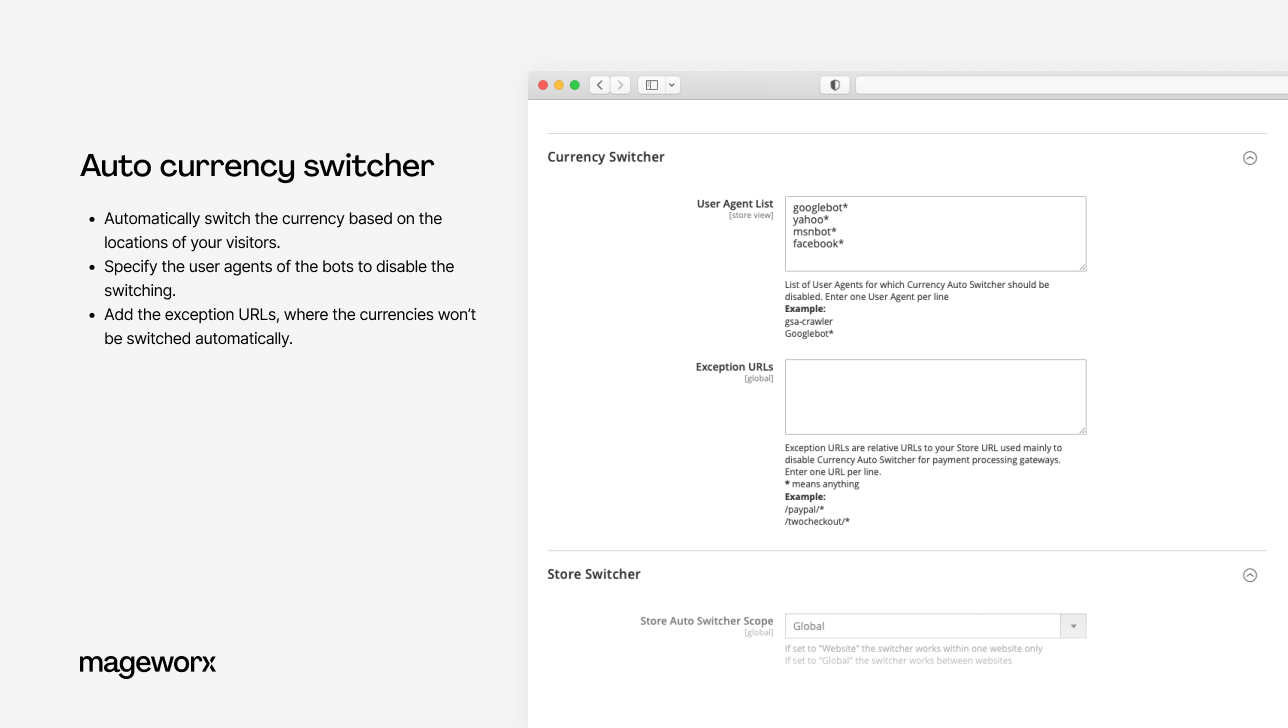
Auto currency switcher Magento 2
Magento 2 auto currency switcher enables you to let shoppers from abroad easily and promptly navigate your store prices by displaying the items’ costs in local currencies.
Besides enabling automatic currency auto-switching, Magento Currency Switcher allows you to restrict such switching by:
For more personalization opportunities, see the Prices Per Customer extension for Magento 2.
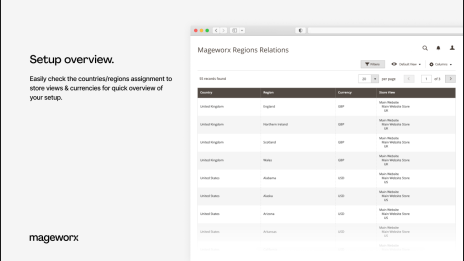
Adding currencies & defining specific countries to apply them to
Defining currencies–country relations allow you to create a more inclusive, customer-centric, and localized shopping experience. It improves customer satisfaction, reduces friction in the purchasing process, and enhances your store's international presence.
The Store Currency Switcher Magento module allows you to:
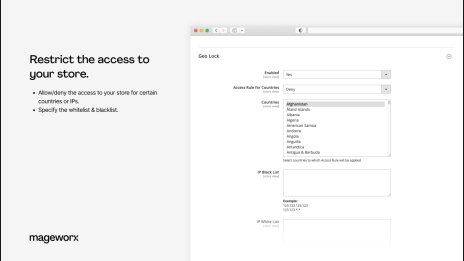
Protect your Magento 2 store from spammers
The Store-Currency Auto Switcher Magento extension enables you to block unwanted or suspicious IP addresses and entire locations from visiting your store. It will help you restrict access to your store for possible spam bots and avoid fraudulent orders.
With Magento Auto Currency Switcher’s geo-lock functionality, you can:
More features
Here’s an extra tool belt that the switch extension comes with:
Need a landing page?
Learn more
Product changelog
2.4.0
May 20, 2025- Adds support for Magento 2.4.8 and PHP8.4
2.3.15
August 21, 2024- Fixes the issue with downloading MaxMind geoip database
- Improves compatibility with the 3rd party GeoIP module provided by SwissUp
2.3.14
July 4, 2024- Improves compatibility with PHP 8.2
FAQ
Product questions
Before you begin:
Log in to your Magento 2 admin panel.
To activate multiple currencies in Magento 2, you can follow these steps:
Step 1: Navigate to currency configuration
- From the Admin Panel dashboard, go to Stores -> Currency -> Currency Rates.
Step 2: Enable additional currencies
- On the Currency Rates page, you'll find a list of currencies supported by Magento.
- Locate the currencies you want to enable and ensure they are selected by checking the corresponding checkboxes.
Step 3: Set exchange rates
- For each enabled currency, specify the exchange rate relative to your base currency (e.g., USD).
- You can manually enter the exchange rates or use an automatic service to fetch them.
Step 4: Save the changes
- Click the Save Currency Rates button to save the changes.
Step 5: Configure display options (Optional)
- If you want to customize how the additional currencies are displayed, you can navigate to Stores -> Configuration -> General -> Currency Setup.
- Adjust the settings related to currency display, decimal precision, and currency switcher Magento 2 options according to your preferences.
- Click the Save Config button to save the changes.
Step 6: Clear cache (if necessary)
- Depending on your Magento configuration, you may need to clear the cache for the changes to take effect. You can do this by going to System -> Cache Management and clicking the Flush Magento Cache button.
Before you begin:
Log in to your Magento 2 admin panel.
To change the currency symbol in Magento 2, you can follow these steps:
Step 1: Navigate to currency configuration
- From the Admin Panel dashboard, go to Stores -> Currency -> Currency Symbols.
Step 2: Edit currency symbol
- On the Currency Symbols page, you'll see a list of currencies and their associated symbols.
- Locate the currency for which you want to change the symbol and click on the corresponding row.
Step 3: Update the currency symbol
- In the Currency Symbol field, replace the existing symbol with the new symbol you want to use.
Step 4: Save the changes
- Click the Save Currency Symbols button to save the changes.
Step 5: Clear cache (if necessary)
- Depending on your Magento configuration, you may need to clear the cache for the changes to take effect. You can do this by going to System -> Cache Management and clicking the Flush Magento Cache button.
After completing these steps, the currency symbol for the selected currency should be updated throughout your Magento site.
It's important to note that changing the currency symbol using these steps will affect the symbol for the selected currency globally across your website. If you need to customize the currency symbol for specific sections or display cases, further customization may be required, such as modifying template files or using additional extensions or customizations.
Always make sure to test the changes thoroughly to ensure that the new currency symbol is displaying correctly and consistently throughout your Magento site.
To add the auto currency switching feature in a Magento store, you can follow these steps:
Step 1: Install the Currency Auto Switcher extension for Magento 2
- Follow the installation instructions provided by the extension developer.
- Make sure to install a version compatible with your Magento 2 installation.
Step 2: Configure the extension
- Once the extension is installed, access your Magento admin panel.
- Navigate to Stores -> Configuration -> General -> Currency Setup.
- Look for the settings related to the currency switcher extension you installed.
- Configure the extension according to your preferences.
- Set the auto currency switching method (e.g., based on geolocation, browser language, etc.).
- Define the default currency.
- Enable or disable the auto currency switcher feature.
Step 3: Test and verify
- Save the configuration changes.
- Clear the cache if necessary.
- Test the auto currency switching feature by accessing your site from different locations or using different browser languages.
- Verify that the currency is automatically switched based on the configured rules.
- Check that the currency symbols and prices are displayed correctly in the switched currency.
Step 4: Customize and fine-tune (Optional)
- If needed, customize the extension's behavior or appearance to match your specific requirements.
- Some extensions may offer additional customization options, such as adding currency selectors, customizing currency rates, or defining exceptions.
- Refer to the extension's documentation or support resources for more information on advanced configuration and customization options.
Note: The specific steps may vary depending on the currency switcher extension you choose. Always refer to the extension's documentation for detailed installation and configuration instructions.
Remember to test the Magento 2 auto currency switcher feature thoroughly and ensure that it works correctly for your target audience. It's important to provide a seamless and accurate currency switching experience to enhance the usability and shopping experience for your customers.
The Magento Auto Switch Language and Currency extension by Mageworx can indeed play a crucial role in enhancing your business globally. Here are some ways it can benefit your business:
- Localization: When expanding your business globally, it's essential to provide a localized experience to your customers. The extension allows you to automatically switch the language and currency based on the customer's location, providing a seamless and personalized experience. This localization helps customers feel more comfortable, increasing their trust and likelihood of making a purchase.
- Improved user experience: By automatically switching the language and currency, the extension eliminates the need for customers to manually select their preferred language and currency. This convenience improves the overall user experience and reduces friction during the shopping process. It saves customers time and effort, making it more likely for them to explore your products and complete their purchases.
- Increased conversion rates: By providing a localized experience and eliminating barriers, such as language and currency selection, the extension can significantly impact conversion rates. When customers see prices displayed in their local currency, it improves transparency and reduces confusion. Likewise, presenting content in their preferred language enhances their understanding of your products and builds trust, leading to higher conversion rates.
- Targeting international markets: With the auto switch language and currency extension, you can easily target specific international markets without the need for manual configurations. It enables you to adapt to different languages and currencies across multiple countries, making it easier to expand your business globally. This flexibility allows you to tailor your offerings to specific markets, increasing your competitiveness and attracting more customers.
- Personalization and customer satisfaction: Providing a personalized experience is crucial for customer satisfaction. The extension enables you to cater to individual customer preferences based on their location, making them feel valued and understood. By automatically adapting the language and currency, you create a customized experience that resonates with customers, enhancing their satisfaction and loyalty to your brand.
Overall, the Magento auto-switch language and currency extension plays a vital role in enhancing your business globally by improving localization, user experience, conversion rates, targeting international markets, and personalization. It enables you to overcome language and currency barriers, making your store more accessible and appealing to a diverse customer base.
General questions
The two most common payment methods are currently accepted―credit cards (all types) and PayPal. All the payment transactions are carried out in full compliance with the security and confidentiality requirements.
Yes, after the purchase you will receive the complete invoice with all necessary details, including our VAT number etc.
We offer four independent ways of Magento 2 extension installation:
- Via Composer
- By copying the code
- Via Magento Marketplace
- Via Mageworx own Repository
Mageworx extensions support Magento 2 Open Source (former Community), Commerce (former Enterprise) editions including Magento 2 Commerce Cloud platform.
Our own repository has been primarily intended to facilitate and speed up the process of Mageworx
extensions installation and update.
In order to work with the repository, you’ll need to have the Composer on the server first. This
is the package manager of the PHP software that allows you to update & install scripts on your
site.
According to the Mageworx License Agreement, you can use one copy of Mageworx software on one Magento production installation. Thus, separate Magento installations require purchasing separate licenses.
Please mind that the extensions are not domain related, i.e., if you run each website on one Magento installation, then one license can be used. However, if you've got several websites on different Magento installations, then you would need to purchase separate licenses for each of them.
Yes, you can install and set up any Mageworx extension on a test environment before making changes on your production site.
By default, all Mageworx Magento 2 extensions are tested on three most popular themes: Luma,
Ultimo, and Porto. However, some of our extensions are compatible with more 3rd party themes.
You can get in touch with our support team at [email protected] to confirm compatibility with the theme that you are currently using.
In the world where 45% of purchases are completed via mobile (according to Retail Dive), we find it crucial to test and optimize all Mageworx extensions for mobile friendliness.
Extension updates are available as long as your support & updates package is active.
Purchases made before February 1, 2022, reserve the right to access our Magento extensions updates free of charge for a lifetime.
Currently, the Mageworx Magento support team can be reached via:
Email at [email protected]
On-site form, which is available here
Live chat on any page
Database migration, migrating custom-built functionality and design, as well as migrating advanced
SEO
settings―these and other options are available within our one-stop migration service.
To get a quote, you’ll need to contact our Client Relations Manager.
We offer a 60-day money-back guarantee for Mageworx extensions that have been purchased via our site. Customer satisfaction and creating true value are our top priority!
Please note that this is except for those Magento 1 extensions that are intended to be upgraded to their Magento 2 versions within 30 days since the moment of M1 version purchase. In such a case, a refund will be applied solely to the Magento 2 extension version.
Please note that extensions purchased at Magento Marketplace are covered by the 25-day Marketplace Refund Policy.
Reward points, bulk & upgrade discounts―at Mageworx, we do our best to show appreciation to our
new and
existing customers. Joining the program is fast and easy. To start saving with us, you need to
create an
account.
By helping Mageworx promote our extensions, you can earn up to 50% on every order. To join the
affiliate
program, you need to create an account on our website.
Go to "My Profile ― Affiliates", then
complete and
verify your affiliate profile.
Feel free to drop us a line on the Support page if you have questions.