Advanced Product OptionsUsing the app
Multi-step setup
We’ve added a new way to display product options — Multi-step mode.
Instead of showing all options at once, Multi-step mode organizes the selection process into clear steps. Customers move through the options one by one, which keeps the product page clean and easy to navigate. This is especially helpful for products with a long list of options, as it saves space on the page and makes the experience less overwhelming.
With Multi-step mode, you can:
- Present options in a structured, step-by-step flow.
- Guide customers through the configuration process more smoothly.
- Keep your product pages neat, even when there are many options available.
- Show customers a summary of everything they selected before they add the product to the cart.
This mode is designed to improve both the look of your product pages and the shopping experience for your customers.
How to Set Up Multi-step Mode
Section titled “How to Set Up Multi-step Mode”Here’s how to enable and configure it:
Step 1: Enable Multi-step Mode
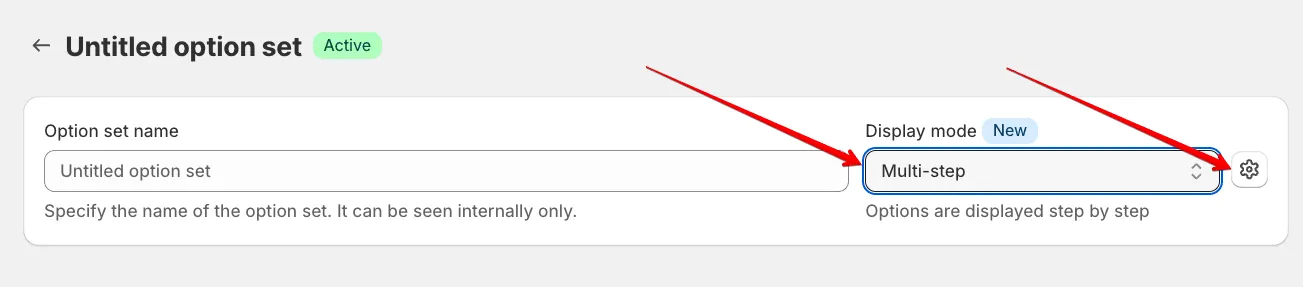
Section titled “Step 1: Enable Multi-step Mode”- When creating an Option Set, look to the menu on the right of the set title.
- Select Multi-step from the display mode options.
- Once selected, the gear (cog) icon becomes active. Click it to open the Multi-step visual settings popup.
Step 2: Configure Visual Settings
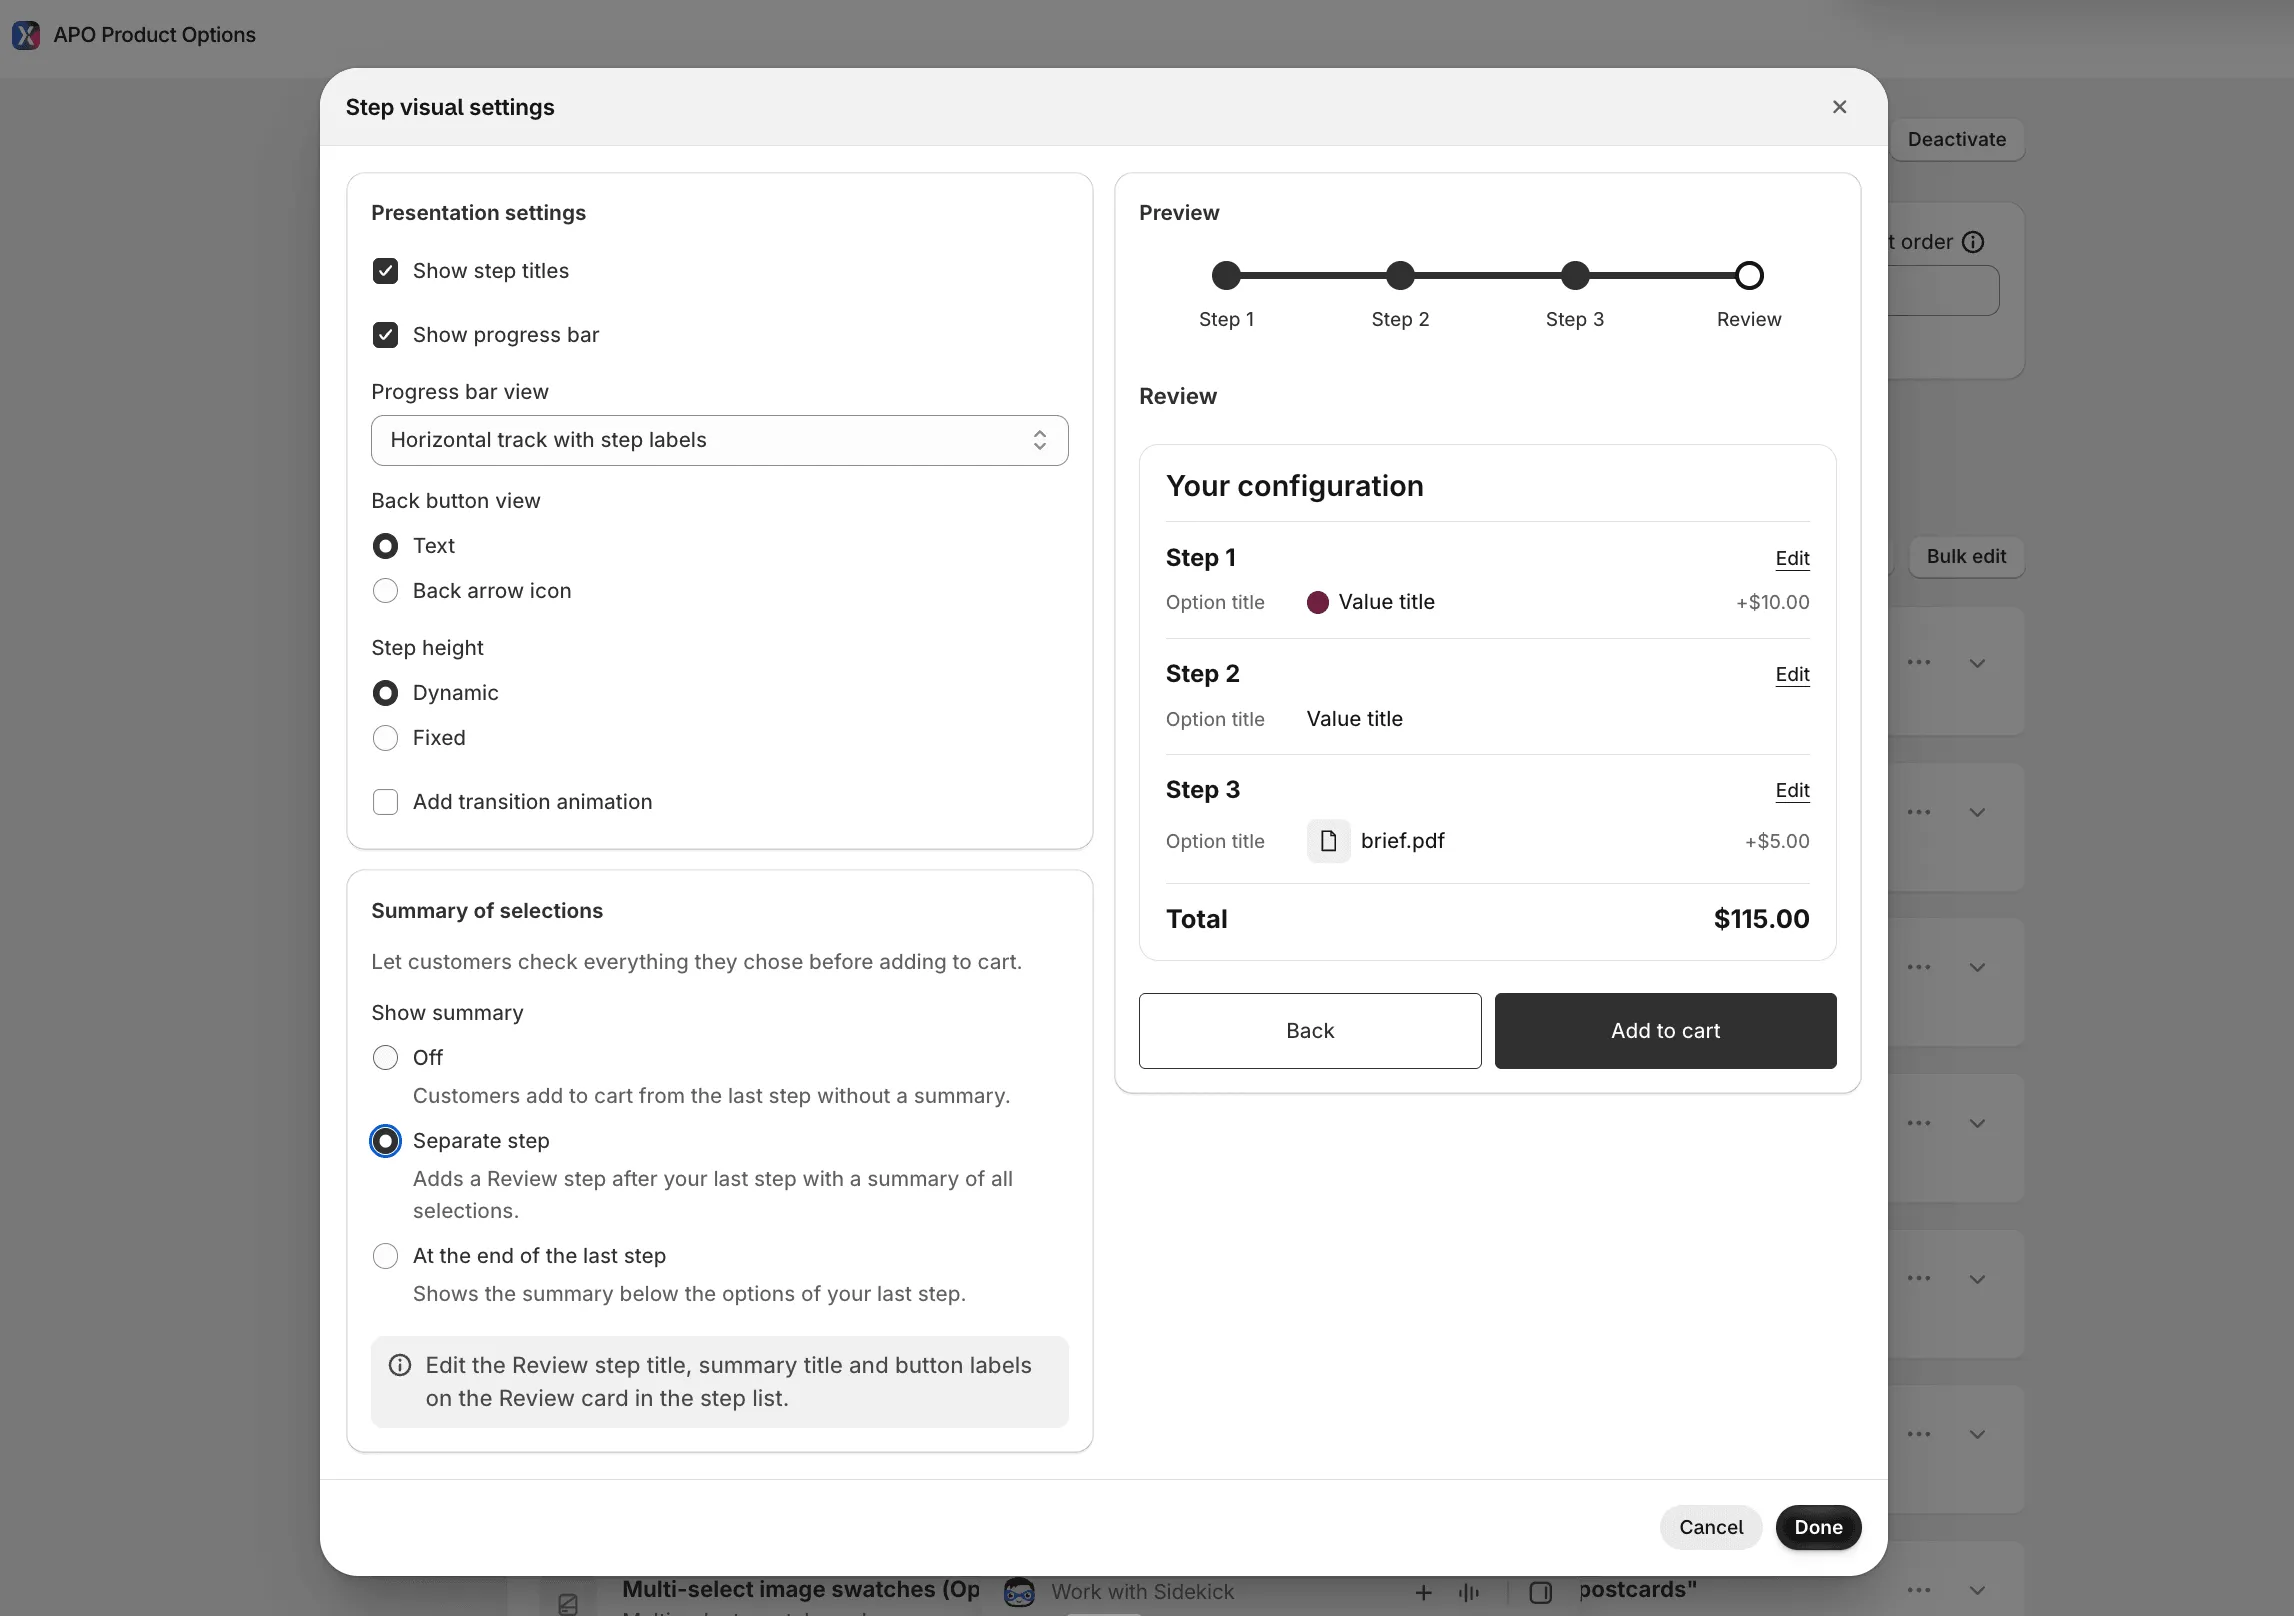
Section titled “Step 2: Configure Visual Settings”Inside the popup, you can adjust how the multi-step flow looks and behaves:
Presentation settings
-
Show step titles – Displays the title of each step.
-
Show progress bar – Lets customers see how far they’ve progressed through the steps.
-
Progress bar view – Choose the style that best matches your store design:
- Line
- Segmented
- Dotted
- Horizontal track with step labels
- Text
-
“Back” button view – Choose whether the back button appears as text or an arrow icon.
-
Step height – Set the height of each step as dynamic (adjusts automatically based on content) or fixed (uniform height for all steps).
-
Add transition animation – Adds a smooth animation effect when moving between steps.
Summary of selections
Let customers check everything they chose before adding the product to the cart. Choose where the summary appears:
- Off – No summary. Customers add the product to the cart from the last step. This is the default.
- Separate step – Adds a Review step after your last step. It shows a summary of all selections, the total price, and the Add to cart button.
- At the end of the last step – No extra step. The summary appears on your last step, below its options and above the Add to cart button.
The preview on the right switches to show how each choice looks.
👉 Tip: A detailed preview mode is available, so you can instantly see how your changes affect the step flow. Summary texts (step title, summary title, button labels) are edited in the step list, not in this popup — see Step 5 below.
Step 3: Create Steps
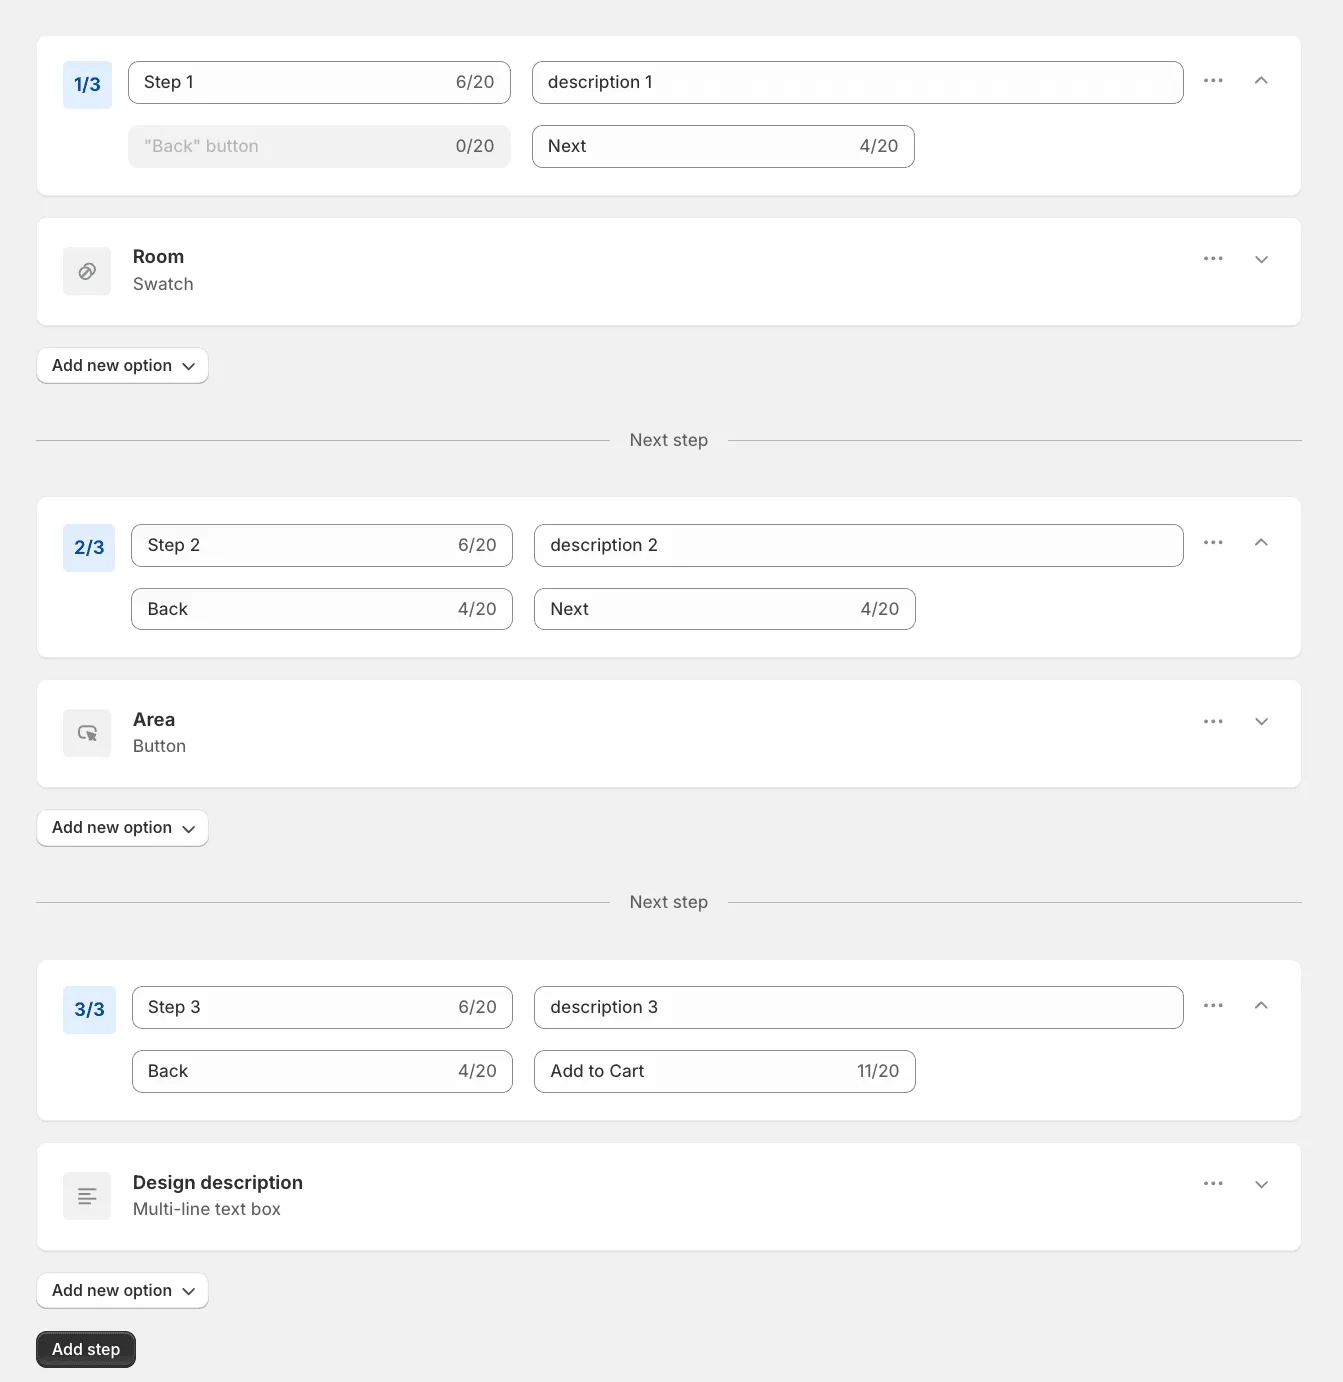
Section titled “Step 3: Create Steps”After configuring the general settings, you can begin creating the actual steps:
-
Add a Step title and (optionally) a Step description.
-
Adjust button labels:
- The Back button label is editable (except on the first step, where it’s disabled).
- The Next button label appears for all but the last step.
- On the final step, you can customize the Add to Cart button label. If the summary is set to Separate step, your last step shows a Next button instead, and the Add to Cart button moves to the Review step.
-
Add the required options for this step (in the same way you normally add options — see Create an option set for details).
Step 4: Add Additional Steps
Section titled “Step 4: Add Additional Steps”- Click Add step to create your second step.
- Repeat the process by giving the step a title/description, adjusting button labels, and adding the relevant options.
- Continue adding as many steps as needed.
That’s it! With Multi-step mode, your customers will move smoothly through a clear, organized selection process, no matter how many options you have.
Step 5: Add a summary of selections (optional)
Section titled “Step 5: Add a summary of selections (optional)”A summary helps customers double-check their choices before buying. It lists everything they selected, grouped by step, shows prices for options that cost extra, and the total price. Each step in the summary has an Edit link that takes the customer back to that step.
First, choose where the summary appears: click the gear (cog) icon → Summary of selections (see Step 2). Then set up the texts in the step list.
| Setting | What customers see | Where you edit the texts |
|---|---|---|
| Off | No summary. The last step has the Add to cart button. | — |
| Separate step | An extra Review step after your last step, with the summary and the Add to cart button. | The Review card at the end of the step list |
| At the end of the last step | No extra step. The summary appears on the last step, below its options. | The card of your last step |
Option A: Separate step
Section titled “Option A: Separate step”Customers go through your steps and then see a final Review step with the summary. The Review step also appears on the progress bar.
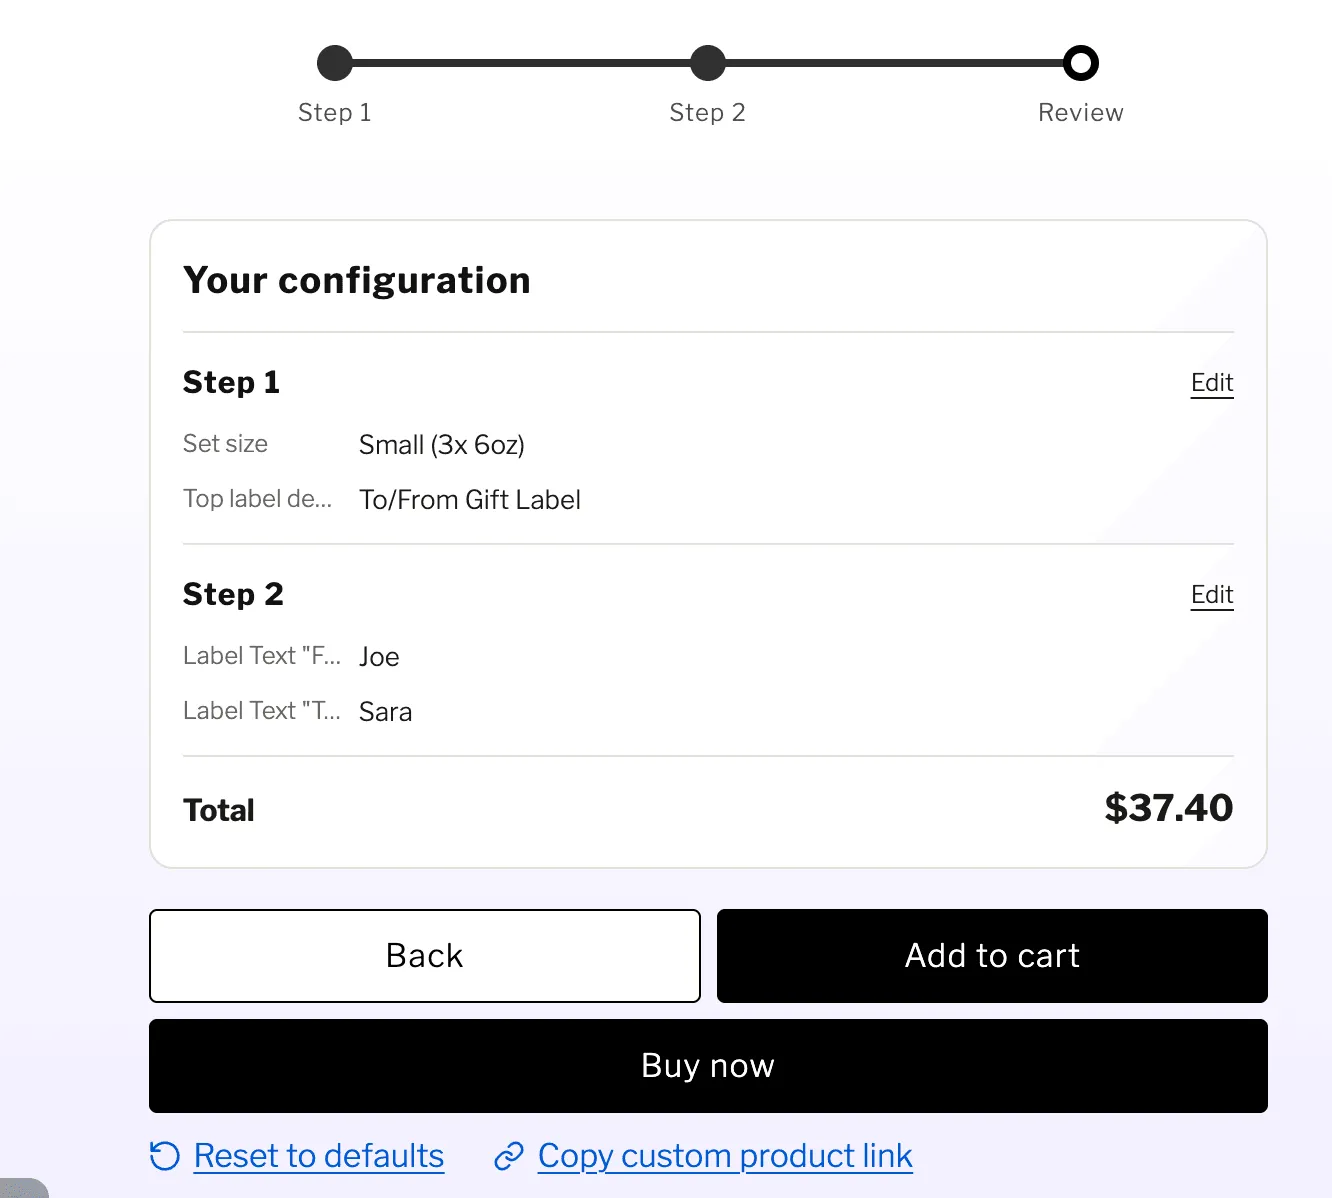
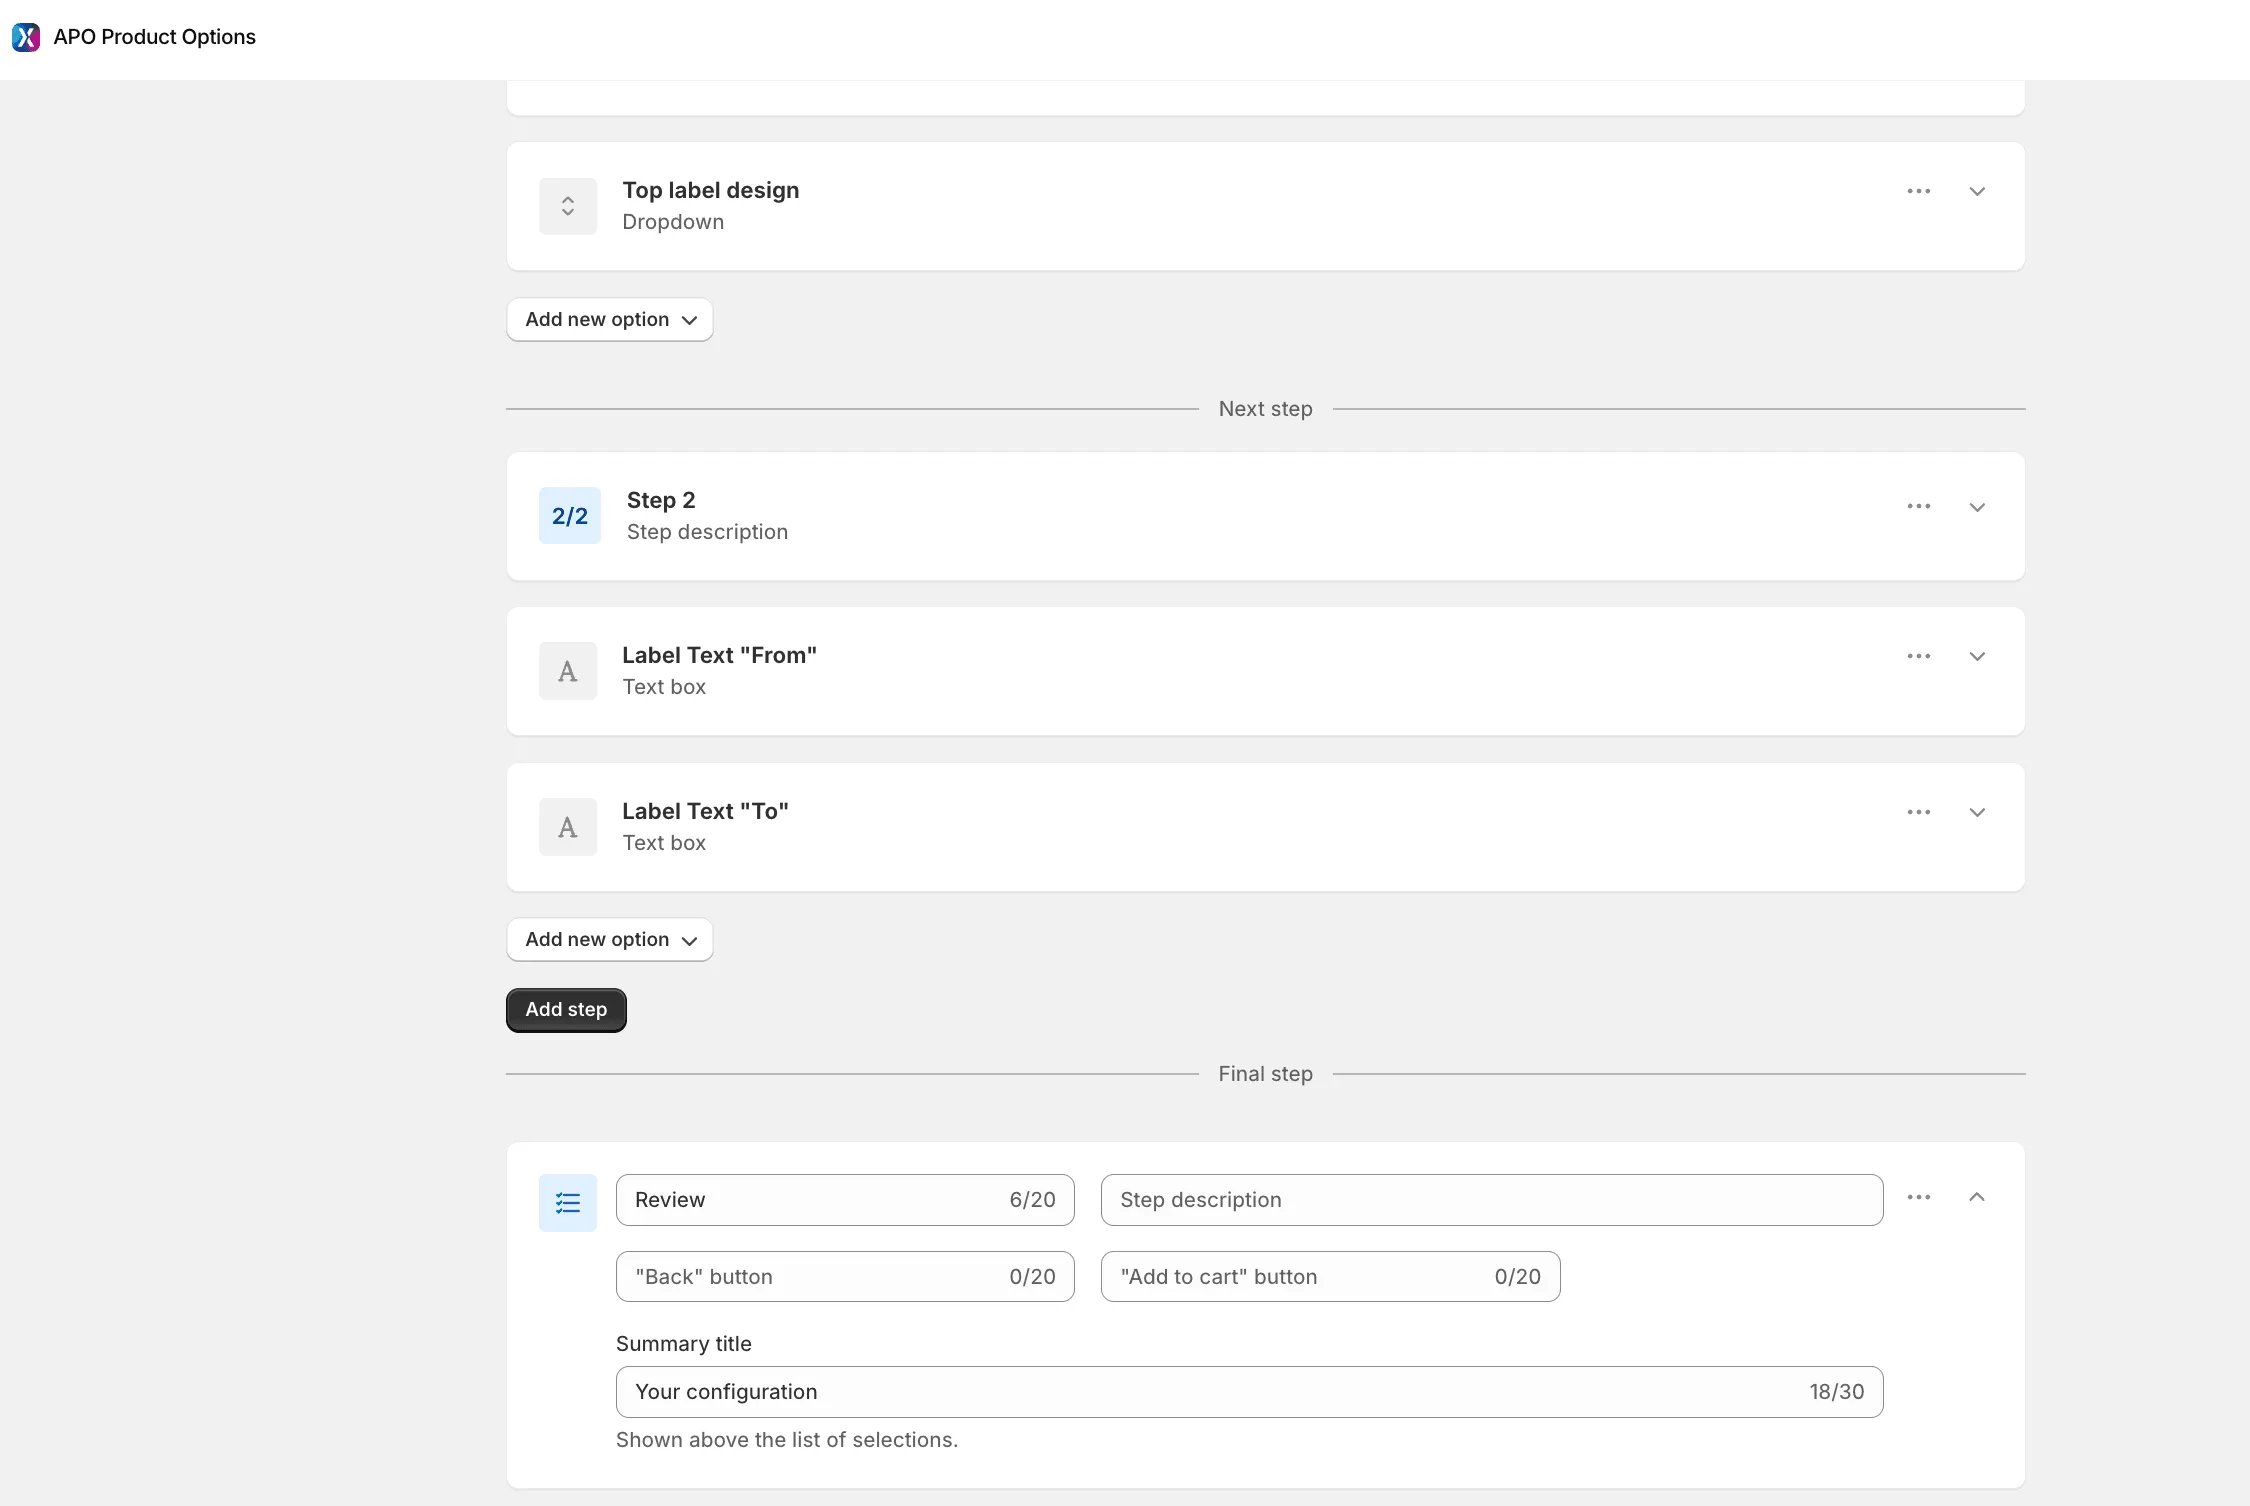
In the step list, a Review card is added automatically after your last step. Expand it to edit:
- Step title – shown on the progress bar and as the step heading (default: “Review”).
- Step description – optional.
- “Back” button and “Add to cart” button labels.
- Summary title – the heading above the list of selections (default: “Your configuration”).
The Review step always stays last. You can’t add options to it, move it, or duplicate it. In its ⋯ menu you can:
- Translate – translate the Review step texts into your store languages.
- Turn off review step – removes the Review step (the same as choosing Off in the gear settings). Your texts and translations are kept if you turn it on again.
Option B: At the end of the last step
Section titled “Option B: At the end of the last step”No extra step is added. The summary appears on your last step, below its options and above the Add to cart button.
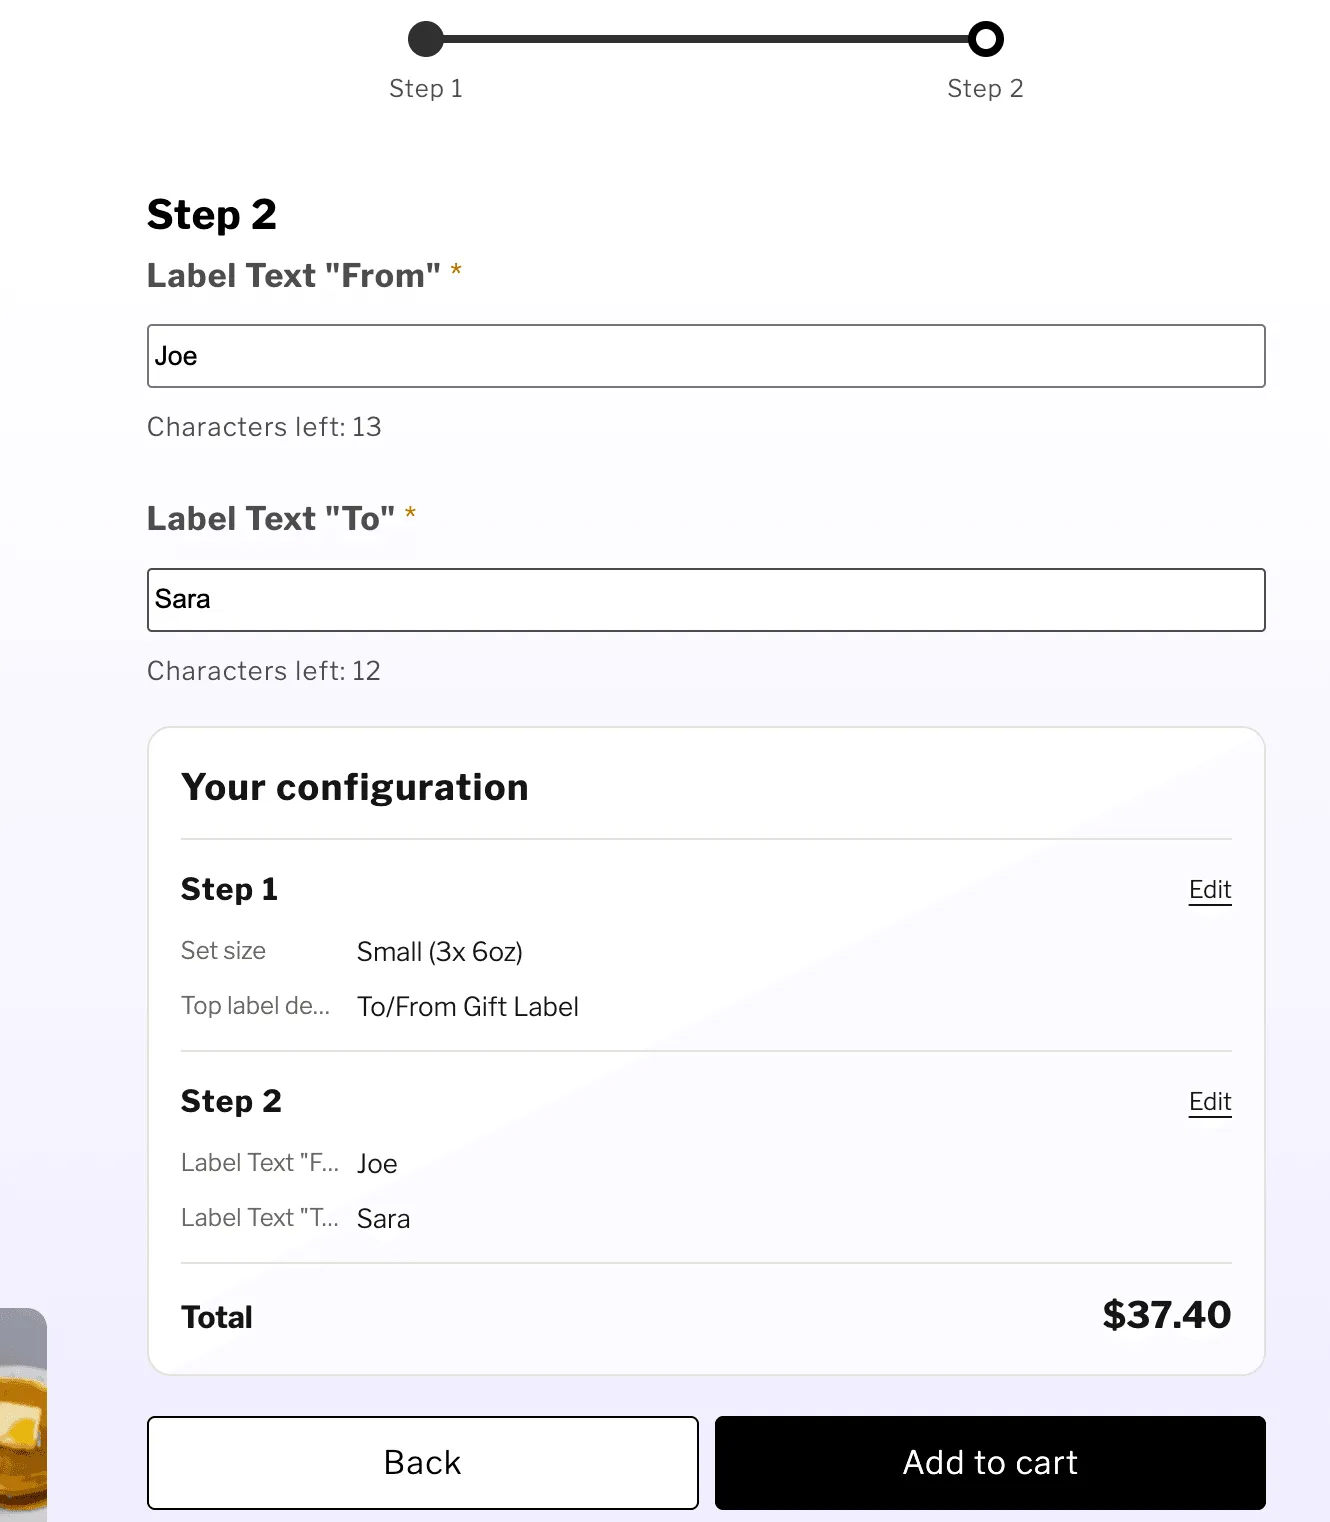
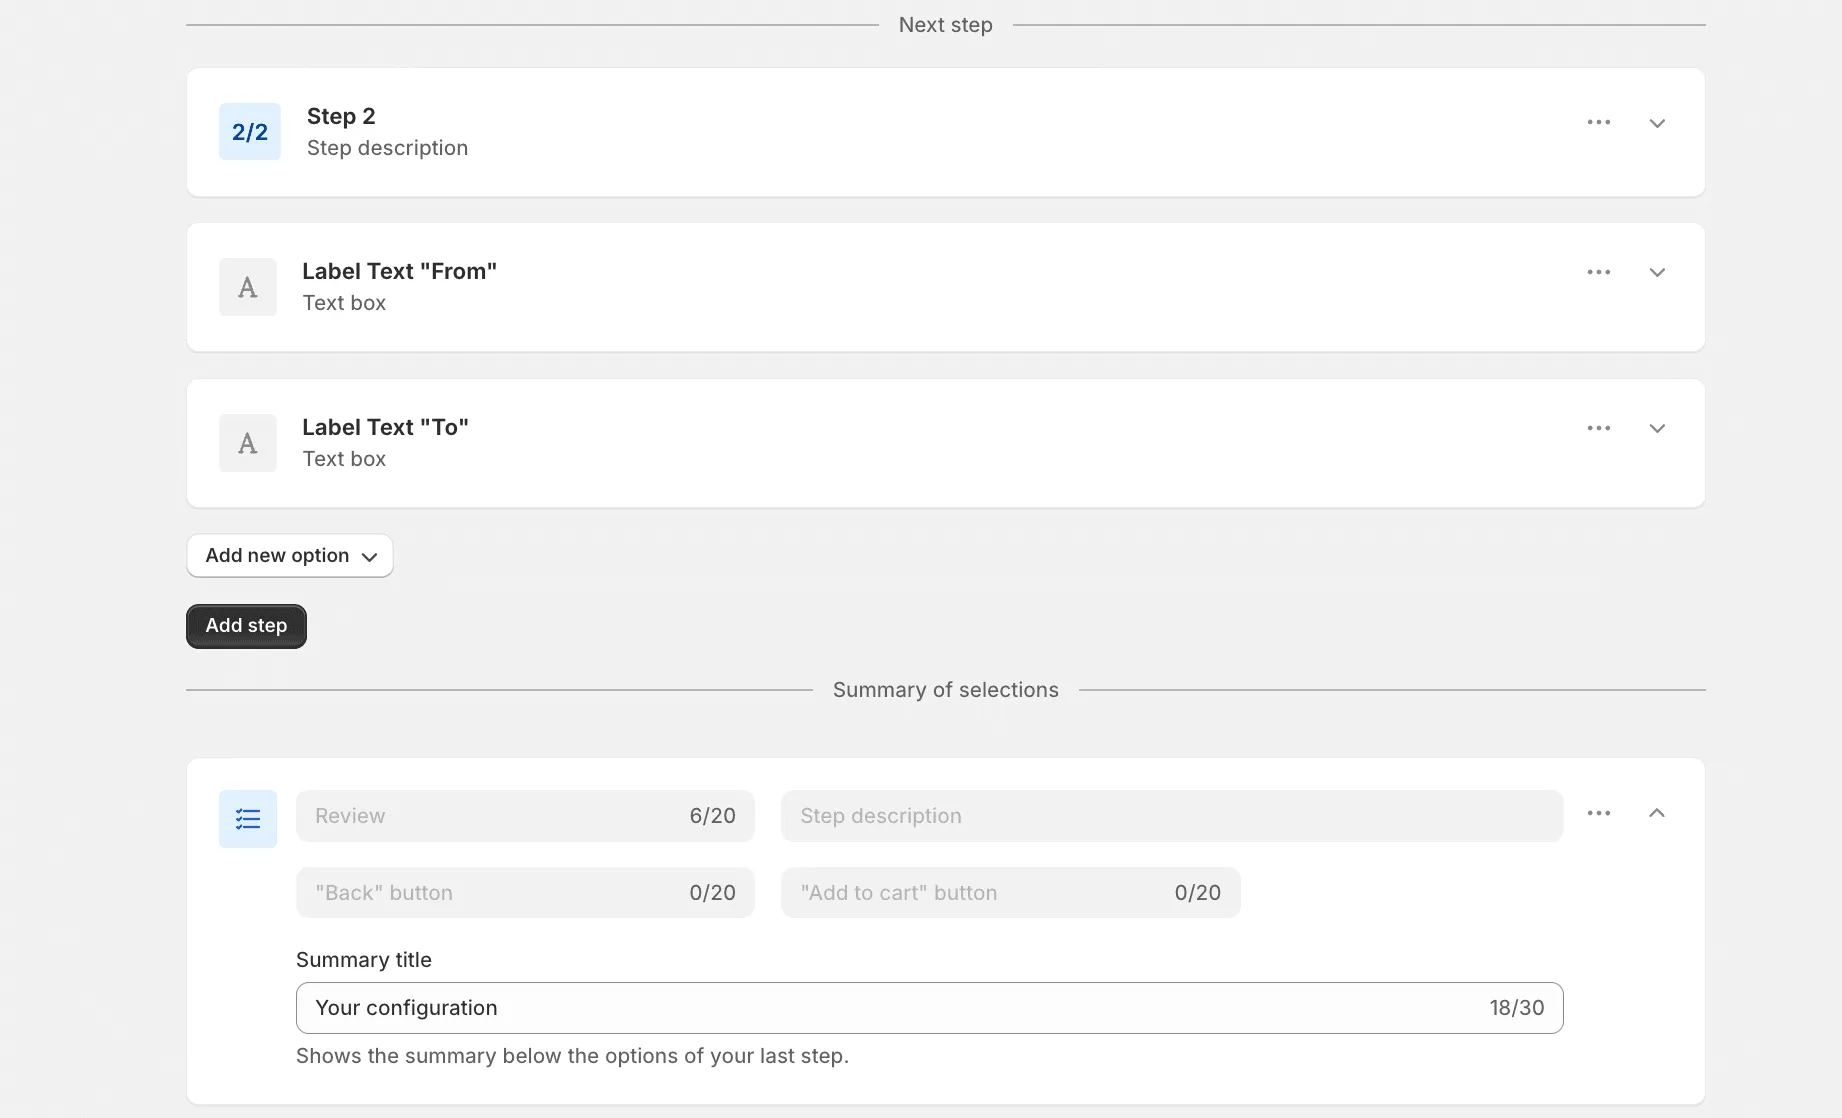
To change the summary heading, edit “Selection summary” in the step list and edit the Summary title field (default: “Your configuration”). To translate it, use ⋯ → Translate on the same step.
What the summary shows
Section titled “What the summary shows”- Step names and, under each step, the option names with the selected values.
- Color and image swatches with a small preview.
- Multi-select options with every selected value on its own line.
- Text options with the customer’s text (long text is shortened).
- File uploads with the file name.
- The price next to values that cost extra. Free values show no price.
- The total price at the bottom.
Step 6: Reorder steps and options
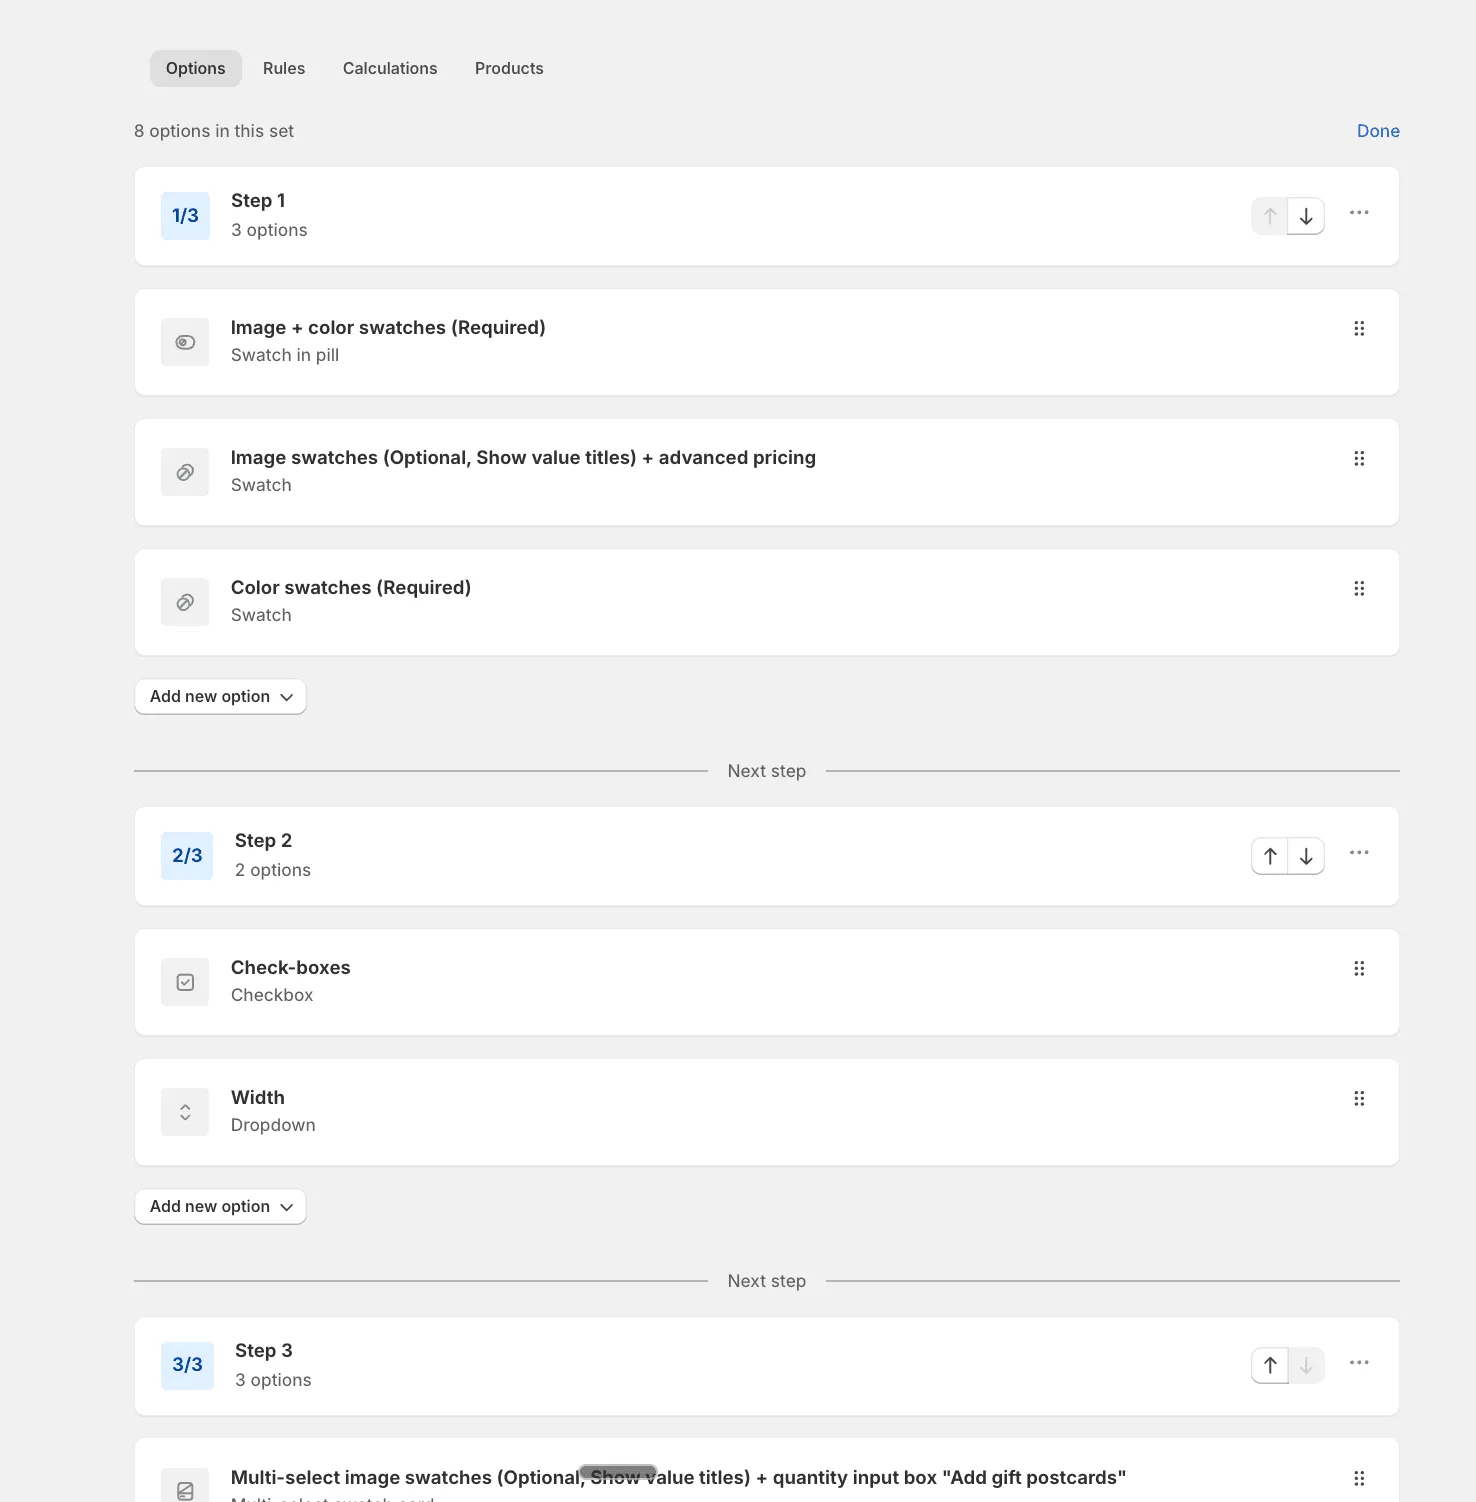
Section titled “Step 6: Reorder steps and options”Built your flow and realised one step belongs earlier? You don’t need to delete anything or start over - steps can be moved at any time.
- Open the Option Set and click Rearrange.
- Use the ↑ / ↓ arrows on a step row to move it one position up or down. The step moves together with all of its options.
- To move an option, drag it by the handle on the left. You can reorder options inside a step or drag one into a different step.
- Click Done, then Save.
The Review step (if enabled) always stays last and can’t be moved.