
Advanced Product OptionsUsing the app
Add options to products using option sets
After you’ve created an option set you need to assign it to product(s) so that options start showing up on the front end.
Steps:
-
From the Option sets page choose an option set you want to assign.
-
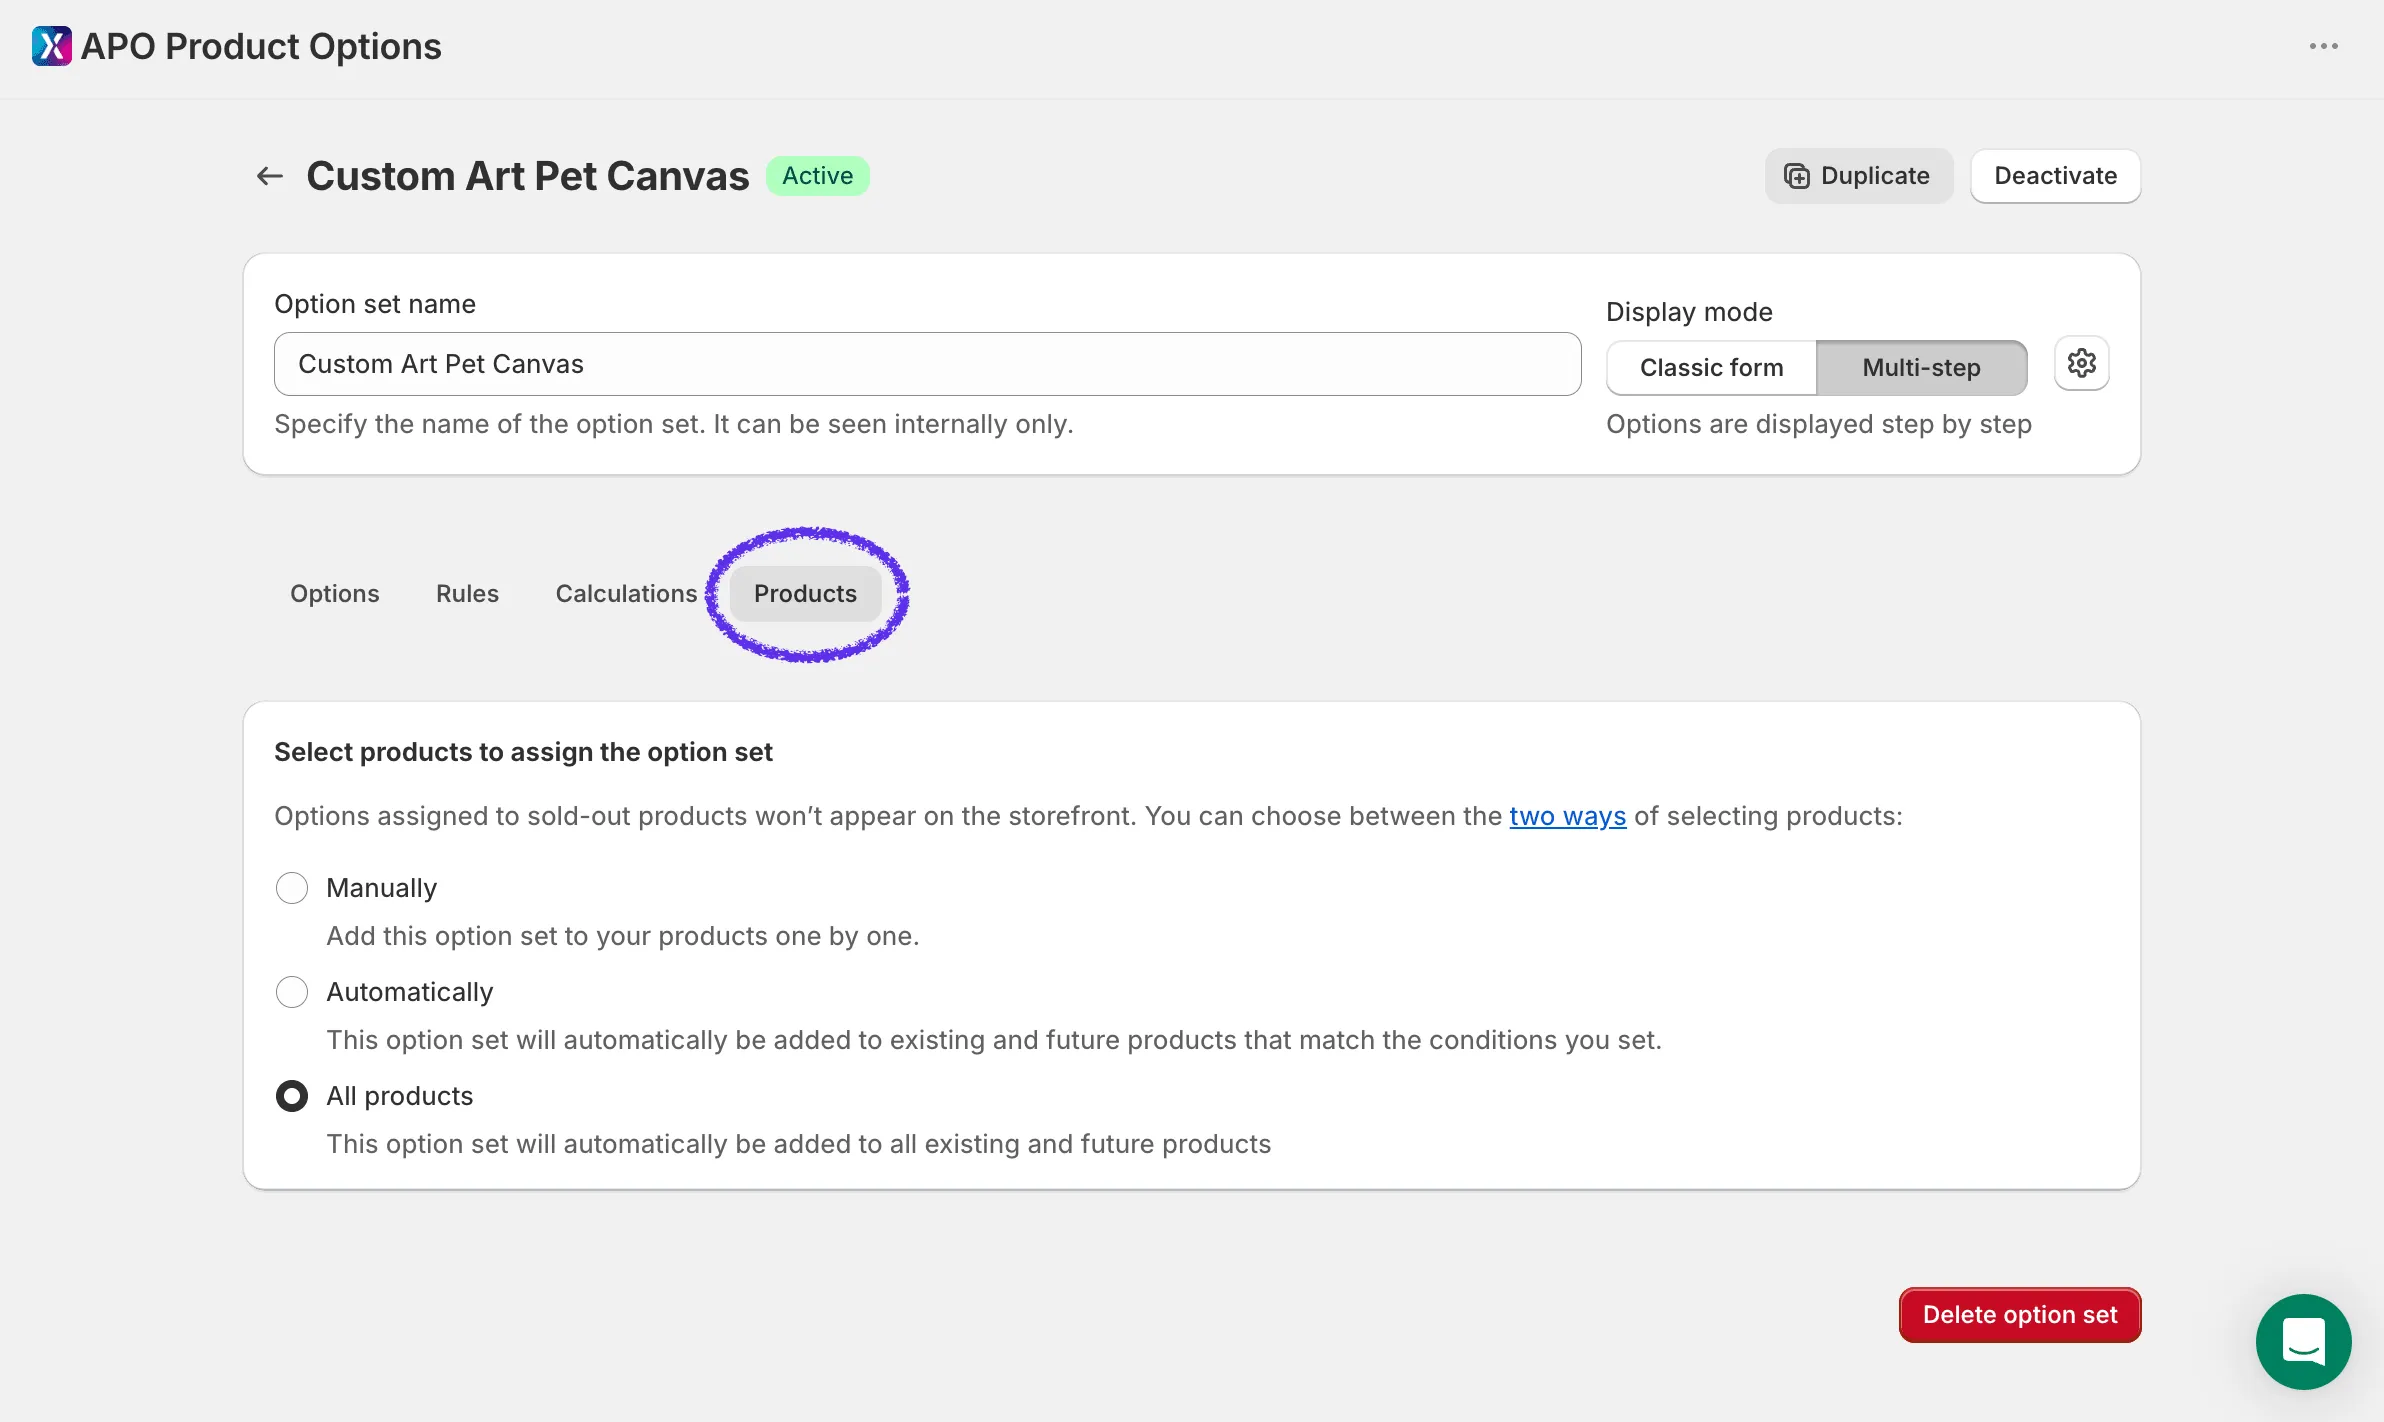
Within that option set, click on the Products tab.
-
Now you need to choose one of three ways of selecting products:
-
Manually - you select the needed products one by one manually or select all the
products from the list to assign this option set in bulk. -
Automatically - in that case, you can add a condition by which to select products. In
this case, both existing products and products added in the future will
be assigned with this option set automatically if the condition is met.
Currently, the condition could be based on three attributes:- Product Type
- Vendor
- Product tag
-
All products - assign the option set to your entire product catalog with a single click.
When this option is selected:
- The option set is assigned to all existing products
- Newly created products automatically inherit the option set
- No manual assignment or conditions are required
This assignment method is ideal for store-wide options such as gift wrapping, warranties, file uploads, personalization fields, terms and conditions, or rush processing options.
-
Manually
Section titled “Manually”Tick the products you need in the list, one by one. To assign the option set to every product in the list at once, use the checkbox at the top of the list.
Two tabs above the list help you check your work:
- All — your whole catalog.
- Assigned — only the products this option set is assigned to.
Automatically
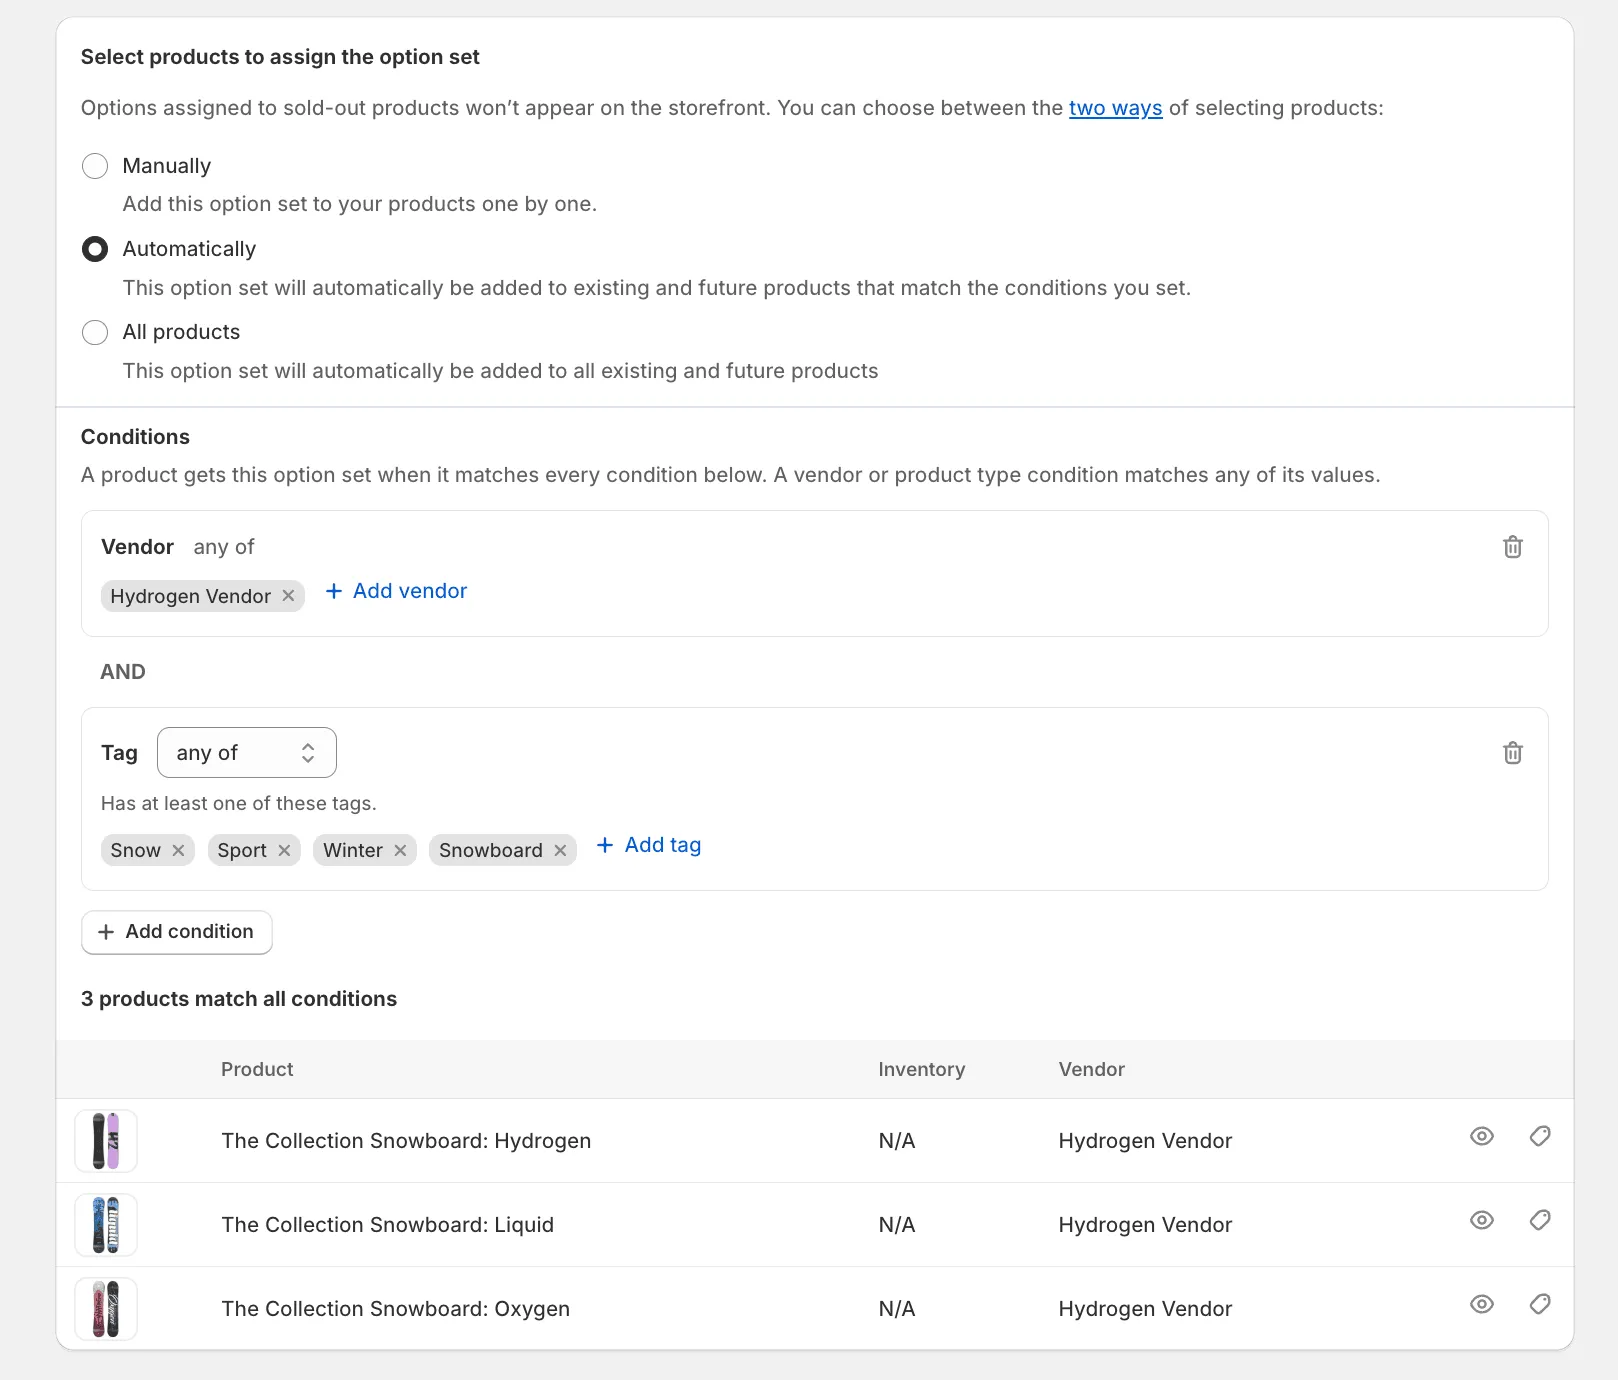
Section titled “Automatically”Choose this when the products that need the options have something in common — the same vendor, product type or tag. The option set is added to every existing product that matches, and to new products as soon as they match. You don’t need to come back and assign them.
Add conditions
Section titled “Add conditions”- Select Automatically.
- Click Add condition and choose a field: Vendor, Product type or Tag.
- Pick one or more values. The list shows the vendors, product types and tags that exist in your store, with the number of products for each.
- To narrow the selection further, click Add condition again and choose another field.
Each field can be used once. To add more vendors, add them to the Vendor condition you already have instead of creating a second one.
Below the conditions you’ll see how many products match and which ones. This list is exactly the set of products that will get the options. If nothing matches, you’ll see No products found — remove a condition or change its values.
How conditions are combined
Section titled “How conditions are combined”- Several values in one condition — a product needs to match any one of them.
- Several conditions — a product needs to match every condition.
A few examples:
| Conditions | Reads as | Which products get the options |
|---|---|---|
| Vendor: Bosch, Daikin | Vendor is Bosch or Daikin | All Bosch products and all Daikin products |
| Vendor: Bosch, Daikin<br>Tag: Ducted | Vendor is Bosch or Daikin, and the product is tagged Ducted | Bosch and Daikin products tagged Ducted. A Bosch product without the tag doesn’t get the options, and neither does a Toshiba product with the tag. |
| Product type: Snowboard<br>Tag (any of): Premium, Sale | Type is Snowboard, and the product is tagged Premium or Sale | Snowboards that have at least one of the two tags |
| Product type: Snowboard<br>Tag (all of): Premium, Sale | Type is Snowboard, and the product is tagged Premium and Sale | Only snowboards that have both tags |
“Any of” and “all of”
Section titled ““Any of” and “all of””Each condition shows how its values are combined.
-
Vendor and Product type always use any of. A product has only one vendor and one product type, so it can never match two vendors at the same time — “all of Bosch and Daikin” would select no products at all.
-
Tag lets you choose between any of and all of, because a product can have many tags:
- any of — the product has at least one of the selected tags.
- all of — the product has every selected tag.
any of is the default for tags. Switch to all of only when a product must carry all the tags at once to get the options.
All products
Section titled “All products”Assign the option set to your entire product catalog with a single click.
When this option is selected:
- The option set is assigned to all existing products.
- Newly created products automatically get the option set.
- No manual selection or conditions are needed.
This works well for store-wide options such as gift wrapping, warranties, file uploads, personalization fields, terms and conditions, or rush processing.