Advanced Product OptionsGetting started
Configuring app’s settings
The Settings section consists of six tabs: General, Design, Translations, CSS Selectors, Import & Export, and Backups. The Import & Export and Backups tabs are available only on the Growth plan.
General
Section titled “General”Themes
Section titled “Themes”In that section, you can activate the app on any theme installed at your store. You just need to select the target theme and save the changes on the theme editor page you’ll be redirected to. Please note that this is a required step to make the app function.
Creating product variants
Section titled “Creating product variants”When a shopper selects options and adds a product to the cart, the app can apply those options using one of three methods. Each method offers different compatibility and feature support.
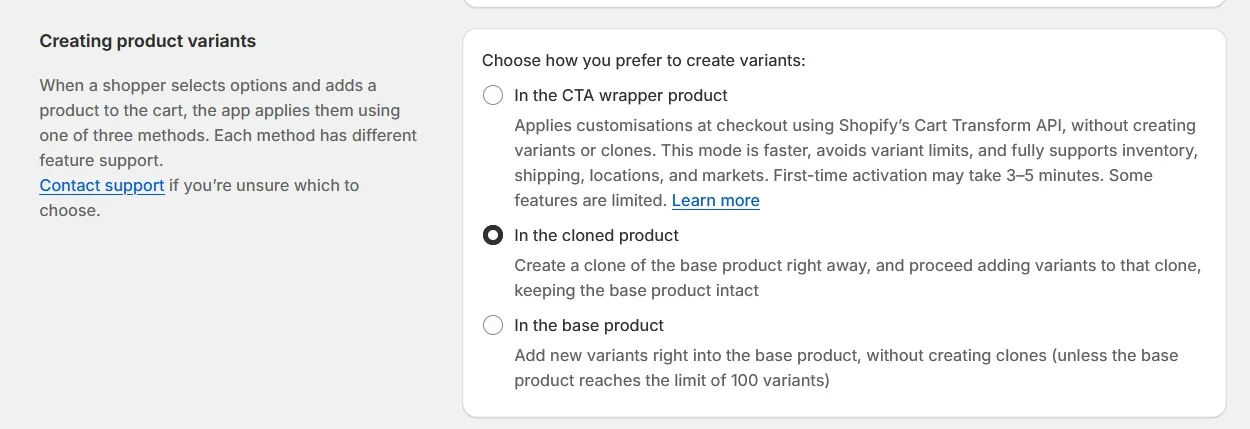
- If CTA wrapper product is selected, the app applies customizations at checkout using Shopify’s Cart Transform API. This method does not create product variants or cloned products. It is typically faster, avoids Shopify variant limits, and provides strong compatibility with Shopify-native features such as inventory, shipping, locations, and markets. Please note some features may be limited. Learn more here: CTA app mode
- If Cloned product is selected, the app creates a copy of the product under the
mws_apo_generatedproduct type and generates the required custom variants inside that clone. These cloned products are used only for storing generated variants and should not appear on the storefront, so you can keep them unlisted. - If Base product is selected, the generated custom variants are stored inside the original product. This mode is usually preferred when you want to combine APO options with existing Shopify variants. However, if a product has no native Shopify variants (for example, it only has the hidden “Default Title” variant), the app must generate a clone to function correctly. Also note that this mode may not be suitable for stores that rely on the Google sales channel and Google Ads, due to how product variants are synchronized.
Cart & order behavior
Section titled “Cart & order behavior”This section includes additional settings that control how the app behaves on the storefront and in the cart/checkout.
Use “Buy now” button - enable this setting if your product pages use express checkout buttons (for example, Shop Pay, PayPal, Apple Pay, or Google Pay). These buttons are not compatible with the app, so this option replaces them with Shopify’s native Buy Now button only on products with options.
Multi-currency support - enable to automatically convert option prices when the store currency changes.
Enable inventory tracking - enable to track inventory for the original product. Please note that inventory is not tracked per individual option.
Full SKU display - displays the full SKU for the currently selected product configuration on the storefront.
Storefront behavior
Section titled “Storefront behavior”This section includes advanced storefront features. Currently, it contains only one setting, Custom product sharing, which allows customers to share configured products via a link.
Formats
Section titled “Formats”In this section, you can adjust how certain app elements are displayed on your storefront.
You can choose the date and currency format, and enable a date picker on mobile devices for your customers.
Design
Section titled “Design”The Design tab is divided into three main sections: Customizer, Options & options’ values, and CSS usage.
Customizer
Section titled “Customizer”In this section, you can adjust the storefront appearance of option types such as Swatch, Wide image card, Tile, Modal, and Dropdown.
The Design version setting applies to legacy setups. If your current value is Base or Version 2 and you would like to switch to Version 3, please contact our support team. Each newer version unlocks additional settings in the app, so we recommend upgrading when possible.
Options & options’ values
Section titled “Options & options’ values”This section controls how Help text (descriptions) is displayed for options and option values:
- Tooltip — the description is hidden behind a question mark icon and appears on hover.
- Text — the help text is displayed directly under the option title.
Please note that this is a global setting. You cannot apply different description display modes for different option sets or individual options.
CSS usage
Section titled “CSS usage”This section is used for visual customization via CSS. Here you can add custom CSS classes that will be added to your store theme, and then assign those classes to specific options to control how they appear on the storefront.
\
Translations
Section titled “Translations”Here you can change the text on the buttons, labels, and other elements that the app adds to your store. This might be useful if your store is not in English, or if it’s in English but you just want to phrase something differently.
Before you start translating, make sure you have selected the correct language. By default, you will be editing the English labels.
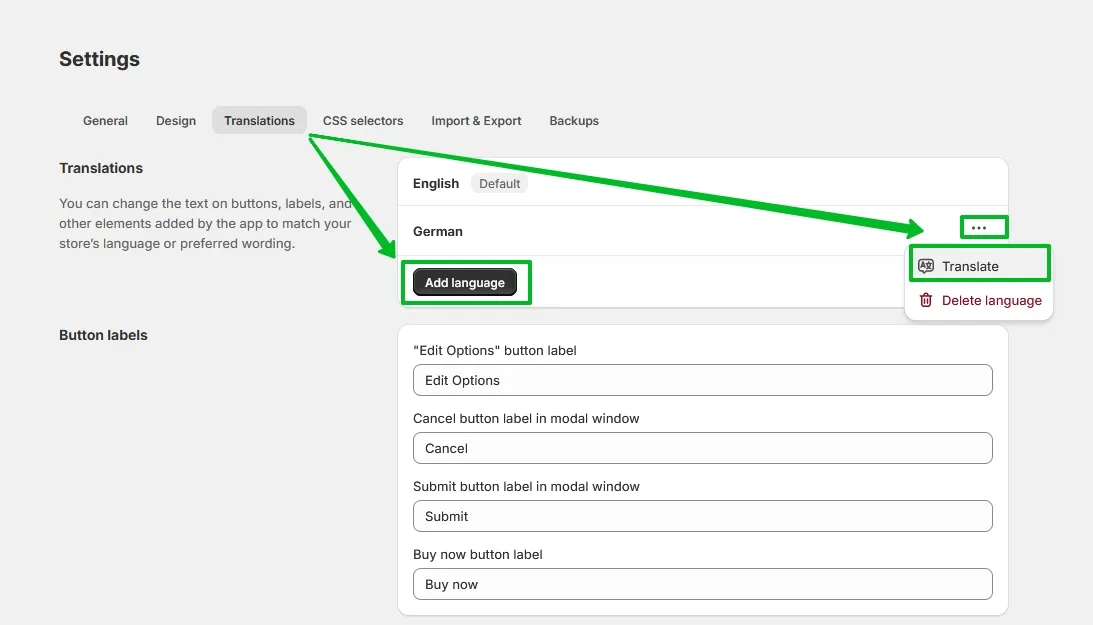
You can learn more in our dedicated translations guide: Translations
CSS Selectors
Section titled “CSS Selectors”During installation, the app attempts to insert all necessary code snippets into your theme automatically. Sometimes, if you have a very customized theme, this doesn’t happen and you might need to tell the app where to put those snippets, and also point to some elements of your page, such as product price, Add to cart button, etc.
Configuring settings in this section can get pretty technical. If you need help with this, feel free to contact our support.
Import & Export
Section titled “Import & Export”The Import & Export tab is available on the Growth plan.
This section lets you export, update, and import existing options. Before importing your first option set (especially if you’re uploading a file exported from another app) please review the required format and guidelines here: Import your first option set
Please note that import/export is a more advanced feature. The app will not automatically adapt to any file format - you must use the supported template/structure exactly as specified.
If you need to transfer your setup from one store to another, we recommend using Backups instead. Import & Export does not include rules, and you would also have to manually remove option IDs (IDs are unique per store), which Backups avoids.
Backups
Section titled “Backups”The Backups tab is available on the Growth plan.
Its main purpose is to help you transfer your APO configuration from one Shopify store to another.
When you click Create backup, the app generates a download link for a ZIP file. This link is shown in the app and is also sent to the store’s email address as an extra precaution. The backup ZIP file is intended only for restoring within APO and should not be edited, as changes may corrupt the file.
When you restore a backup, the app creates new configurations and does not overwrite your existing option sets or settings.
Please note that backup download links are available for 24 hours. This does not mean the backup file “expires”, it only means you need to download the ZIP within 24 hours before the link becomes inactive.
Backups can also be useful before making major changes to your option sets. If you want a safe rollback point, create a backup first and then proceed with editing.
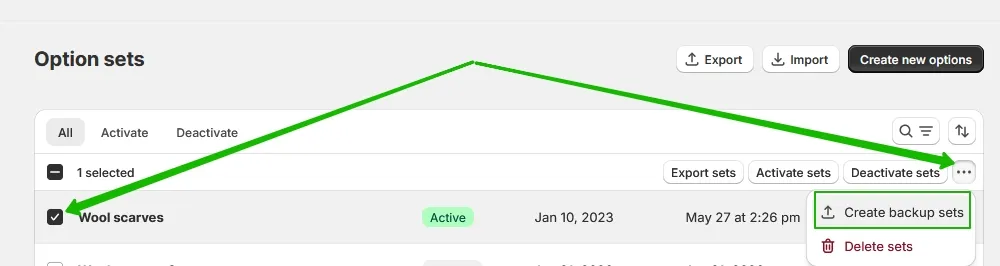
You can back up not only all option sets at once, but also specific sets. To do this, go to Option sets, select the sets you need, click the three dots menu, and choose Create backup sets.