The process of transferring a Magento 2-based site from one local host to another one is not a time-consuming process. However, it has a number of nitty-gritty details & special aspects that should be taken into consideration before plunging into the process.
In this blog post, we will make transferring a Magento 2 site from localhost to server as easy as Lego. Let’s have an insight.
Table of Contents
Main Steps
To begin with, let’s take a look at the main steps of transferring:
- Magento 2 site sanity check on the current host (A);
- Getting the remote host ready (B);
- Remote host check (B);
- Getting data ready for transfer; 4.1. File dump; 4.2. Database dump;
- Data transfer;
- Data unpacking; 6.1. Files unpacking; 6.2. Import of databases;
- Access data correction on the remote host (B);
- Correction of access permissions to files and directories;
- Standard procedures before launching Magento;
- Magento performance checks on the remote host (B);
- Solution of frequent issues.
Easy as Lego: Step-by-Step Guidelines
1. Magento 2 site sanity check on the current host
All is easy here: run and check. Usually, an order (full cycle) should be created for such purposes. Then check:
- search;
- product pages,
- categories,
- customer’s account.
This is an important stage as it allows you to steer clear from wrestling with questions regarding when exactly something has stopped operating after moving to a new host. Also, this will save you from the necessity to deal with the basic host issues that can be resolved in advance (A).
I encourage you NOT to transfer a by halves operating Magento without any urgent need. It is much easier to deal with all issues on the current host (A) before starting the process of transferring. Proved and tested ― this will save you both time and the pain in the neck.
2. Getting the remote host (B) ready
The server, on which the Magento copy is deployed, must meet the minimum requirements for your Magento version.
Study the official documentation to find out more about those requirements: https://devdocs.magento.com/guides/v2.3/install-gde/system-requirements-tech.html
The environment must be set up before proceeding to the next steps of the transferring process (web-server with a virtual host, PHP, database).
Unfortunately, the configuration of each separate part is beyond the pale of this article. However, you can easily find the required additional information on the web. So, it should be of no difficulty.
I recommend paying special attention to the presence of the required PHP extensions.
Should you have any questions on any step of this tutorial, please leave a comment. I’ll do my best to answer all of them.
3. Remote host check (B)
Before transferring Magento, make sure it works on the new host and the host itself operates properly. First, check that the web-server responds at the stated address (we assume that the host has been already configured).
In my example, I use the standard path that is available right after Apache2 on the Linux server was installed:
> /var/www/html
sudo -u apache echo "<?php phpinfo();?>" > /var/www/html/index.php*Here and further, the commands will be run from the corresponding users if required. If the command is run without a username, then command execution should be meant as from the current user and the availability of any corresponding permissions.
If no errors appear after running this command, then it all went well and your file `index.php` must be available at the following address: {host}/index.php. The result in your browser should look about like this (though much still depends on your PHP version):
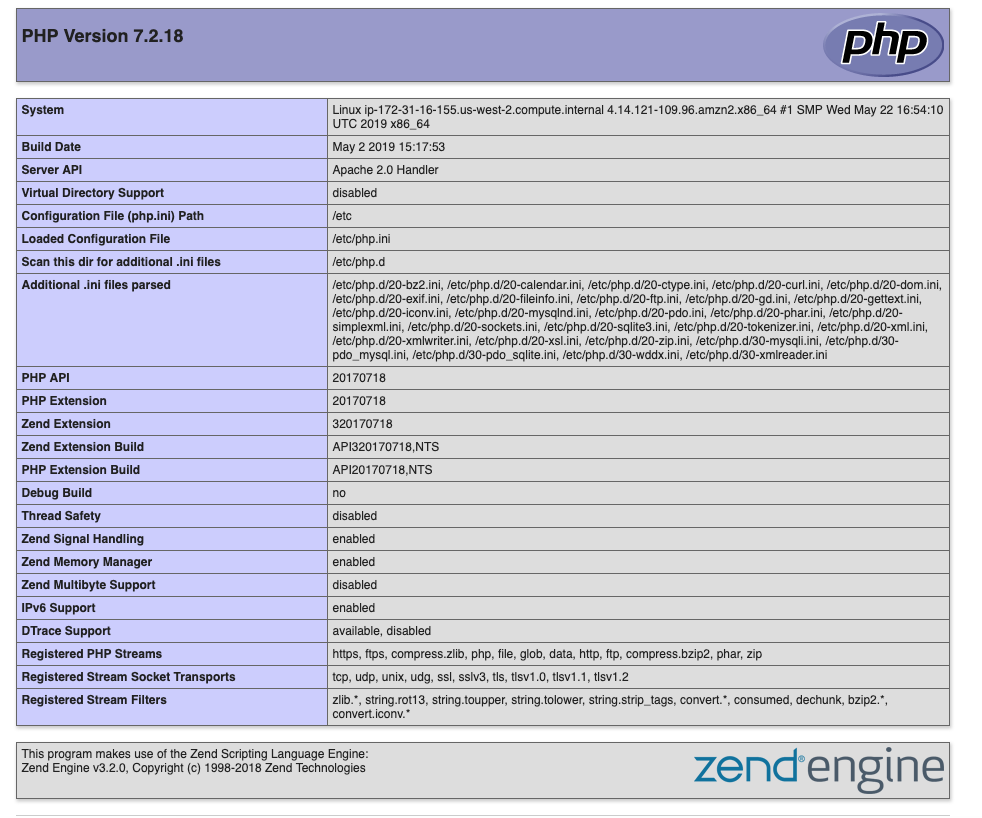
If something went wrong and you do not see info about your PHP version, please address a corresponding guide on the configuration of a web-server you need.
Also, I recommend studying the logs in advance ― this will save a bunch of your time.
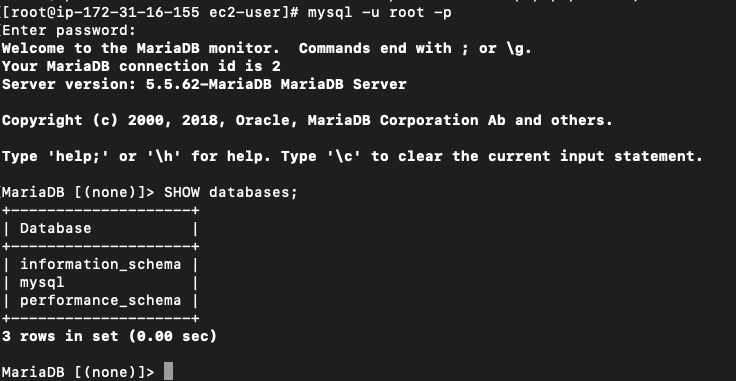
Next, check that the database service has been launched and operates properly:
mysql -u root -pAs a result, you should successfully connect to MySQL. Use the `exit` command to exit.
* Enter login and password you used when setting up MySQL.
Further, after connecting to MySQL successfully, you’d need to check the existing databases.
SHOW databases;Names of the databases that you are planning to transfer must not be the same as the ones that already exist on the new server. In case there are similar databases, this problem should be solved manually by deleting an existing but not used database, for instance, or by renaming a Magento database you intend to transfer. Note that you must necessarily enter the changed name in the configuration file of the Magento environment `app/etc/env.php`.
Your result should look about as follows:
Also, you’d need to check that the service itself has been launched and listens to the standard port using the netstat utility:
netstat -vulntp | grep -i mysqlYour result will look about as follows:
> tcp 0 0 0.0.0.0:3306 0.0.0.0:* LISTEN 3366/mysqld4. Getting data ready for transfer
4.1. File dump
Before creating a file dump, I strongly encourage you to take all unnecessary files away from the Magento directory, if there are ones, i.e., old dumps, cache, logs, etc.
rm -rf var/cache/* var/page_cache/* var/generation/* var/composer_home/cache/* var/log/* pub/static/*This will allow you to shorten the process. Besides saving you from transferring unnecessary files, you will avoid using server space without any particular need.
*Do NOT forcibly delete `.htaccess` and other hidden files, if you use Apache2 web-server (the `rf` command doesn’t delete them by default). These files are required for correct Magento operation.
Now, go to the directory where our Magento is in the local server (A). In my example, it is:
> /Users/sergei/PhpstormProjectsThe directory with Magento is named under aws-botapi.
Let’s create an archive for its further transfer to the remote host (B):
tar -zcf aws-botapi.tar.gz aws-botapiYou should check that the archive has been created:
ls -la aws-botapi.tar.gz4.2. Databases dump
If there are several separate databases that are arranged locally on your Magento site, then all of them must be transferred. In my example, two databases are used. You can find them in the configurations of the Magento environment `app/etc/env.php` in the `db => connection => ` section.

Now, dump all the databases:
mysqldump -u root -p db1 | gzip > ./db1.sql.gz
mysqldump -u root -p db2 | gzip > ./db2.sql.gz
*Use such info as database username and database name.
5. Data transfer
Transfer Magento files dump using the `scp` utility (copying via ssh) or use any other means at your convenience (for example, copying via `ftp`):
scp -i ~/.ssh/myprivatekey.pem aws-botapi.tar.gz [email protected]:/home/ec2-userWhere,
a) -i ~/.ssh/myprivatekey.pem is the path to the private key for connection (ignore this if you use solely password);
b) ec2-user is the username for connection;
c) 52.12.187.98 is the server address;
d) /home/ec2-user is the absolute path on the server, to where we copy the files.
*If you use a port that is different from the standard one, do not forget to identify it using a separate parameter (for example, `-P 6000` for 6000 port).
After copying is completed, you will see a line of the kind:
> aws-botapi.tar.gz 100% 312MB 4.3MB/s 01:11 Repeat the same actions for files dump:
scp -i ~/.ssh/myprivatekey.pem db1.sql.gz [email protected]:/home/ec2-user
scp -i ~/.ssh/myprivatekey.pem db2.sql.gz [email protected]:/home/ec2-user
6. Data unpacking
6.1. Files unpacking
On the server (B), let’s navigate to the directory, which we copied the archives to. Let’s unpack the Magento files to the directory of the local host:
> tar -zxf aws-botapi.tar.gz -C /var/www/html/Make sure to check that the files have been unpacked correctly:
ls -la /var/www/htmlIf the Magento files have been unpacked to the sub-directory, transfer them using either `mv` or `cp` commands.
6.2. Import of databases
Connect to MySQL on the server (B):
mysql -u root -pNow, let’s create a new database:
CREATE DATABASE IF NOT EXISTS db1 CHARACTER SET utf8 COLLATE utf8_general_ci;*The result should look about like this:
> Query OK, 1 row affected (0.01 sec)Make the similar actions in case you’ve got other databases.
Then, import databases from the dump:
gunzip < /home/ec2-user/db1.sql.gz | mysql -u root -p db1
gunzip < /home/ec2-user/db2.sql.gz | mysql -u root -p db2
Connect to MySQL:
mysql -u root -pand check that all the databases are present:
SHOW databases;The list of all databases must get available, including ours:
+--------------------+
| Database           |
+--------------------+
| db1                |
| db2                |
| information_schema |
| mysql              |
| performance_schema |
+--------------------+
5 rows in set (0.00 sec)
Select the database we’ve just imported:
USE db1;and check the presence of tables:
SHOW tables;In case the tables have not been created or they are empty, check the dump file itself and repeat the whole process once again except for the step when a new database was created (as it already exists).
7. Access data correction on the remote host (B)
The main data that should be changed in Magento after being transferred is 1) basic URLs and 2) access keys to MySQL:
Changing basic URLs
You will need to change all old paths in the `core_config_data` table. To start with, let’s localize these fields using the ‘value’ query that includes the old address. Let’s suppose that the old website address was ‘1001101010.com’, then the search command will look as follows:
SELECT * FROM core_config_data WHERE `value` LIKE '%1001101010.com%' \G*`\G` at the end of the query instead of `;` will make the records better readable.
** Don’t forget to use `table_prefix` before table names if it was installed.
The result will look about like that:
mysql> SELECT * FROM core_config_data WHERE `value` LIKE '%1001101010.com%' \G
*************************** 1. row ***************************
config_id: 2
    scope: default
 scope_id: 0
     path: web/unsecure/base_url
    value: http://1001101010.com/
*************************** 12. row ***************************
config_id: 2401
    scope: default
 scope_id: 0
     path: web/secure/base_url
    value: https://1001101010.com/
*************************** 13. row ***************************
config_id: 2402
    scope: default
 scope_id: 0
     path: web/secure/base_link_url
    value: https://1001101010.com/
13 rows in set (0.00 sec)
At this point, our goal is to change the old address to a new one. For this purpose, let’s make sure that it should be changed in all lines indeed (it is so most of the time except for some rare cases that involve the configuration of 3rd party modules) and run the following query:
UPDATE `core_config_data`
 SET `value` = replace(value, '1001101010.com', 'mynewdomain.com')
 WHERE `value` LIKE '%1001101010.com%';
It will replace all occurrences of `1001101010.com` lines in the `value` field to the `mynewdomain.com` line.
The result should be about as follows (the number of lines should be equal):
> Query OK, 13 rows affected (0.00 sec)
> Rows matched: 13  Changed: 13  Warnings: 0
The following request:
SELECT * FROM core_config_data WHERE `value` LIKE '%1001101010.com%' \GNow, it’s time to proceed to editing the file of the environment `app/etc/env.php` (from the Magento root; in the example, it was `/var/www/html/`).
Let’s open it in a text editing program (I use Nano though it’s surely the question of personal preferences).
nano /var/www/html/app/etc/env.phpThen edit data in `’db’ => ‘connection’` by specifying the accurate data from the new server in the ‘username’ and ‘password’ fields.
*IMPORTANT! If your database is located on a remote server, there is no need to change data. The only thing you need to do is to make sure there is access from the current server to that remote database. (For example, that it has been added to the firewall whitelist on the database server).
Use the ‘localhost’ value in the ‘host’ field to understand whether the connection is local or not.
Next, save the file.
8. Correction of access permissions to files and directories
In order to accurately set up access permissions, you need to know from which user and with which group your web-server runs.
Most frequently, it is either `apache` for CentOS or `www-data` in Ubuntu. As a rule, the username equals the group name. However, on different servers, this may differ.
The following command will help you figure it out:
ps aux | egrep '(apache|httpd)'
As a result, in the first column, you’ll see username (the group name is likely to be the same. However, if you are unsure, use the `groups apache` command, where `apache` is the username in order to check it out).
The first thing after this, we will need to transfer all files and directories inside Magento to the web-server user (it is `apache` in the example. For the `www-data` user simply replace `apache:apache` to `www-data:www-data`, and similarly for others):
sudo chown -R apache:apache /var/www/htmlNext, check whether the changes have been applied or not:
ls -la /var/www/htmlAll files and directories (except for the parent one marked as `..` must have a user and the `apache` group (if `www-data` is a web-server user in your system, then it should be marked as an owner):
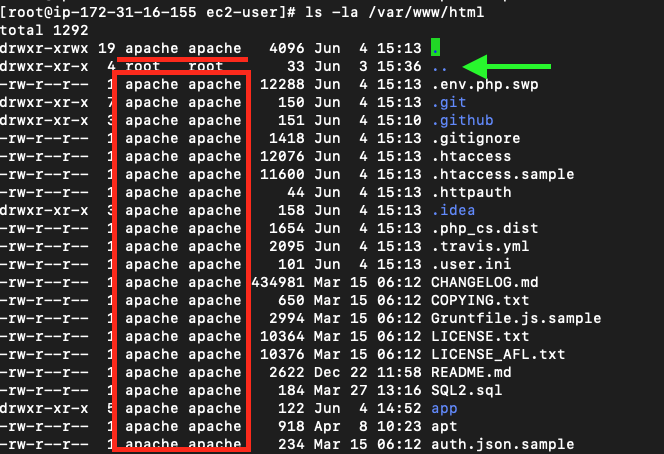
Now, it is required to accurately set up access permissions to the Magento files and directories. According to the documentation, the following setup is highly recommended:
*All commands must be run from root Magento!, consistently 1 after 1. In the example, the Magento root on the server is `/var/www/html`.
Use the `pwd` command to check the current location.
find var generated vendor pub/static pub/media app/etc -type f -exec chmod u+w {} +
find var generated vendor pub/static pub/media app/etc -type d -exec chmod u+w {} +
chmod u+x bin/magento
*If the current user lacks permissions to run these commands, use the user’s `root ` ( `sudo` command, like `sudo find …`)
9. Standard procedures before launching Magento
It is time to check that Magento launches from the command line. To begin with, let’s test the standard output of the commands you’ve got access to:
*Now, after setting up permissions, any access to Magento will be made from the same web-server user that generates files, cache files, statics, etc. If you ignore this, Magento may stop running and you will be forced to restore permissions once again (the previous step in these guidelines).
**For accurate operation, you’ll need to find the right php interpreter on your server. Usually, ` php` alias refers to the up-to-date version. However, you’ll often need to indicate the full path, such as `/usr/bin/php72` for example.
***Here and further, all Magento commands will run from the Magento root directory on the server (B).
sudo -u apache php bin/magento listThis will make the list with the commands available in the commands line:
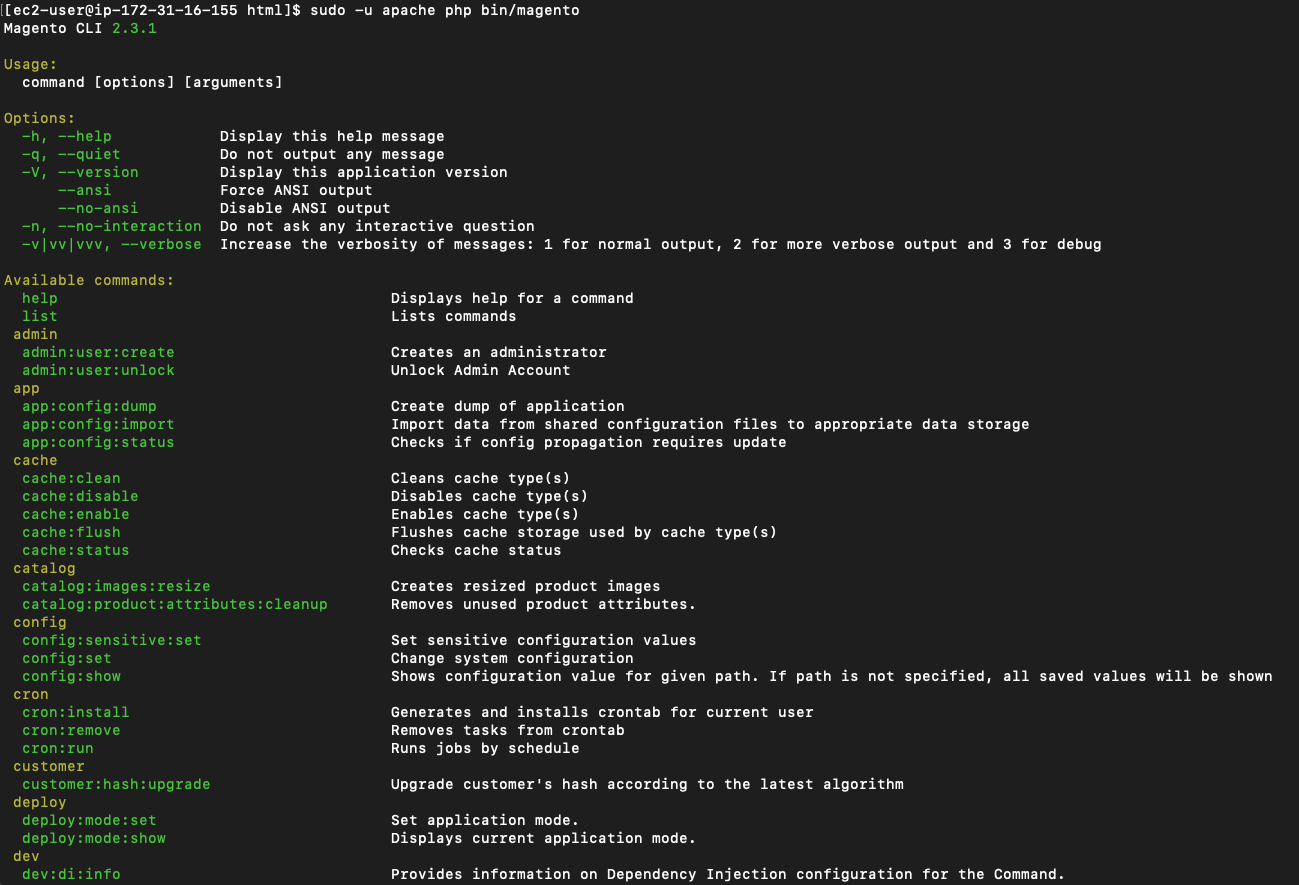
If it all went successfully, you can proceed to the further commands:
*If before the transfer you didn’t clear directories with cache and the generated files, this is the right time to do that using the following command:
sudo rm -rf var/cache/* var/page_cache/* var/generation/*sudo -u apache php bin/magento setup:upgradeYou can avoid running this command, but I still recommend making sure that all the modules are written and no errors occur. As a result, you’ll see a list with modules, which were processed, while not seeing any errors in the process.
Perform compilation in order to generate the necessary Magento files:
sudo -u apache php bin/magento setup:di:compile*At this point, it is critical to detect all errors that have occurred. Otherwise, Magento will run improperly. If no errors have been found, then everything is just perfect. ?
Then, generate statics ( if the production mode is enabled. To check your current mode, use the following command:
sudo -u apache php bin/magento deploy:mode:showsudo -u apache php bin/magento setup:static-content:deploy
*To generate statics for a specific locale, specify it as a parameter after the command. For example, `sudo -u apache php bin/magento setup:static-content:deploy ru_RU` will be used for the Russian locale.
Congratulations! You’ve successfully transferred your Magento2 store from localhost to properly operate on a new server. Now, open it in a browser by entering a new address!

10. Troubleshooting: frequent issues
Issue #1
Problem:
If when copying the archive, you receive a message of the kind:
scp: /var/www/html/aws-botapi.tar.gz: Permission deniedThen you should check where you’ve copied the archive on the server in the first instance. It is highly likely that the user who intends to connect lacks permissions to make a record in this directory (`/var/www/html` in the example).
Solution:
This can be solved by changing the directory where you try to copy upon running the ` scp ` command or connecting to the server and adjusting the access permissions to this directory for the current user:
`sudo chown -R ec2-user /var/www/html` (make a user the owner of the `/var/www/html` directory and of all the included files and directories), or
`sudo chmod -R o+w /var/www/html` (permits all (`o-ther`) making a record (`w-rite`) in the directory `/var/www/html`).
Use these commands with caution as they directly influence your system security.
Issue #2
Problem:
If when importing databases, the following error occurs`ERROR 1049 (42000): Unknown database ‘db1’` (where `db1` is the name of a database), then your database has not been created.
Solution:
Try to access`mysql` and re-create this database once again.
Issue #3
Problem:
If when changing files and directories owner, you see the command `chown: invalid user: … `, then you likely specified web-server user on your server incorrectly.
Solution:
Consult the corresponding guides on the configuration of the server in your system or use the `ps aux` utility to determine the right user.
Issue #4
Problem:
If there are PHP errors when starting Magento on a new server ( as a rule, it means the absence of some PHP extensions)…
Solution:
This can be solved by the installation of the missing extensions.
a) `PHP’s json extension is required to use Monolog’s NormalizerFormatter` ―
*php-json* extension is missing;
b) `PHP Fatal error: Uncaught Error: Class ‘DOMDocument’ not found in …` ―
*php-xml* extension is missing;
c) `PHP Fatal error: Class ‘IntlDateFormatter’ not found in …` ―
*php-intl* extebnsion is missing.
Issue #5
Problem:
If PHP extensions are missing when running the `composer update` command, you’ll see the following errors:
For example,
`phpunit/phpunit 6.5.14 requires ext-mbstring * -> the requested PHP extension mbstring is missing from your system.`
Solution:
To deal with such errors, you need to simply install PHP extensions the composer is referring to. For example, `yum install php-mbstring`.
A full list of the required extensions for your Magento 2 version can be found in the official documentation.
Bottom Line
You are all set! In this article, I did my best to present easy to follow steps on transferring your Magento 2 site from localhost to server.
If you still have questions or wish to share your opinion, feel free to use the comment section below. I’ll do my best to answer all the questions and concerns!


