
For a retail store to run smoothly and profitably online, the ultimate mission is not only to get shoppers to push the Add to cart button but also to leave them with a sense of satisfaction. Arranging proper delivery is essential to make shopping an enjoyable journey, with no undesirable stops or inadvertencies. With orders managed in a straight manner and brought to recipients on time, you keep customers happy, while strengthening your business reputation.
The Local Pickup & Delivery Date, available as a Shopify plugin, enables eCommerce stores to integrate seamlessly and manage the functionality for scheduling shipments. From this article, you will learn how to set the app running and how to configure its features and capabilities up to current merchandising needs and order administration rules.
Table of Contents
Overview of Features
The Delivery Date & Time Suite boasts a user-friendly design and proven compatibility with ten free-of-charge Shopify themes. The app lets online store owners create a unique experience, for delivery management personnel and consumers alike, by empowering them with the following capabilities:
- Easy-as-pie installation with required code snippets embedded automatically; or you can use the advanced manual process as an alternative for custom setup.
- Guided onboarding to teach you how to best tailor its features to your workflow.
- Tracking order and payment status all through the request management flow.
- Specifying shipment rules, such as estimated delivery or idle dates (e.g., holidays or days off), or same-date shipment hours, or order processing limitations.
- Setting front-end user experience, including disabling or enabling interface elements, as well as editing the way the functionality is represented on your Shopify page.
For a person on the other side of a shop window—a customer, the value of the app translates into a simplified flow of scheduling the delivery date and time.
How to Get Started with the Suite
It takes just the two easy steps to set the app up and running for the benefit of your business:
Step 1. Go to the Shopify page and click Add app.
The suite comes with a free trial period of five days, subsequently available on a subscription basis at the monthly rate of 9.99$.
Step 2. Complete the automatic installation and enjoy the effortless delivery administration flow.
The app functionality is integrated into your Shopify page code with no interference on your part, allowing customers to choose a convenient shipment date and time. For advanced manual installation instructions, look through the web guide. Alternatively, you can contact the Mageworx support service by emailing to [email protected]. Its specialists will have the installation completed for you free-of-charge.
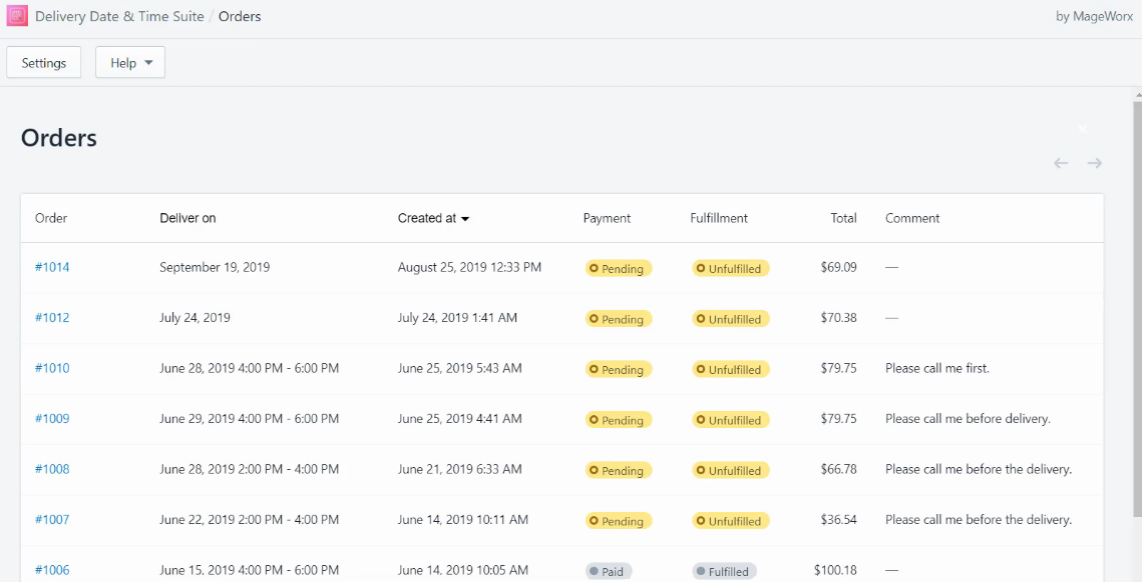
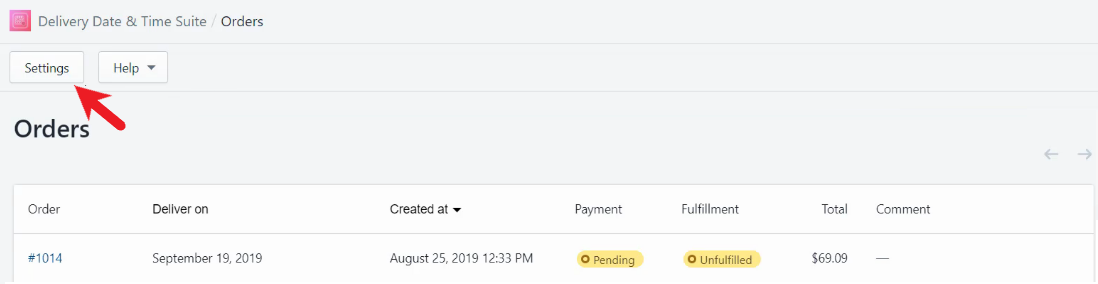
To start working with the plugin, go to your Shopify admin page, select Apps → Delivery Date & Time Suite. On the displayed Orders screen, you will see a summary overview of current requests, together with their completion and payment statuses, delivery dates, and customer comments.
How to Manage Orders
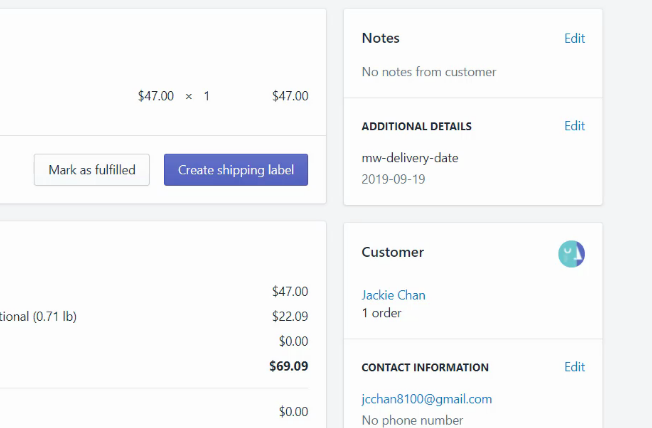
To look through and edit the details of a particular order, click any item in the Order column. The app will navigate you to a page featuring the following areas:
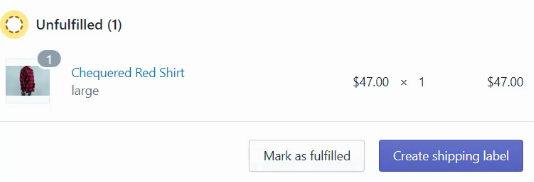
- Sold product info. The section informs about the state of a customer request (fulfilled/unfulfilled), quantity, and the price of the merchandise. In addition, it includes buttons to change the order status and to create a shipping label.
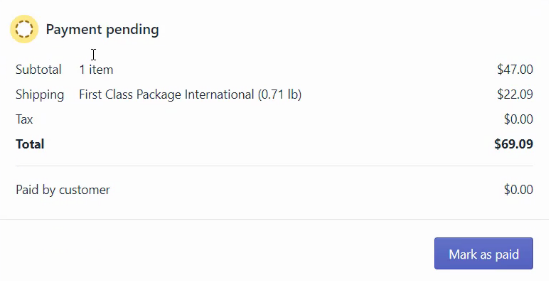
- Payment particulars. Apart from the settlement status, the area contains delivery terms and total amount charged. Clicking the Mark as paid button updates an order as paid.
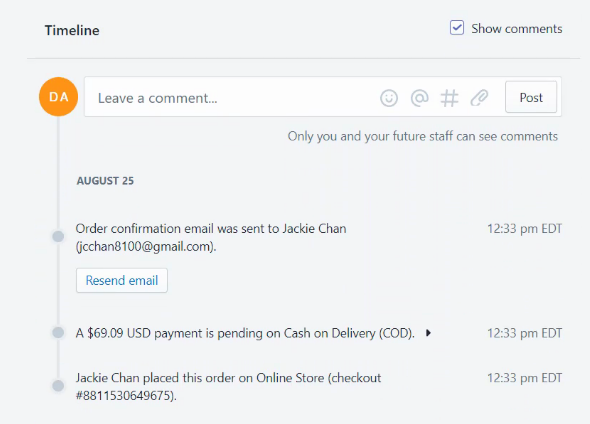
- Request processing timeline. The section highlights major actions within a delivery flow from order placement, together with date and time. Store administrators can also add comments to accompany specific records.
From this page, managers can also view and edit customer order-related notes and contact information, additional details (e.g., delivery date), shipping and billing addresses. It also provides access to conversion and fraud analysis data.
How to Configure the App
To set the Delivery Date & Time Suite to your current business needs, click the Settings button on the Orders page.
Use the available interface elements (e.g., buttons, checkboxes) to choose what’s best suited to manage your in-store delivery process. Quitting the Settings page, always confirm the choice by clicking Save. Also, read on for detailed configuration instructions.

Enabling/Disabling the Suite
To make the code-embedded functionality for planning a delivery schedule available on your Shopify page, navigate to the General section of the app settings.

The “enabled” status is on by default. To disable the feature in your cart, click the Disable button.
Configuring the User Interface
The suite features two groups of settings to configure the delivery planning functionality on the shop visitors’ side. One allows choosing to display or hide specific information fields and enable or disable certain features on the store’s Shopify page. The other is intended for localizing the app and beautifying its appearance.
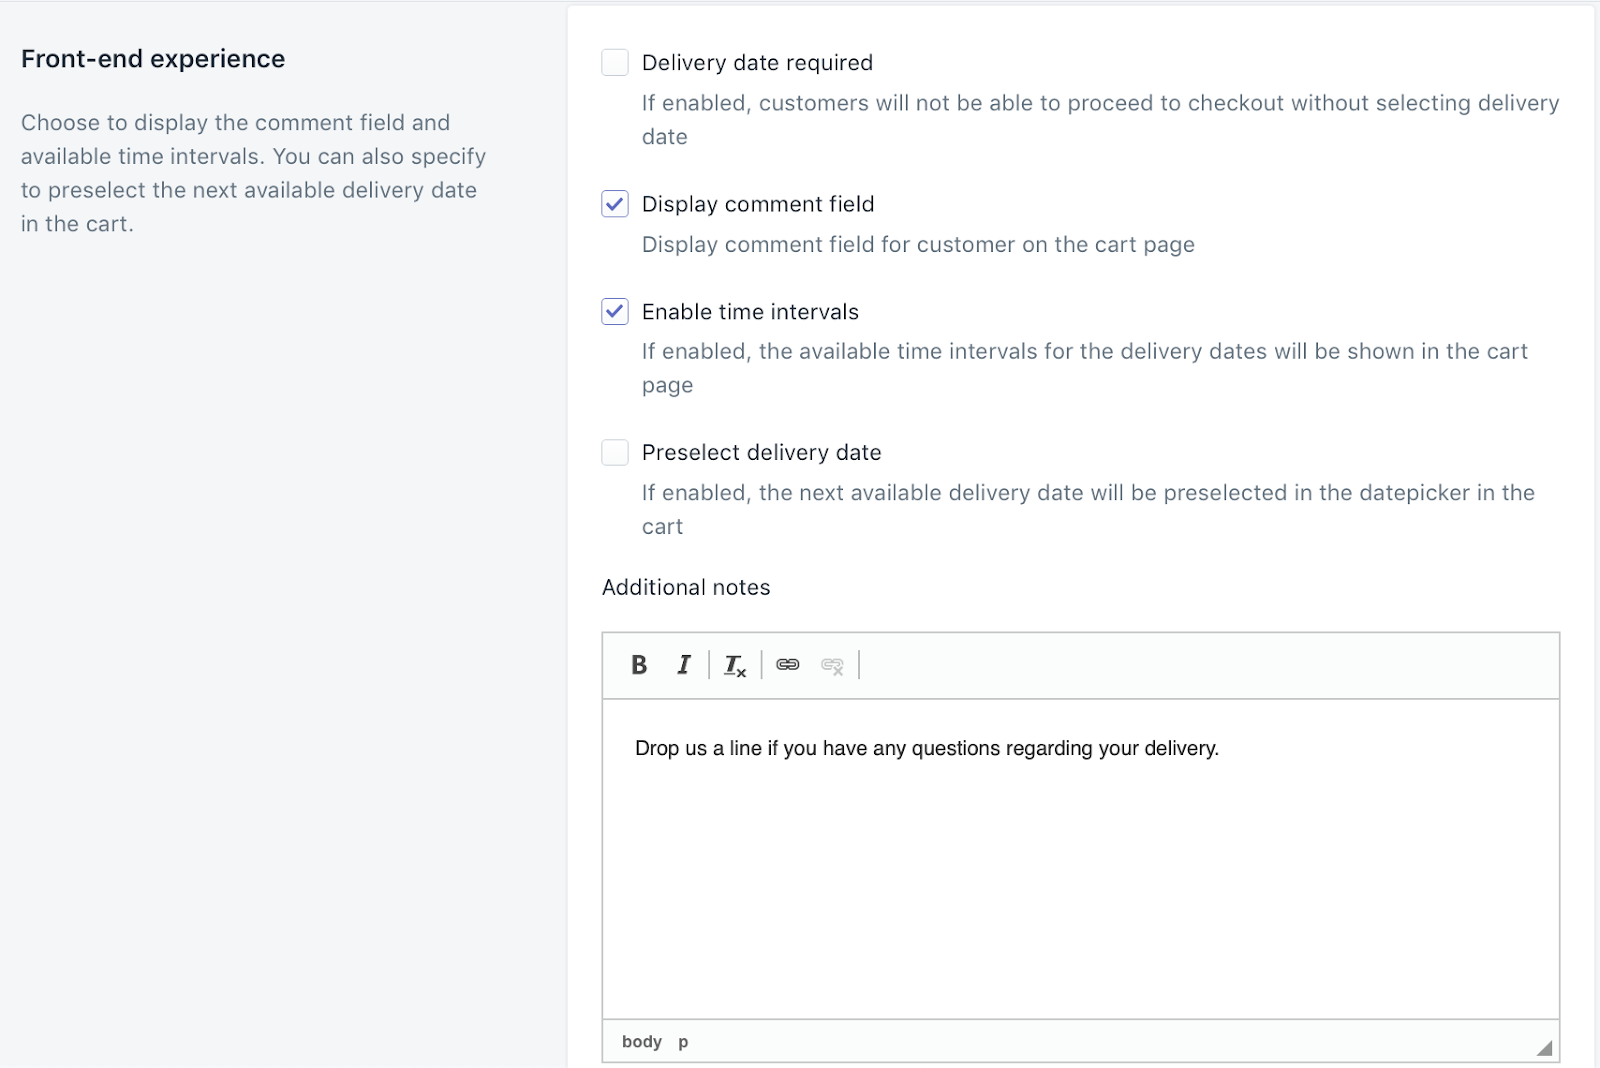
The Front-end experience configuration area (on the screenshot above) represents the first group of settings. Work it through to achieve the following effects:
- To make scheduling shipment date and time obligatory or optional to proceed with the purchasing flow, check or uncheck Delivery date required accordingly.
- For users to be able to post comments to requests, select Display comment field. If the box is not checked, no such commentary input section appears on your site cart page.
- When your store’s policy is to deliver within specific time spans, check Enable time intervals for customers to know their options.
- To let in shoppers on the next available shipment day, add it to your Shopify site calendar by checking Preselect delivery date.
- If you want to provide consumers with extra delivery particulars, make sure to add a description in the Additional notes field.
Use Translations settings of the first group to localize fields related to the app-enabled functionality.

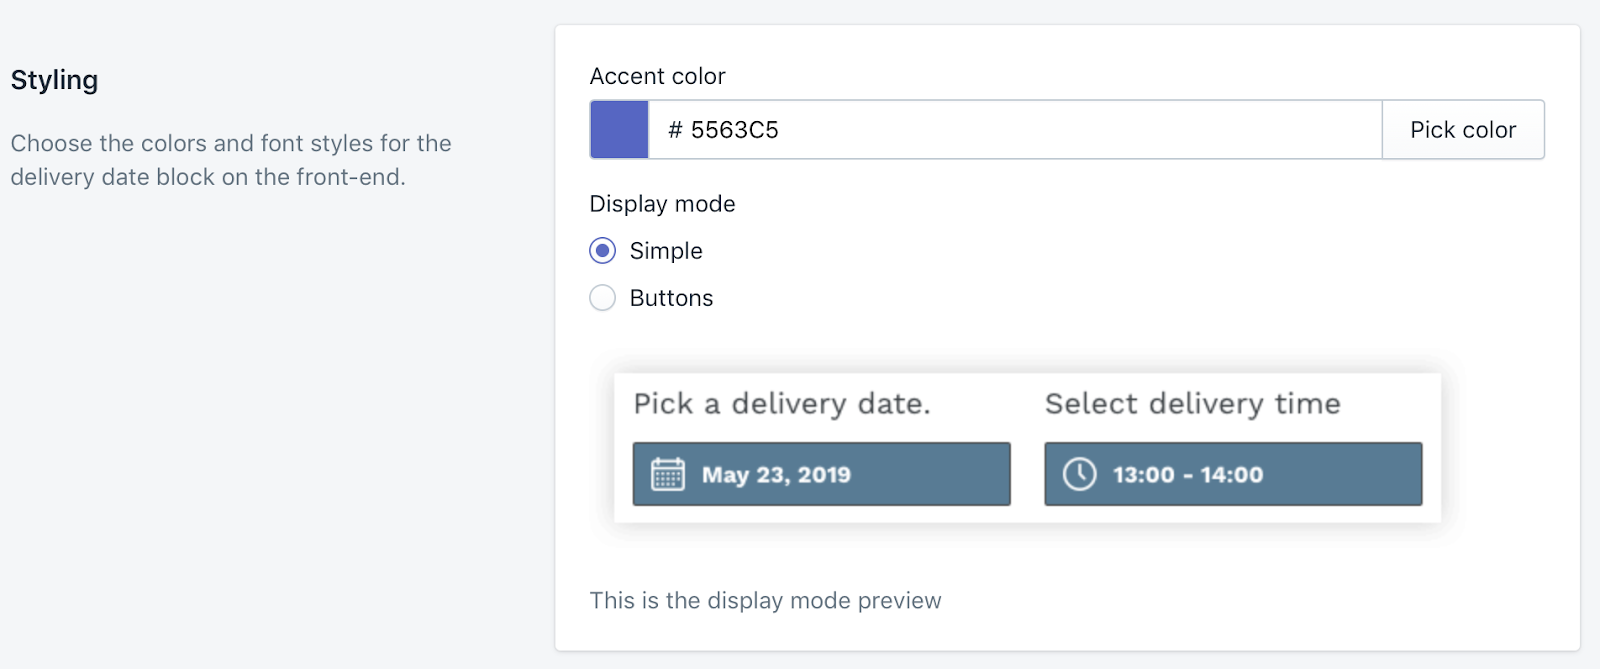
In the Styling area, edit the color and the mode to choose or edit delivery date and time on a product page at Shopify—a dropdown calendar or buttons.
Managing Shipment Rules and Restrictions
Checking the fields in the Shipping configuration and Shipping restrictions areas allows establishing rules for online outlets to process requests and arrange delivery via the suite.

To complete the configuration, follow the instructions below:
- In the Day column, check the weekdays when you have the resources and сapacity to deliver.
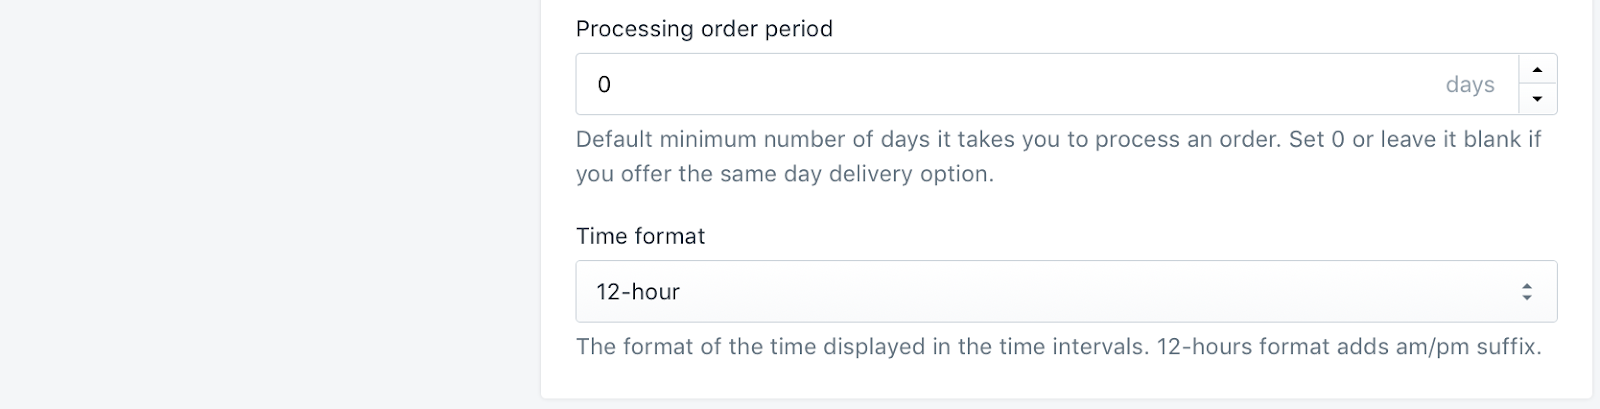
- In the Time Format field, specify the style to display estimated delivery time—either the 12- or 24-hour count.
- Fill in the SDD end time column to define when the store is going to accept no more orders to be shipped on the same day. Pay attention to use the format as preset in Step 2.
- Set the maximum quantity of orders your outlet is capable to process on a specific day in the Orders limit boxes.
- Click Manage periods to set or edit delivery intervals, if you are using those at your Shopify site.
- Set the minimum number of days to handle a customer request in the Processing order period field.
- Proceed to the Shipping restrictions block.

- In the Maximum delivery period field, type in a span in days available for order reservation by customers.
- Add dates when your store is closed for delivery requests in the Blackout dates box.
When you need to disable the scheduling functionality for specific products (e.g., available for pre-ordering only) on your Shopify cart page, set the Product tags field accordingly.
Once you have gone through all the above settings, you can rightfully rely on the Delivery Date & Time Suite to facilitate managing shipment flows related to your Shopify page. When you need more details about the settings, take the time to read the complete user guide.


I encounter “Liquid error: Could not find asset snippets/delivery-date.liquid ” at cart page.
How any idea how can I resolve this?
Alvin,
Thank you for leaving a comment and apologies for the delayed reply. You probably have it solved by now. Our support team at [email protected] is always there to assist. But our Delivery Date & Time Suite for Shopify does not have such a file. The one of ours is “mw_DD_objects.liquid”.
If you have more questions, please contact our support team directly. They are known to be lightning-fast in addressing any issues =)