
Announcement bar is the best way to inform your site visitors and potential buyers about the latest news, special offers, deals, and promotions. It is also a great way to grab your customers’ attention.
Unlike pop-ups, announcement bars neither irritate nor distract site visitors from the primary content. Thus, to make critical site data always displayed and available, you might even want to make such info bars instantly displayed, and not hidden.
By specifying shipping terms, delivery cost, precise time or conditions of a promo campaign, by announcing holiday sales, offering to sign up to a newsletter and promoting promo codes, you motivate shoppers to complete a purchase. It leads to a tangible increase in conversion rate.
From this article, you’ll learn how to add a customizable announcement bar to your Shopify store in a few mouse clicks. Also, we will guide you through the configurations of a countdown timer without having to install 3rd-party apps and absolutely free of charge. No coding skills are required to add this functionality. All you need to do is copy and paste a few lines of text to the theme of your Shopify store. Read on to learn more.
A little off-topic. If you need an announcement bar with a possibility for a customer to immediately calculate a required amount of money to get a free gift or free shipping ― including advanced configuration possibilities of its look ― take a look at our FREE Shopify Sales Motivator — Promo Bars app.
Step-by-Step Guidelines
Step 1. Making Changes in Your Current Shopify Theme
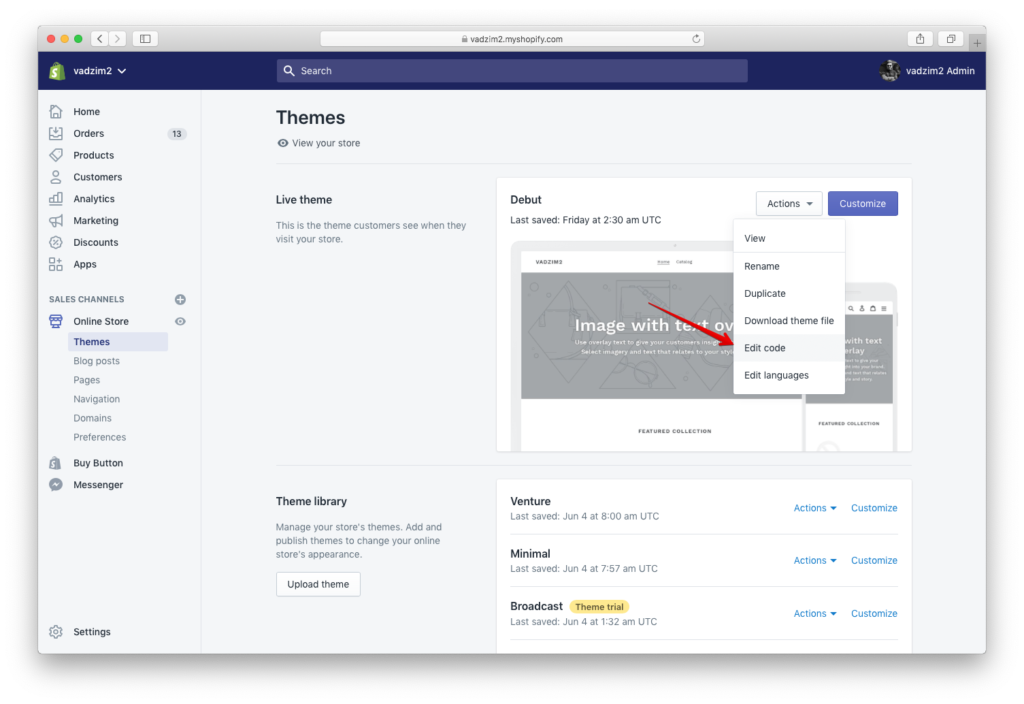
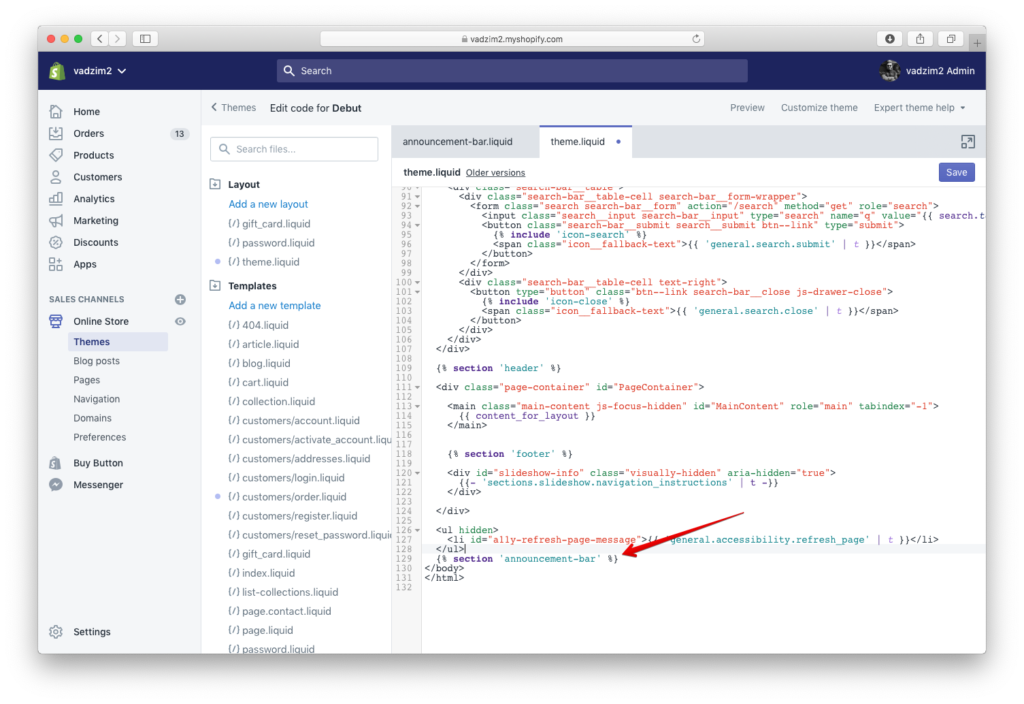
- Log in your Shopify store admin panel. Follow the path: Online Store → Themes. In the ‘Actions’ drop-down menu of the theme where you want to add the bar, click ‘Edit code’ (on the screenshot below, see the published theme).
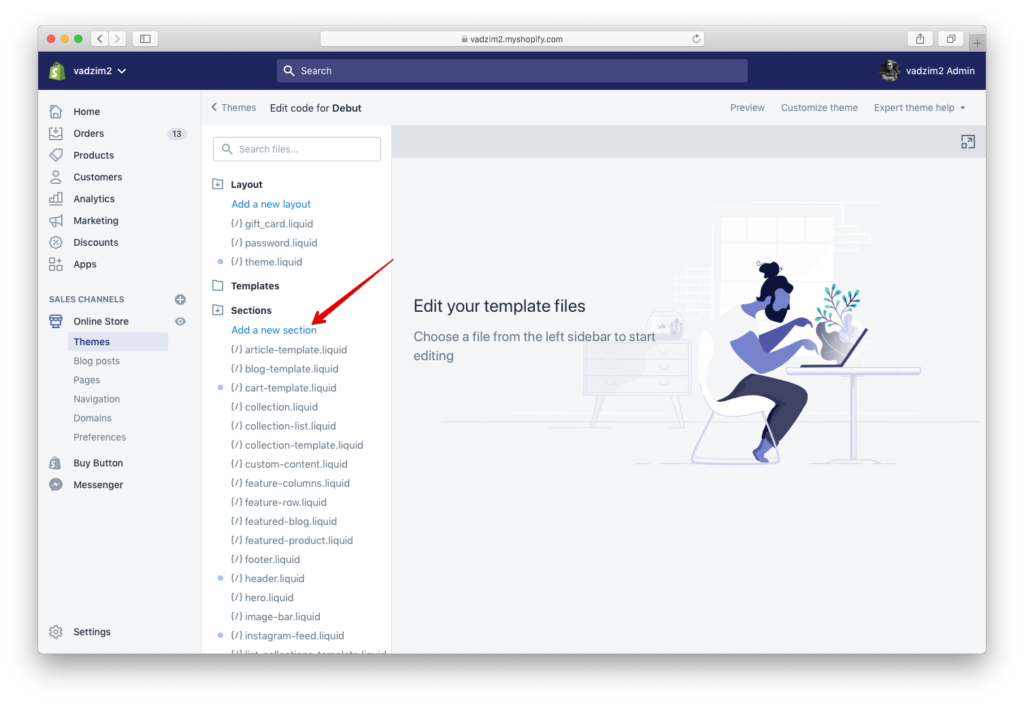
2. In the ‘Sections’ folder, click ‘Add new section’.
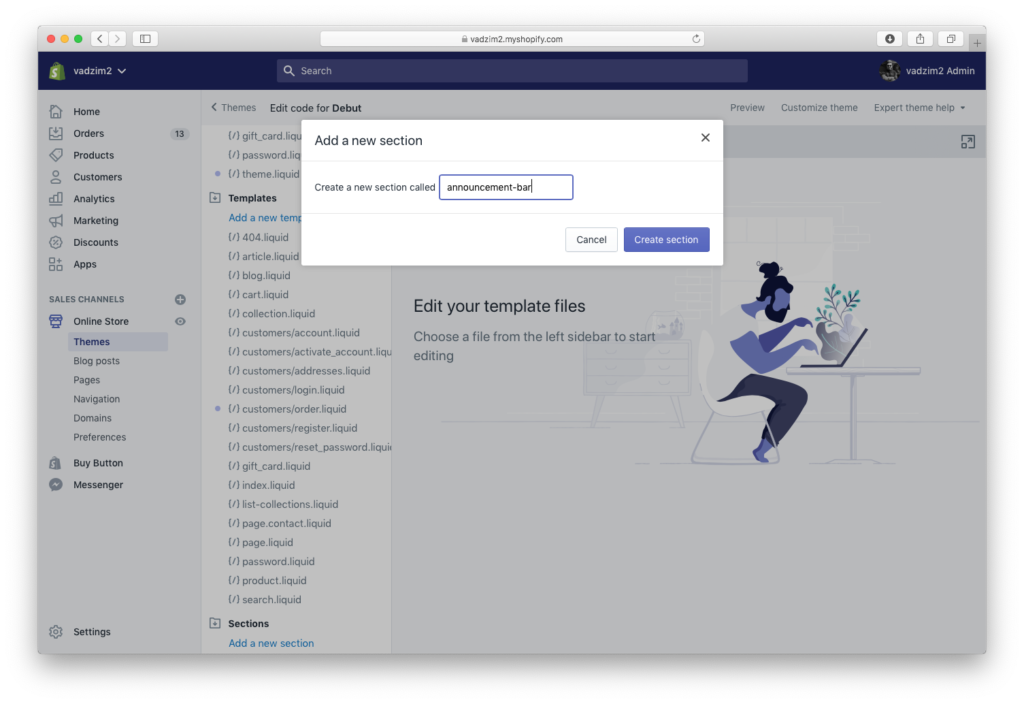
3. Type in the name of the section ― announcement-bar ― and click the ‘Create section’ button.
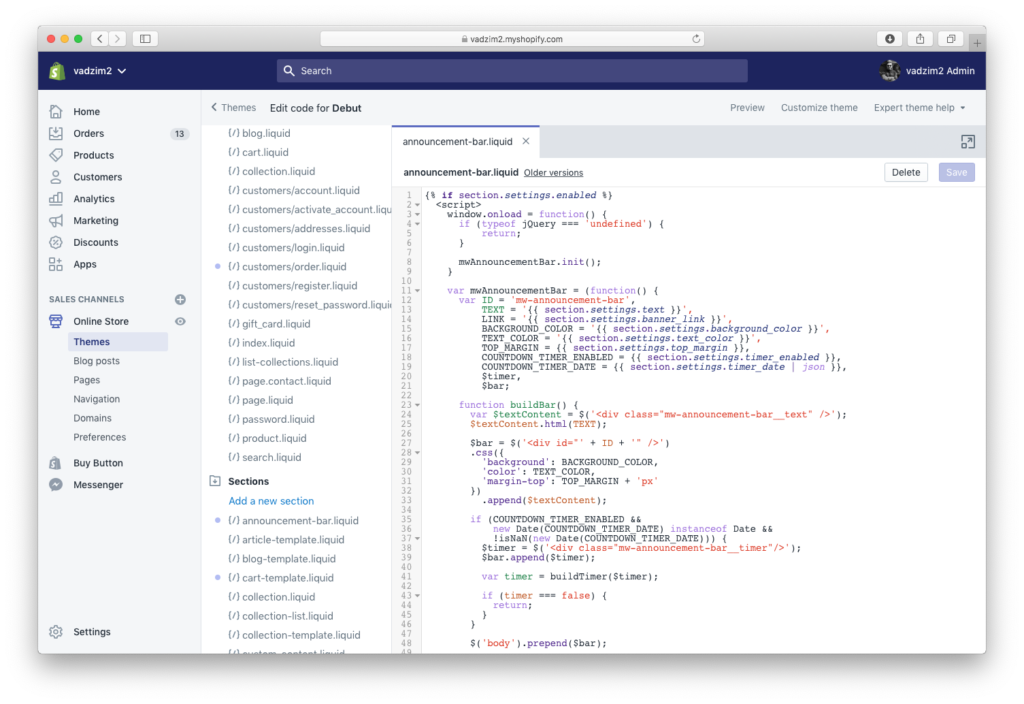
4. Insert this code to the created ‘announcement-bar.liquid’ file and click ‘Save’.
5. In the ‘theme.liquid’ file, find the code </body>. Insert the following code right before that line:
{% section 'announcement-bar' %}
Step 2. Announcement Bar Configuration
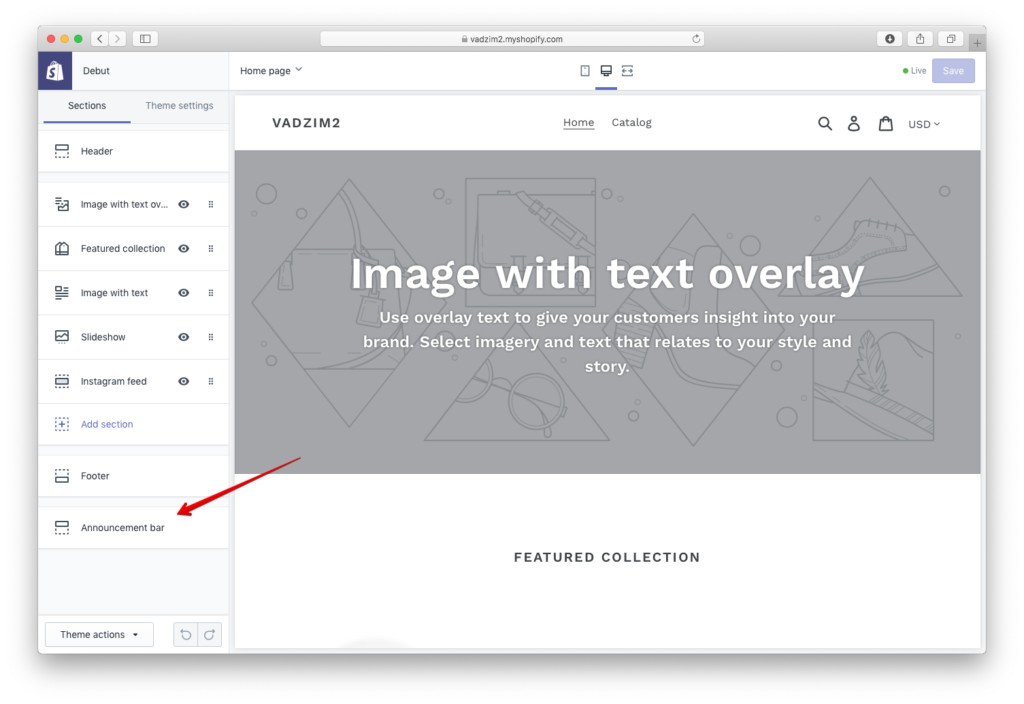
Go to Online Store → Themes, and click ‘Customize’ next to the theme you added code to in Step 1. If everything is done correctly in the previous step, you’ll see a newly created ‘Announcement bar’ section. Click on it to start the configuration.
The functionality is rather simple. You can either enable or disable the banner display, edit its content (HTML tags supported), as well as text and background colors, add a link for a customer to follow when clicking on the banner. Also, you get to specify the top margin in case the banner gets covered by other elements.
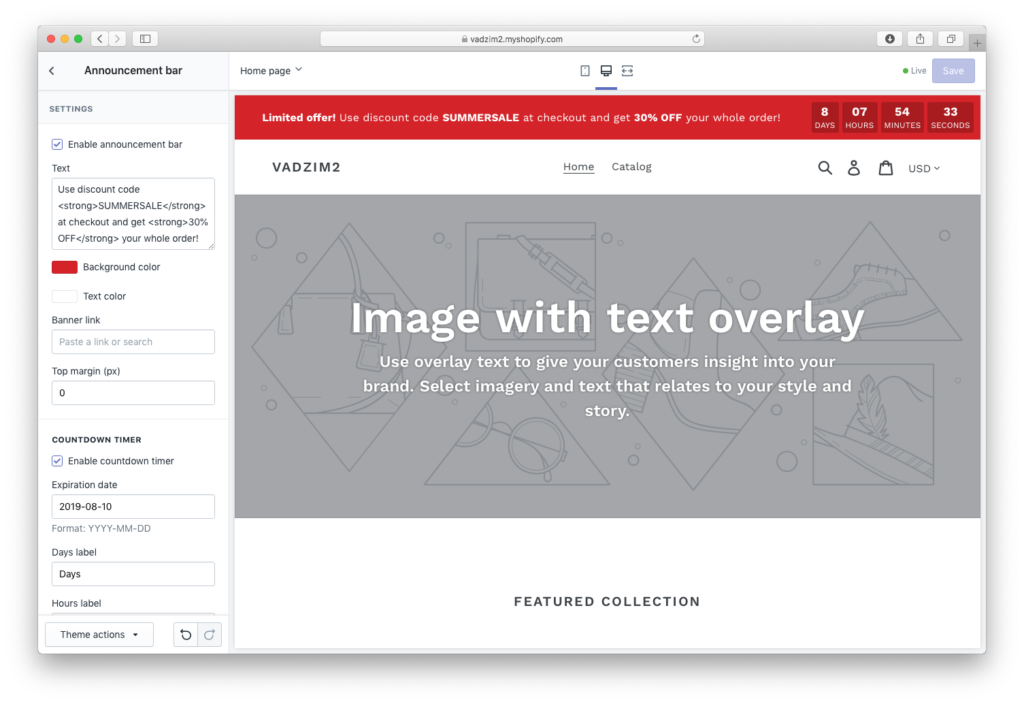
To activate the countdown banner, fill in the ‘Expiration date’ field (pay attention to the date format: YYYY-MM-DD) and check the ‘Enable countdown timer’ box. When required, it is possible to edit the following labels: Days, Hours, Minutes, and Seconds.
When the timer ends, the banner will disappear and will not get further displayed until the ‘Expiration date’ gets changed or the timer is disabled.
That’s it! We hope this solution works for you just fine. Should you have any difficulties or questions, please leave us a comment in the comments field. We will be happy to assist!


Hi! hope you are doing great. I have followed your instruction but don’t see anything on the home page announcement bar even changing the background color.can you help me?
Hello Muhammad,
Thank you for taking the time to leave a comment.
Please contact Vadzim, the author and Shopify developer, directly at [email protected]. He will be happy to assist.
Thanks for this! Is it possible to adjust the hours, minutes, and seconds? My launch is at noon. As it’s set up now, my countdown will end at midnight on Tuesday, rather than noon.
Emily, thank you for the question. Code customization would be required to achieve that. If your question is still up-to-date, we can go further and add, what exactly is required.
Is there a way to customize the red banner? I saw you can change the text color and the box around the numbers.
Hello Jon,
To change background color of the bar and countdown digits, click the ‘Background color’ option under the settings section of the Announcement bar and pick desired color (see screenshot).