As it’s been a while now since Magento 2 is out, many merchants have transferred their stores on to the newer version. Developers have also started to get their hands dirty with it.
According to opinions that are circulating in the community, most developers are facing the issue on CSS preprocessing. So I decided to walk you through this issue and clear your concept about the process.
This article is about the preprocessing of the style sheets in Magento 2 and how they are compiled to CSS. Also, it will clarify the differences of style sheet preprocessing in Magento 1 and Magento 2. In addition, the blog post will provide frontend developers with the basic info that he or she needs to debug the stylesheets in Magento.
Table of Contents
Magento 1
In Magento 1, the standpoint of the frontend developer is a piece of cake, as they mostly work on custom projects. All you have to do in this case is to include your CSS files through XML in the action tag like this:
<action method="addCss"><stylesheet>css/styles.css</stylesheet></action>
In Magento 1, you can use whatever you want, it is up to you.
Also, the first theme that came out with Magento 1.9 was Madison Island theme, was using SaaS preprocessor for compiling CSS.
Magento 2
In Magento 2, the preprocessing of the CSS file is a lot different story.
With the new version of the platform you have to include the CSS through XML, and the files look different. The main CSS files are located in /pub/static/frontend/Magento/theme/en_US/css/styles-l.css
This is the basic CSS file from Magento 2:
<page>
        <head>
               <css src="css/styles-m.css" />
               <css src="css/styles-l.css" media="screen and (min-width: 768px)"/>
               <css src="css/print.css" media="print" />
        </head>
</page>
Root Source Files
.less files are those files through which .css files are included into the layout.
In Magento 2 these .css files are compiled. If we talk about the layout of the blank theme of Magento, we’ll see that the .css files that are included are:
        <Magento_Blank_theme_dir>/web/css/styles-m.css
        <Magento_Blank_theme_dir>/web/css/stles-l.css
        <Magento_Blank_theme_dir>/web/css/print.css
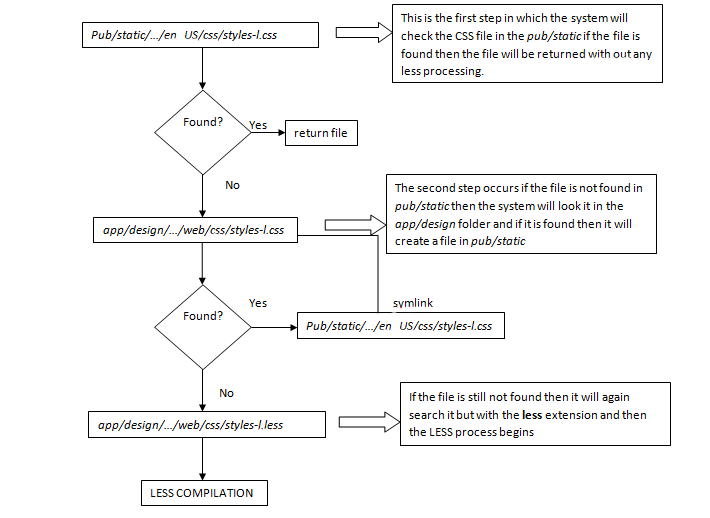
Request Flow
This is how the request workflow works in Magento 2.
LESS Compilation Modes
The following are the modes of compiling .less files to CSS:
1. Server Side: This mode is the default compilation mode. If your application is in production mode the compilation is done on the server and uses the LESS PHP library.
2. Client Side: If your application is out of the production side then the compilation is done on your browser using the native less.js library
How to Config LESS Compilation Modes?
In order to set up the compilation mode just perform the following steps and your compilation mode will be activated.
1. From the Magento Admin go to Stores > Configuration > ADVANCED > Developer
2. Next, select Default Config from the Store View drop-down list
3. In the Workflow type select the compilation mode (right under Frontend development workflow)
4. Save the changes by clicking on the Save Config button
5. Make sure that the compilation mode is the same for both website scope and Store View. That can be done by checking and making it same the Frontend development workflow option that is done on step 3.
We will drive through both the server-side and client-side compilation mode styles debugging.
Server Side LESS Compilation
This is the step, which the LESS processor follows is doing compilation at the server-side. The process is done for each CSS file included in the layouts.
1. First, the processor checks whether the requested .css file is found. If yes, then it stops the execution and proceeds to step 2.
2. Next, the processor changes the extension to .less and then finds the file using the Magento fallback mechanism. If it is not found, then it stops the execution and jumps to the next step.
3. After the file is found, the processor reads the .less file content and resolves the @magento_import and default LESS@import directives </code>.
4. Next, using the Magento fallback mechanism, it will now resolve all the paths in the system. The resolved files get copied to var/view_preprocessed/less.
5. Now, after all the paths are resolved, the source files get passed to PHP LESS compiler. Next, the compiled .css files are published to pub/static/frontend/<vendor>/<theme>/<local>.
Styles Debugging in Server-Side Compilation Mode
Styles Debugging in Server-Side Compilation Mode
In order to apply your changes in the server-side compilation, you need to clear the pub/static/frontend/<vendor>/<theme>/<local>. You have to delete the directory in the system and then restore the pages. If this does not happen, you will need to clear the var/cache. Also, you have to clear var/view_preprocessing directories.
Alternatively, you can also use the Grunt Java Script task runner to streamline the process of applying and debugging style customizations on the server-side.
To see how to Compile LESS with Grunt, scroll down to Client Side compilation mode.
- Client Side LESS Compilation
The client side and the server side follow the same flow. The only difference occurs at the 5th step of the server side LESS compilation. Following files are now published to pub/static/frontend/<vendor>/<theme>/<local>:
1. .less files with the resolved @magento_import directive
2. The symlinks to the root source files that do not contain @magento_import
3. And last the .less file included to the root source files using @magento_import and @import directives.
Styles Debugging in the Server-Side Compilation Mode
As mentioned above, the LESS compilation at the client-side is implemented using the native less.js library. The configurations are set in lib/web/less/config.less.js by default. You can change it whenever needed.
You can find all the LESS related documentation at http://lesscss.org/usage/#using-less-in-the-browser . Here, most of the stylesheet changes will be shown immediately after you have reloaded a page in the browser.
These are the cases in which you have to clear the pub/static/frontend/<vendor>/<theme>/<local>:
- If the root source files that contain the @magento_import or @import directories are changed, and the imported file is specified with the extension
- You have renamed, removed or added a .less file that is imported with @magento_import or with @import directive but you haven’t corrected the directives accordingly.In order to clear the pub/static/frontend/<vendor>/<theme>/<local> after one of the above cases have occurred, you have to delete the directory in the file system. After deleting, you have to reload the pages in the browser so that the compilation and publication is triggered.
The @magento_import Directive
You might be wondering what @magento_import directive is. It is the Magento-specific LESS directive in which multiple files are stored with a name pattern. Also, it allows you to store files with the same names, but with the different locations. This directive can be used in the root source files of the theme only known as @magento_import.
The @import directive only contains a single file that is found according to the static files fallback.
Rules and Regulation of the Usage
There are some rules that concern the usage of this directive in your system during the compilation AND while including .less file using this directive. These are listed below:
1. The LESS preprocessor will ignore the @magento_import if it is not commented with two slashes (//) in order to avoid any conflicts with original LESS syntax.
2. This directive must contain the file path. This path is specified to the file, in which the directive is called, put is in either single (“) or double quotes (“”). \
The best practice here is to mention the file extension in the path (but technically you can ignore it).
Processing of @magento_import
The built-in LESS preprocessor in the area of static resources does the following steps:
1. It searches all @magento_import directives.
2. Changes the original @magento_import directives to standard @magento_import directives.
The example below will show you how @magento_import is used before and after the processing in the <Magento_Blank_theme_dir>/web/css/styles-l.less
| Before | After |
| There is only one directive in the <Magento_Blank_theme_dir>/web/css/styles-l.less file which is:
//@magento_import ‘source/_widgets.less’;// |
After processing the following will appear:
@import ‘../Magento_Catalog/css/source/_widgets.less’; @import ‘../Magento_Cms/css/source/_widgets.less’; @import ‘../Magento_Reports/css/source/_widgets.less’; @import ‘../Magento_Sales/css/source/_widgets.less’; //Theme widgets |
Bottom Line
So this article has summed up how the CSS preprocessing is done in Magento 2, and what is the basic difference between the preprocessing in Magento 1 and Magento 2.
As you have noticed without doubt, the whole process in Magento 2 of the LESS preprocessing is pretty complicated. Most of the frontend devs prefer using SaaS in combination with Gulp. That is why the community is engaged in some really interesting projects. Who knows what the future brings. In short, the community is speaking of the usage of these technologies, Magento is listening to them and we are hoping for a good outcome.
If you liked this article and if this was helpful for you, then give me you feedback! Or if you want to ask any question then post it in the comments section to get it answered.
Author’s bio:
Wajid Hussain is Magento Community Manager at Cloudways – Managed Magento Hosting Platform. He has vast experience in Magento and PHP-related fields. He is an avid football fan.


